

How to Use Your Hawaiian Telcom
Universal TV Remote Control
FIND OUT WHAT’S ON AND WHAT’S COMING UP
1.
Press
.
2.
Scroll using
or
to see
program listings by channel & time.
3.
Press
to change the channel to
that program.
Additional notes:
• Title, description, cast, and rating information
will be displayed for highlighted programs if available.
• To go forward in the guide in 24-hour intervals, use
DAY
DAY
.
PICTURE-IN-PICTURE BROWSING
Find out what’s on other channels without
missing a moment of your current program.
1.
Press
or
to scroll through the
program listings while watching live TV.
2.
Press
to select a program or to get more
information about an upcoming program.
3.
Press
EXIT
(EXIT) to close the browsing
panel.
MENU
Customize your settings to personalize your
Hawaiian Telcom TV experience.
• Press
MENU
to quickly access the
Live TV,
Recorded TV, Video On Demand, Apps,
Music, My Account
or
Settings
drop down menus:
• Set favorites.
• Search for programs by title or name of actor/actress/director.
• Set the channels you want to see.
• Control closed captioning.
• Customize sounds settings.
HAWAIIAN TELCOM DIGITAL VIDEO RECORDER (DVR)
Your DVR puts you in control of your TV viewing. You can record, pause, and replay your
favorite shows at the touch of a button. Now you can watch what you want, when you want.
Pause or rewind live TV with your DVR
• Pause live TV for up to 60 minutes by pressing
(PAUSE).
Press
(PLAY) to restart.
• Rewind live TV by pressing
.
Record programs from any Set Top Box
• Press
(RECORD) on your remote control to start recording. A record light
on all Set Top Boxes will remain lit until the recording stops. In the Guide,
a red
icon will be displayed next to the program you are recording.
• To end recording at any time, press (STOP) and scroll down to Stop Recording;
press
to confirm.
Schedule a recording of a program or a series
• Press
, then use
to navigate to the program you want to record.
• To record a single show, press (RECORD) once (one red dot will appear).
• To record a whole series, press (RECORD) twice (three red dots will appear).
• To cancel a recording from either the Guide or Picture-In-Picture menus, press
(RECORD) three times and red dots will disappear.
Manage your recordings with the touch of a button
• Press
DVR
RE
CO
RDED T
V
(DVR).
• By Date/By Title: List of recorded shows
• Add Recording: Schedule a show
• Scheduled: Displays future recordings
• Series: Displays series recordings
• Use
or
to access your recordings, edit recording settings, or add a recording.
Manage your DVR remotely through our online portal at hawaiiantel.com/myaccount
• Login or Register to My Account.
• Under the Hawaiian Telcom TV section, click on
Program My DVR
.
• Use the onscreen arrows to scroll through the TV listings.
• Click on a program to access the program info screen. Choose recording options.
• Make room for new recordings by deleting unwanted recorded programs.
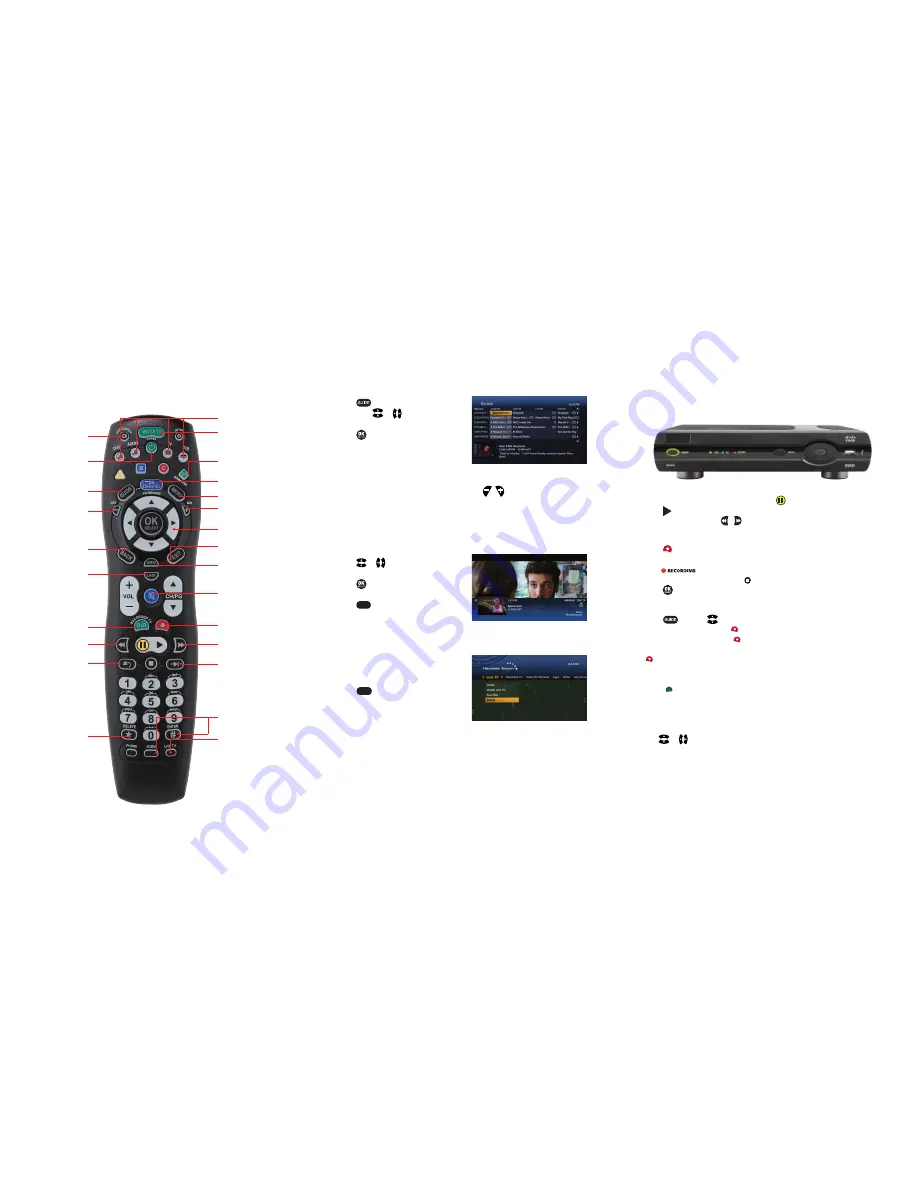
Control devices with
mode buttons
Record TV with one click
Go to Video On Demand
(VOD) library
Skip back in
7 second
increments
Fast forward in 30
second increments
Fast forward
Go to recorded
TV program list
Modify Viewing or
Guide options
Returns to live TV
Go to main menu screen
Return to previous
menu screen
Rewind
Exit from a menu screen
or return to current program
Mute the sound
on your TV
Edit text on the
search screen
Navigate channels,
menus and screens
Go to program
info screen
Go to program
guide screen
Go backward
in guide by 24-
hour intervals
Go forward in guide by
24-hour intervals
Return to the last
channel you
were watching
For helpful hints
on how to
program your remote control,
such as Auto Search to find your
TV code and Power Control Sync
Code to turn on multiple devices
with one push, visit our Support
link online at hawaiiantel.com/tv.
Go to the App
Dashboard
Control selections on
TV including Input/
Source and TV/Video
Controls and
powers on/off
individual devices
Controls and powers
on/off programmed
devices simultaneously


