Product Overview 1-29
Physical Description
In order to provide a high density of ports, the FSIP uses special port adapters and adapter cables.
A port adapter is a daughter card that provides the physical interface for two FSIP ports. Both ports
use the same high-density, 60-pin universal receptacle that supports all interface types. The adapter
cable connected to the port determines the interface type and mode.
The interface ports are not set to a default mode or for a default clock source, so there are no software
commands required to enable internal or external timing (DCE or DTE). Each port automatically
supports the mode of the port adapter cable when one is connected; however, there is no default
clockrate set. You must set the clockrate on all DCE ports with the clockrate command before the
port can operate with an external timing signal. To use the port as a DCE interface, you must set the
clockrate and connect a DCE adapter cable.
To use the port as a DTE interface, you need only connect a DTE adapter cable to the port. If you
connect a DTE cable to a port on which a clockrate is set, the system will ignore the clockrate until
a DCE cable is attached. For example, you can change an interface from an EIA/TIA-232 to a V.35
by replacing the adapter cable, or change the mode of an EIA/TIA-232 DTE port by replacing the
EIA/TIA-232 DTE cable with an EIA/TIA-232 DCE cable, provided that you have already specified
a clockrate for the port.
Note
Although no software configuration is necessary to enable internal clocking for DCE mode,
you cannot bring up a DCE interface until you set the clockrate. For a brief description of the
clockrate command, refer to the section “Replacing RSP7000 DRAM SIMMs” in the chapter
“Maintenance.” For complete command descriptions and configuration instructions, refer to the
related software documentation, which is available on UniverCD.
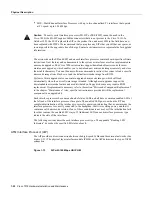
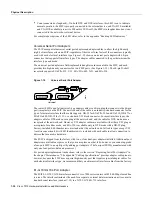
Figure 1-18 shows the FSIP LEDs. As with the other interface processors, the enabled LED is on
when the FSIP is enabled for operation. The four LEDs below each port indicate the state of that
interface. The labels on each LED indicate the signal state when the FSIP port is in DTE mode.
However, the direction of the signals is reversed when the FSIP port is in DCE mode. For example,
a DCE device usually generates a clock signal, which it sends to the DTE device. Therefore, when
the Receive Clock (RxC) LED on a DTE interface is on, it indicates that the DTE is receiving the
clock signal from the DCE device. However, when the RxC LED on a DCE interface is on, it
indicates that the DCE is sending a clock signal to the DTE device. Because of limited space on the
FSIP faceplate, only DTE mode states are labeled on each port. Figure 1-18 shows the interpretation
of each LED for ports that are operating in DCE mode.
The following LED state descriptions include the meanings for both DTE and DCE interfaces. The
signals indicated for DTE interfaces correspond to the LED labels. However, the signals on DCE
interfaces travel in the opposite direction and do not correspond directly to the LED labels. Refer to
the LED labels for DTE interfaces and the cross-reference for DCE signals shown in Figure 1-18
when reviewing the LED state descriptions that follow:
•
RxC (Receive Clock)—On both DTE and DCE interfaces, this LED is on when the port is
receiving an external clock signal.
•
RxD (Receive Data)—On both DTE and DCE interfaces, this LED is on when the port is
receiving data signals (packets) from the network. This LED is also on when it detects an idle
pattern that is commonly sent across the network during idle time.
•
TxC (Transmit Clock)—On DTE interfaces, this LED is on when the port is sending the transmit
clock signal. On DCE interfaces, it indicates that the DCE is sending the TxC signal to the DTE.
Содержание TelePresence Server 7010
Страница 10: ...x Cisco 7010 Hardware Installation and Maintenence ...
Страница 14: ...iv Cisco 7010 Hardware Installation and Maintenance Document Conventions ...
Страница 112: ...2 52 Cisco 7010 Hardware Installation and Maintenance Initial Configuration Information Page ________ ...
Страница 148: ...3 36 Cisco 7010 Hardware Installation and Maintenance Using the Flash Memory Card ...
Страница 158: ...4 10 Cisco 7010 Hardware Installation and Maintenance Troubleshooting the Processor Subsystem ...
Страница 242: ...5 84 Cisco 7010 Hardware Installation and Maintenance Replacing Internal Components ...
Страница 258: ...A 16 Cisco 7010 Hardware Installation and Maintenance MIP Interface Cable Pinouts ...
Страница 270: ...B 12 Cisco 7010 Hardware Installation and Maintenance Interface Processor LEDs ...
Страница 274: ...C 4 Cisco 7000 Hardware Installation and Maintenance ...
Страница 287: ...Index 13 ...


