


3
What’s in the box?
Cisco SPA 232 Wireless DECT Phone
© 2012 Cisco and/or its affiliates. All rights reserved. This document is Cisco Public.
Page 2 of 8
Figure 1. Cisco SPA232D Multi-Line DECT ATA
Figure 2. Ports on Cisco SPA232D
Table 1 lists additional features and benefits of the Cisco SPA232D Multi-Line DECT ATA.
Table 1.
Features and Benefits of Cisco SPA232D Multi-Line DECT ATA
Feature
Benefit
Toll-quality voice and carrier-grade
feature support
The SPA232D delivers clear, high-quality voice communication in diverse network conditions. Excellent
voice quality in a demanding IP network is consistently achieved through our advanced implementation
of standard voice-coding algorithms. The SPA232D is interoperable with common telephony equipment
such as voicemail, fax, PBX, interactive-voice-response (IVR) systems, and many third-party call-control
systems such as Broadsoft and Asterisk.
Large-scale deployment and
management
The SPA232D offers all the important features and capabilities with which service providers can provide
customized VoIP services to their subscribers. It can be remotely provisioned, and it is software-
upgradable. A secure profile upload saves providers the time, expense, and hassle of managing and
preconfiguring or reconfiguring subscriber equipment for deployment.
Outstanding security
The Cisco SPA232D supports highly secure, encryption-based methods for communication,
provisioning, and servicing.
Comprehensive feature set
The standards-based Cisco SPA232D is compatible with essential Internet VoIP provider features such
as caller ID, call waiting, call transfer, call forwarding, three-way conferencing, voicemail, and much
more to provide a complete, affordable, and highly reliable VoIP solution.
Enhanced mobility
An integrated DECT base station with exclusive support for Cisco SPA302D Multi-Line DECT Handsets
provides a simple and reliable mobility solution for users who tend to frequently move about their
location but must be always reachable around the premises.
Easy installation and changes
The web-based configuration utility enables quick deployment and easy changes.
Peace of mind
Cisco solutions deliver the solid reliability you expect from Cisco. All solution components have been
rigorously tested to help ensure easy setup, interoperability, and performance.
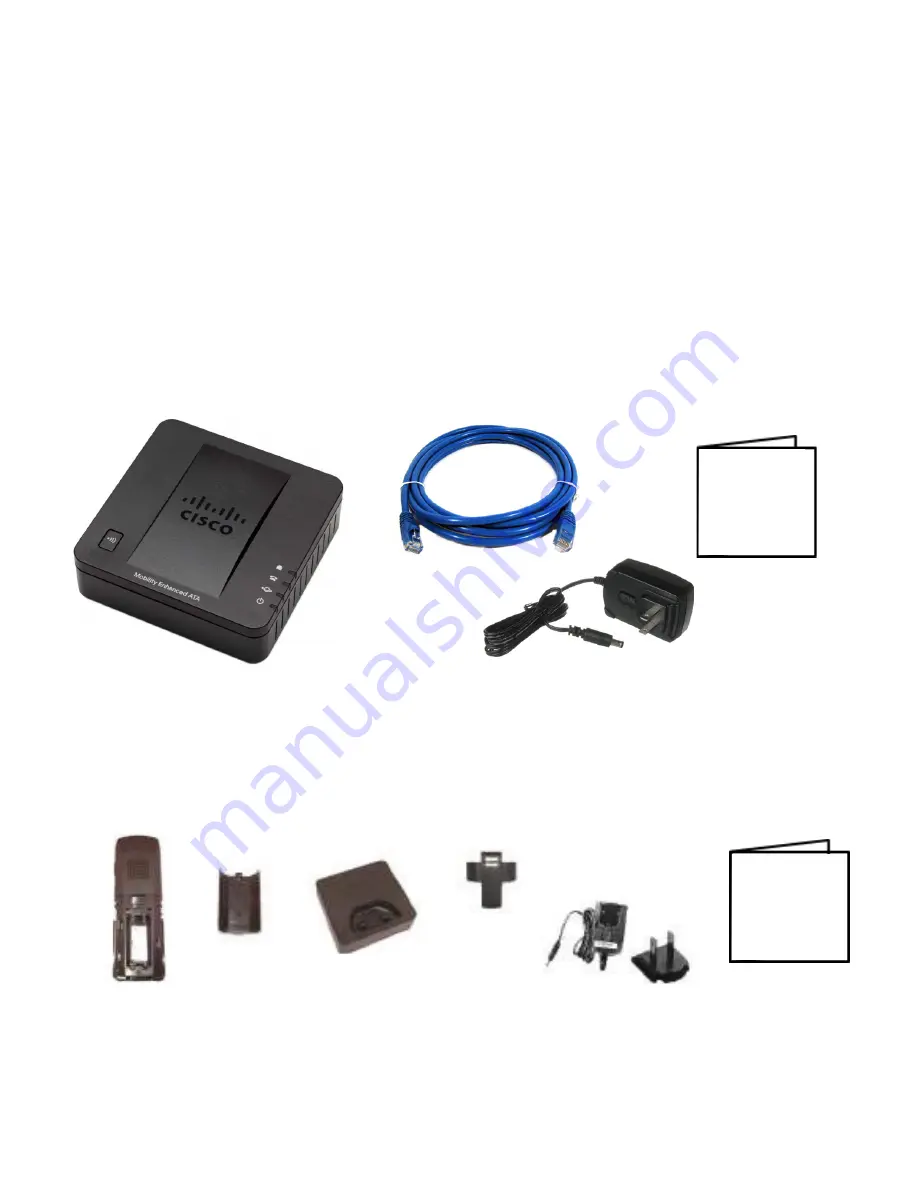
SPA 232 Base Parts
SPA 232 Handset Parts
A. Phone Base
B. Ethernet Cable
C. Power Adapter with Plug
D. Quick Start Guide
A. Cordless Handset
B. Handset Backplate
C. Handset Cradle
D. Belt Clip & Tool
E. Power Adapter with Plug
F. Quick Start Guide
A
B
C
D
F
Quick Start Guide
Quick Start Guide
Owner’s Manual
15
The ports labeled “PHONE” and “LINE” at the rear of the Cordless
Base are not used. Do not connect anything to these connectors.
The “RESET” button at the rear of the Cordless Base is not used.
Pressing the RESET button will make your Cordless Base
inoperable and require replacement.
Note
WARNING
Setting up the Cordless Handsets
4. Open Cordless Handset box and remove the Cordless
Handset, Power Clip, Power Adapter, and Charging Cradle.
5. Each Cordless Handset purchased from Intermedia will come
with batteries pre-installed. Batteries must be charged for 10
hours prior to first use. See instructions for installing batteries if
not installed.
6. Remove the protective film from the Handset and charging
cradle.
7. Install the optional Belt Clip on the Cordless Handset
A
B
C
D
E
Содержание SPA 232
Страница 1: ...Quick Start Guide Intermedia Hosted PBX Cisco SPA 232 Wireless DECT Phone ...
Страница 2: ...2 Welcome to your Hosted PBX Service ...
Страница 17: ...17 www intermedia net knowledgebase voice voicesupport intermedia net 1 877 880 0055 We are here to help ...
Страница 18: ...www intermedia net CiscoSPA232D QS 001 CISCOSPA232D QS 001 ...


