background image

S e n d   d o c u m e n t   c o m m e n t s   t o   n e x u s 7 k - d o c f e e d b a c k @ c i s c o . c o m

4-21

Cisco Nexus 7000 Series Hardware Installation and Reference Guide

OL-23069-06

Chapter 4      Installing a Cisco Nexus 7018 Chassis

Installing the Front Door and Air Intake Frame

To install the front door and air intake frame to the Cisco Nexus 7018 cable management system, follow 
these steps:

Step 1

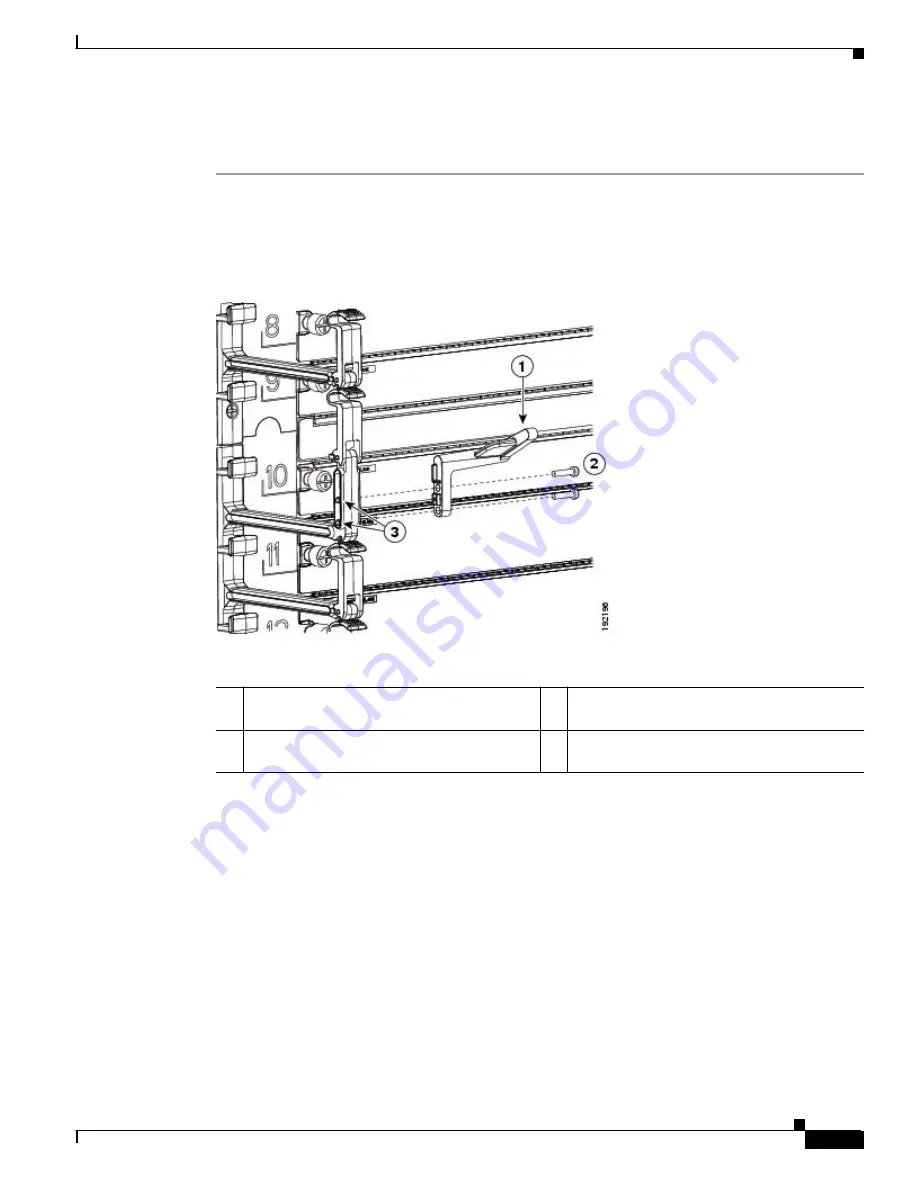
Position the left door stopper (700-27454-01) on the middle of the left cable management frame and 
fasten it with two M3x10 pan-head screws as shown in 

Figure 4-13

. Tighten these two screws to 5 to 7 

in-lb (0.6 to 0.8 N·m).

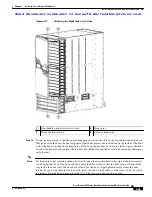
Figure 4-13

Attaching the Left Door Stopper

Step 2

Position the right door stopper (700-27592-01) on the middle of the right side of the cable management 
frame and fasten it with two M3x10 pan-head screws as shown in 

Figure 4-14

. Tighten these two screws 

to 5 to 7 in-lb (0.6 to 0.8 N·m).

1

Left door stopper identified with an L on the 
bottom of the base.

3

Screw holes on the cable management frame.

2

Two M3x10 screws that fasten the stopper to 
the cable management frame. 

Содержание Nexus 7010

Страница 1: ...sc o co m Americas Headquarters Cisco Systems Inc 170 West Tasman Drive San Jose CA 95134 1706 USA http www cisco com Tel 408 526 4000 800 553 NETS 6387 Fax 408 527 0883 Cisco Nexus 7000 Series Hardware Installation and Reference Guide November 30 2011 Text Part Number OL 23069 06 ...

Страница 2: ...expense You can determine whether your equipment is causing interference by turning it off If the interference stops it was probably caused by the Cisco equipment or one of its peripheral devices If the equipment causes interference to radio or television reception try to correct the interference by using one or more of the following measures Turn the television or radio antenna until the interfer...

Страница 3: ...llation and Connection Guidelines 1 18 Managing the System Hardware 1 19 Replacing Components 1 19 C H A P T E R 2 Installing a Cisco Nexus 7009 Chassis 2 1 Preparing to Install the Switch 2 1 Required Tools 2 2 Installing a Rack or Cabinet 2 2 Unpacking and Inspecting a New Switch 2 3 Installing the Bottom Support Rails on the Rack 2 4 Prerequisites for Attaching the Bottom Support Rails 2 5 Requ...

Страница 4: ...e Bottom Support Rails on the Rack 3 3 Prerequisites for Attaching the Bottom Support Rails 3 4 Required Tools and Equipment 3 4 Attaching the Bottom Support Rails 3 4 Installing the Chassis 3 7 Prerequisites for Installing the Chassis 3 7 Required Tools and Equipment 3 8 Installing the Chassis 3 9 Grounding the Cisco Nexus 7010 Chassis 3 11 Prerequisites for Grounding the Chassis 3 12 Required To...

Страница 5: ...ecting an AC Power Supply Unit to AC Power Sources 5 2 Prerequisites for Connecting AC Power Supply Units to AC Power Sources 5 3 Required Tools and Equipment 5 3 Connecting a 6 kW AC Power Supply Unit to AC Power Sources 5 3 Connecting a 7 5 kW AC Power Supply Unit to AC Power Sources 5 4 Connecting a DC Power Supply Unit to DC Power Sources 5 5 Grounding a 6 kW DC Power Supply Unit 5 5 Prerequis...

Страница 6: ...aining Transceivers and Fiber Optic Cables 6 12 C H A P T E R 7 Managing the Switch Hardware 7 1 Displaying the Switch Hardware Inventory 7 1 Displaying the Switch Serial Number 7 7 Displaying Power Usage Information 7 9 Power Supply Configuration Modes 7 10 Power Supply Configuration Overview 7 10 Configuring the Power Supply Mode 7 12 Power Supply Configuration Guidelines 7 13 Information About ...

Страница 7: ...ted Switch Operating Systems 7 38 EPLDs Available with Release 6 0 1 7 38 Determining Whether to Upgrade EPLD Images 7 40 Downloading the EPLD Images 7 40 EPLD Images Needed for vPCs 7 41 EPLD Images Needed for LISP 7 42 Installation Guidelines 7 43 Preparing the EPLD Images for Installation 7 43 Upgrading the EPLD Images 7 45 Verifying the EPLD Upgrades 7 47 Displaying the Available EPLD Versions...

Страница 8: ... Supervisor Module 9 23 Replacing an I O Module 9 25 Required Tools 9 26 Replacing an I O Module 9 26 Replacing a Cisco Nexus 7009 Fabric Module During Operations 9 31 Replacing a Cisco Nexus 7010 or 7018 Fabric Module During Operations 9 32 Required Tools 9 32 Replacing a Cisco 7010 or 7018 Fabric Module 9 32 Replacing a Cisco Nexus 7009 Fan Tray During Operations 9 37 Replacing a Cisco Nexus 701...

Страница 9: ...itches A 5 Power Requirements for Switch Components A 5 Power Supply Configuration Modes A 6 Power Supply Cable Specifications A 9 Chassis Clearances A 14 Cisco Nexus 7009 Chassis Clearances A 14 Cisco Nexus 7010 Chassis Clearances A 15 Cisco Nexus 7018 Chassis Clearances A 15 Facility Cooling Requirements A 15 Chassis Airflow A 16 A P P E N D I X B Transceivers and Module Connectors B 1 10 Gigabi...

Страница 10: ...System E 1 Powering Down the Cisco Nexus 7000 Series System E 1 Disconnecting the System from the Console E 1 Disconnecting the System from the Network E 2 Repacking the System Components E 2 Prerequisites for Repacking the System E 2 Required Tools and Equipment for Repacking the System E 2 Repacking the Cisco Nexus 7010 Switch E 3 Repacking the Cisco Nexus 7018 Switch E 11 A P P E N D I X F Site...

Страница 11: ...ing a Service Request page xix Audience This guide is for experienced network system administrators who configure and maintain Cisco Nexus 7000 Series switches Organization This document is organized as follows Chapter Description Chapter 1 Overview Provides an overview of the installation process Chapter 2 Installing a Cisco Nexus 7009 Chassis Describes how to install the Cisco Nexus 7009 hardwar...

Страница 12: ...he connection devices used to connect the Cisco Nexus 7000 Series switch to the Internet Appendix D Chassis and Module LEDs Describes the switch and module LEDs that indicate system conditions Appendix E Repacking the Cisco Nexus 7000 Series Switch for Shipment Explains how you should repack the Cisco Nexus 7000 Series switch in case you need to ship it Appendix F Site Preparation and Maintenance ...

Страница 13: ...ded at the end of each warning to locate its translation in the translated safety warnings that accompanied this device SAVE THESE INSTRUCTIONS Waarschuwing BELANGRIJKE VEILIGHEIDSINSTRUCTIES Dit waarschuwingssymbool betekent gevaar U verkeert in een situatie die lichamelijk letsel kan veroorzaken Voordat u aan enige apparatuur gaat werken dient u zich bewust te zijn van de bij elektrische schakel...

Страница 14: ...Avvertenza IMPORTANTI ISTRUZIONI SULLA SICUREZZA Questo simbolo di avvertenza indica un pericolo La situazione potrebbe causare infortuni alle persone Prima di intervenire su qualsiasi apparecchiatura occorre essere al corrente dei pericoli relativi ai circuiti elettrici e conoscere le procedure standard per la prevenzione di incidenti Utilizzare il numero di istruzione presente alla fine di ciasc...

Страница 15: ... accidentes Al final de cada advertencia encontrará el número que le ayudará a encontrar el texto traducido en el apartado de traducciones que acompaña a este dispositivo GUARDE ESTAS INSTRUCCIONES Varning VIKTIGA SÄKERHETSANVISNINGAR Denna varningssignal signalerar fara Du befinner dig i en situation som kan leda till personskada Innan du utför arbete på någon utrustning måste du vara medveten om...

Страница 16: ...ão de prevenção de acidentes Use o número da declaração fornecido ao final de cada aviso para localizar sua tradução nos avisos de segurança traduzidos que acompanham o dispositivo GUARDE ESTAS INSTRUÇÕES Advarsel VIGTIGE SIKKERHEDSANVISNINGER Dette advarselssymbol betyder fare Du befinder dig i en situation med risiko for legemesbeskadigelse Før du begynder arbejde på udstyr skal du være opmærkso...

Страница 17: ...Se n d d o c u m e n t c o m m en t s t o n ex u s 7 k d o c f e e d b a ck c i sc o co m xvii Cisco Nexus 7000 Series Hardware Installation and Reference Guide OL 23069 06 Preface ...

Страница 18: ... Nexus 7000 Series Regulatory Compliance and Safety Information Cisco Nexus 7000 Series Connectivity Management Processor Configuration Guide Software Documents The Cisco Nexus 7000 Series switches ship with the Cisco NX OS software You can find software documentation for the Cisco NX OS software at the following URL http www cisco com en US products ps9402 tsd_products_support_series_home html Th...

Страница 19: ...ice request and gathering additional information see the monthly What s New in Cisco Product Documentation which also lists all new and revised Cisco technical documentation at http www cisco com en US docs general whatsnew whatsnew html Subscribe to the What s New in Cisco Product Documentation as a Really Simple Syndication RSS feed and set content to be delivered directly to your desktop using ...

Страница 20: ...Se n d d o c u m e n t c o m m en t s t o n ex u s 7 k d o c f e e d b a ck c i sc o co m xx Cisco Nexus 7000 Series Hardware Installation and Reference Guide OL 23069 06 Preface ...

Страница 21: ... latency interconnect LLI technologies The Cisco Nexus 7000 Series models are described in the following topics Cisco Nexus 7009 System page 1 1 Cisco Nexus 7010 System page 1 5 Cisco Nexus 7018 System page 1 10 Cisco Nexus 7009 System The Cisco Nexus 7009 chassis has 9 slots that allow for one or two supervisor modules and up to seven I O modules The chassis also holds up to five fabric modules o...

Страница 22: ...er 1 Overview Cisco Nexus 7000 Series Figure 1 1 Standard Hardware Features on the Front and Sides of the Cisco Nexus 7009 Chassis 1 Air intake area for power supply units 5 Supervisor modules 1 or 2 slots 1 and 2 2 Fabric modules up to 5 N7K C7009 FAB 2 6 Cable management top hood with LEDs 3 Cable management side frame 7 Air intake areas for supervisor I O and fabric modules ...

Страница 23: ... 10 100 1000 I O modules with XL option N7K M148GT 11L 48 port 1 Gigabit Ethernet I O modules N7K M148GS 11 48 port 1 Gigabit Ethernet I O modules with XL option N7K M148GS 11L 48 port 1 10 Gigabit Ethernet I O modules with XL N7K F248XP 25 32 port 10 Gigabit Ethernet I O modules N7K M132XP 12 32 port 10 Gigabit Ethernet I O modules with XL option N7K M132XP 12L 32 port 1 and 10 Gigabit Ethernet I...

Страница 24: ...y units have blank panels installed in place of the missing components to maintain the designed airflow for system cooling You must install the Cisco Nexus 7009 chassis in a two or four post 19 inch EIA rack that meets the following specifications Mounting rails that conform to the English universal hole spacing as specified in ANSI EIA 310 D 1992 The minimum vertical rack space is 24 5 inches 62 ...

Страница 25: ...modules and up to eight I O modules The chassis also holds up to five fabric modules two system fan trays two fabric fan trays up to three power supply units and a cable management system The chassis also has a mounting bracket and four positioning handles two on each side that you use to install the chassis after you position it on a rack Optionally you can include an air filter and mid frame doo...

Страница 26: ...11 48 port 10 100 1000 I O modules with XL option N7K M148GT 11L 48 port 1 Gigabit Ethernet I O modules N7K M148GS 11 48 port 1 Gigabit Ethernet I O modules with XL option N7K M148GS 11L 48 port 1 10 Gigabit Ethernet I O modules with XL N7K F248XP 25 32 port 10 Gigabit Ethernet I O modules N7K M132XP 12 32 port 10 Gigabit Ethernet I O modules with XL option N7K M132XP 12L 32 port 1 and 10 Gigabit ...

Страница 27: ... a ck c i sc o co m 1 7 Cisco Nexus 7000 Series Hardware Installation and Reference Guide OL 23069 06 Chapter 1 Overview Cisco Nexus 7000 Series Figure 1 4 Optional Hardware Features on the Front Side of the Cisco Nexus 7010 Chassis 1 Mid frame door assembly 2 Air filter ...

Страница 28: ... number of supervisor modules I O modules fabric modules or power supply units have blank panels installed in place of the missing components to maintain the designed airflow for system cooling 1 Fan exhaust for the supervisor and I O modules 4 Fabric modules up to 5 N7K C7010 FAB 1 or N7K C7010 FAB 2 2 System fan trays 2 N7K C7010 FAN S and exhaust for the supervisor and I O modules 5 Power suppl...

Страница 29: ...ngle chassis installation and 73 5 inches 186 6 cm or 42 rack units for a dual chassis installation We recommend that you use a 45 RU rack for a dual chassis installation If you install one chassis install it at the lowest possible RU on the rack for stability as shown in Figure 1 6 If you install two chassis in the same rack install the bottom chassis first and then install the other chassis on t...

Страница 30: ... five fabric modules two fan trays up to four power supply units and a cable management system The chassis also has a mounting bracket and four positioning handles two on each side that you use to install the chassis after you position it on a rack Optionally you can include a front door to protect the I O cable connections Figure 1 8 identifies the standard features on the front and sides of the ...

Страница 31: ...k d o c f e e d b a ck c i sc o co m 1 11 Cisco Nexus 7000 Series Hardware Installation and Reference Guide OL 23069 06 Chapter 1 Overview Cisco Nexus 7000 Series Figure 1 8 Standard Hardware Features on the Front and Sides of the Cisco Nexus 7018 Chassis ...

Страница 32: ...48 port 10 100 1000 I O modules with XL option N7K M148GT 11L 48 port 1 Gigabit Ethernet I O modules N7K M148GS 11 48 port 1 Gigabit Ethernet I O modules with XL option N7K M148GS 11L 48 port 1 10 Gigabit Ethernet I O modules with XL option N7K F248XP 25 32 port 10 Gigabit Ethernet I O modules N7K M132XP 12 32 port 10 Gigabit Ethernet I O modules with XL option N7K M132XP 12L 32 port 1 and 10 Giga...

Страница 33: ...re Installation and Reference Guide OL 23069 06 Chapter 1 Overview Cisco Nexus 7000 Series Figure 1 9 Cable Management System for the Cisco Nexus 7018 Chassis 1 System status LEDs these LEDs show the system status displayed by the chassis LEDs 3 Upper cable management assemblies 2 Top hood 4 Lower cable management assemblies ...

Страница 34: ...d b a ck c i sc o co m 1 14 Cisco Nexus 7000 Series Hardware Installation and Reference Guide OL 23069 06 Chapter 1 Overview Cisco Nexus 7000 Series Figure 1 10 Optional Front Door for the Cisco Nexus 7018 Chassis 1 Front doors 2 Air intake frame for power supply units ...

Страница 35: ... s 7 k d o c f e e d b a ck c i sc o co m 1 15 Cisco Nexus 7000 Series Hardware Installation and Reference Guide OL 23069 06 Chapter 1 Overview Cisco Nexus 7000 Series Figure 1 11 Standard Hardware Features on the Back of the Cisco Nexus 7018 Chassis ...

Страница 36: ...rack space is 43 75 inches 111 1 cm or 25 rack units RU for a single chassis installation and 87 5 inches 222 2 cm Install the Cisco Nexus 7018 chassis at the lowest possible RU on the rack for stability as shown in Figure 1 12 If there is another device in the rack install the heaviest one at the bottom Warning Stability hazard The rack stabilizing mechanism must be in place or the rack must be b...

Страница 37: ...g Installation of the equipment must comply with local and national electrical codes Statement 1074 Before you can install a Cisco Nexus 7000 Series system you must prepare the site for the installation You must make sure that the altitude temperature humidity air quality airflow electromagnetic and radio frequency interference floor structure power and earth grounding of the installation site all...

Страница 38: ...our post 19 inch EIA rack and attach two bottom support rails you can begin installing the Cisco Nexus 7000 Series system To install the system you must load the chassis onto a mechanical lift use the mechanical lift to position and elevate the chassis at its bottom support rails on a rack or cabinet push the chassis onto the rack or cabinet and then secure the chassis to the rack or cabinet With ...

Страница 39: ...t functions include displaying system and module information setting the power supply modes and managing module functions For more information about these functions see Chapter 7 Managing the Switch Hardware Replacing Components While the Cisco Nexus 7000 Series system is operational you can replace any one of the following components if they are redundant Power supply Supervisor module Fabric mod...

Страница 40: ...d d o c u m e n t c o m m en t s t o n ex u s 7 k d o c f e e d b a ck c i sc o co m 1 20 Cisco Nexus 7000 Series Hardware Installation and Reference Guide OL 23069 06 Chapter 1 Overview Replacing Components ...

Страница 41: ...l a power supply unit in the chassis see Chapter 5 Installing Power Supply Units This chapter includes the following sections Preparing to Install the Switch page 2 1 Installing the Bottom Support Rails on the Rack page 2 4 Installing the Chassis page 2 11 Grounding the Cisco Nexus 7009 Chassis page 2 19 Installing the Cable Management Frames page 2 24 Installing the Front Door and Air Intake Fram...

Страница 42: ...SD protocol at all times to prevent ESD damage This protocol includes but is not limited to wearing an ESD wrist strap that you connect to the earth ground Note For a list of tools required to assemble and secure the rack or cabinet see the documentation that the manufacturer shipped with the rack or cabinet Installing a Rack or Cabinet Before you install the Cisco Nexus 7009 chassis you must inst...

Страница 43: ... 7009 chassis you need to unpack and inspect it to be sure that you have all the items that you ordered and verify that the switch was not damaged during shipment If anything is damaged or missing contact your customer representative immediately Tip Do not discard the shipping container when you unpack the Cisco Nexus 7009 system Flatten the shipping cartons and store them with the pallet used for...

Страница 44: ...ts and two center mount brackets in the Center Mount Kit You must install either the front mount bottom support rails or the center mount bottom support rails before installing the chassis Note If you are installing three Cisco Nexus 7009 chassis with front mount brackets in a 42 RU rack and you can safely position the bottom chassis at the rack using a mechanical lift you can fasten the chassis d...

Страница 45: ...upport rack 1 RU Required Tools and Equipment You need the following tools and equipment to attach the bottom support rails Number 1 Phillips screwdriver One of the following bottom support kits Front mount bottom support kit shipped with the Bottom Support Kit which is found in the accessory kit Center mount bottom support kit special ordered and not shipped with the chassis Table 2 1 lists the i...

Страница 46: ...hes 66 7 cm 15 RU above the bottom support rails for the lower chassis as shown in Figure 2 1 Note When installing the chassis without bottom support rails you can skip this step Warning To prevent bodily injury when mounting or servicing this unit in a rack you must take special precautions to ensure that the system remains stable The following guidelines are provided to ensure your safety This u...

Страница 47: ...you have three screw holes M6 x 19 mm or 12 24 x 3 4 in Phillips screws on the front end of each bracket using a total of 6 screws for both brackets as shown in Figure 2 2 1 For the heaviest Cisco Nexus 7009 chassis to be installed in the rack position two front mount bottom support rails at the lowest RU on the rack 3 The distance between the bottom support rails must be at least 26 25 inches 66 ...

Страница 48: ...crews to attach it to each rail one screw for each rail Attaching the Center Mount Bottom Support Rails To maximize the stability of the rack you should install the chassis as low as possible on the rack Install the heaviest chassis first at the bottom of the rack If you install a second chassis in the same rack install it immediately above the lower system if there is enough vertical space 1 Left...

Страница 49: ... 7 cm 15 RU above the center mount bottom support rails for the lower chassis as shown in Figure 2 3 Figure 2 3 Positioning the Center Mounted Bottom Support Rails Warning To prevent bodily injury when mounting or servicing this unit in a rack you must take special precautions to ensure that the system remains stable The following guidelines are provided to ensure your safety This unit should be m...

Страница 50: ...Bottom Support Rail to a Rack Step 3 Align the crossbar to the lower back of the two bottom support rails and use two M4 x 8 mm screws to attach it to each rail one screw for each rail 1 For the first and heaviest Cisco Nexus 7009 chassis installed in a rack position two center mount bottom support rails at the lowest RU on the rack 3 Allow at least 26 25 inches 66 7 cm 15 RU for each Cisco Nexus ...

Страница 51: ... installation Data center ground that is accessible where you are installing the Cisco Nexus 7009 chassis Two or four post 19 inch EIA rack or cabinet that includes such a rack These installation instructions show how to install the chassis in a two post rack You follow the same steps for installing the chassis on the front two posts of a four post rack or cabinet For more information on the rack ...

Страница 52: ...to push the chassis which can weigh up to 300 pounds 136 kg onto and off the mechanical lift and rack If you are going to mount the center of the chassis to the rack or cabinet you must also have the optional center mount kit Table 2 3 lists the items in the center mount kit Warning To prevent bodily injury when mounting or servicing this unit in a rack you must take special precautions to ensure ...

Страница 53: ...is never attempt to lift or tilt the chassis using the handles on modules such as power supplies fans or cards these types of handles are not designed to support the weight of the unit Statement 1032 Caution To lift the chassis use a mechanical lift Use the handles on the side of the chassis for only repositioning the chassis after it is already on the mechanical lift or in the rack or cabinet Ste...

Страница 54: ...h the screw holes in the vertical mounting rails Tip To adjust the placement of the chassis so that the screw holes in the chassis mounting brackets align with the screw holes in the vertical mounting rails use the chassis handles shown in Figure 2 6 Step 5 Use a Phillips screwdriver to screw in seven to eight M6 x 19 mm or 12 24 x 3 4 inch screws in each of the two chassis vertical mounting brack...

Страница 55: ...by its Center Brackets To install a Cisco Nexus 7009 chassis by its optional center bracket to a rack or cabinet follow these steps Step 1 Follow these steps to replace the front mount bracket on the chassis with center mount brackets a Remove the two front mount brackets from the chassis by unscrewing the five screws that hold each bracket to the front sides of the chassis see Figure 2 7 1 Seven ...

Страница 56: ...uide OL 23069 06 Chapter 2 Installing a Cisco Nexus 7009 Chassis Installing the Chassis Figure 2 7 Removing the Front Mount Brackets b Position the center mount bracket so that its five screw holes are aligned to the five screw holes used for the front mount bracket see Figure 2 8 1 Remove five screws from each bracket 2 Remove the bracket from the chassis ...

Страница 57: ...mechanical lift as follows a Position the mechanical lift next to the shipping pallet that holds the chassis b Elevate the lift platform to the level of the bottom of the chassis or no more than 0 25 inches 0 635 cm below the bottom of the chassis c Use at least two persons to slide the chassis fully onto the lift so that the side of the chassis touches or is close to the vertical rails on the lif...

Страница 58: ...chassis is elevated to the height of the bottom support rails or no more than 0 25 inch 0 635 cm above the bracket Step 4 Use at least two persons to push the chassis onto the installed bottom support rails until the front mount brackets come in contact with the rack rails Push the lower half of the front side of the chassis so that the back side enters the rack first and push until the chassis ve...

Страница 59: ...ect the AC power to the system The system ground also referred to as the network equipment building system NEBS ground provides additional grounding for EMI shielding requirements and for the low voltage supplies DC DC converters on the modules This grounding system is active even when the AC power cables are not connected to the system You establish this ground by connecting one of the two ground...

Страница 60: ...exus 7009 system accessory kit Grounding screws Two M4 x 8 mm metric pan head screws These screws are shipped with the Cisco Nexus 7009 accessory kit Grounding wire Not supplied with the Cisco Nexus 7009 system accessory kit This wire should be sized to meet local and national installation requirements Depending on the power supply and system a 12 AWG to 6 AWG copper conductor is required for U S ...

Страница 61: ...wire Verify that the ground wire is securely attached to the ground lug by attempting to pull the wire out of the crimped lug Step 4 Remove the adhesive label from one of the two system grounding pads and secure the grounding wire lug to the grounding pad with two M4 screws Figure 2 12 shows the location of the grounding pads on the front side of the chassis Ensure that the grounding lug and the g...

Страница 62: ...9 Chassis Grounding the Cisco Nexus 7009 Chassis Figure 2 12 Grounding Pad on the Front of the Cisco Nexus 7009 Chassis Prepare the other end of the grounding wire and connect it to an appropriate grounding point in your site to ensure an adequate earth ground for the switch If the rack is grounded connect the grounding wire as explained in the documentation provided by the vendor for the rack 1 G...

Страница 63: ...pter 2 Installing a Cisco Nexus 7009 Chassis Grounding the Cisco Nexus 7009 Chassis Connecting Your ESD Wrist Strap to the Chassis After you connect the chassis to the data center earth ground you can ground your ESD wrist strap by plugging it into an ESD port shown in Figure 2 13 Figure 2 13 ESD Grounding Port on the Front of the Cisco Nexus 7009 Chassis 1 ESD grounding port ...

Страница 64: ...hassis When you install the cable management frames you attach two side frames to the front mount brackets on the chassis and then attach a top hood to the top of the two side frames and the chassis Note Chassis with center mount brackets include front mount brackets for holding the cable management frames To install the cable management frames on the Cisco Nexus 7009 switch chassis follow these s...

Страница 65: ...assis Step 3 Place the top hood part number 800 33785 01 on top of the two cable management frames that are already installed Push the top hood toward the chassis so that its alignment pins enter the alignment holes and the top hood rests against the chassis as shown in Figure 2 15 1 Cable management frame 3 Position the frame so that the two lower hooks on the front mount bracket fit inside the t...

Страница 66: ...ment Frames Figure 2 15 Positioning the Top Hood with the Cable Management Frames and the Chassis Step 4 Use four M4x8 pan head screws to loosely fasten the top hood to the chassis as shown in Figure 2 16 Figure 2 16 Fastening the Top Hood to the Chassis and Cable Management Assemblies 1 Alignment pins 2 Alignment holes 1 Four M4x8 pan head screws that fasten the top hood to the left and right cab...

Страница 67: ...2 to 1 7 N m Step 7 Tighten each of the eight screws that fasten the cable management frames to the rack mount brackets to 11 to 15 in lb 1 2 to 1 7 N m Installing the Front Door and Air Intake Frame If you need to install the optional double hinged door and air intake frame you must install them after installing the cable management frame on the chassis To install the front door and air intake fr...

Страница 68: ...he right cable management frame see Figure 2 18 You must open each bushing to fit it around the post Figure 2 18 Placing Two Bushings on a Cable Management Frame Hinge Post Step 3 Assemble the two pieces of the right door stop over the bushings and post Fasten the two pieces together with two M4 flathead screws see Figure 2 19 1 Align the left door stopper to the cable management frame 2 Fasten th...

Страница 69: ...gement side frames and align two alignment pins on the hinge bracket part number 700 31339 01 to two alignment holes in the chassis as shown in Figure 2 20 Push the hinge bracket to the chassis so that the pins go into the chassis Two screw holes in each of the cable management side frames should align to screw holes in the hinge bracket 1 Assemble the right and left sides of the right door stop a...

Страница 70: ...e OL 23069 06 Chapter 2 Installing a Cisco Nexus 7009 Chassis Installing the Front Door and Air Intake Frame Figure 2 20 Positioning the Hinge Bracket to the Cable Management Frames and Chassis Step 5 Attach the bracket to the chassis and cable management frames with eight loosely fastened M4x8 screws as shown in Figure 2 21 1 Alignment pins 2 Alignment holes ...

Страница 71: ...n the four M4x8 screws that fasten the hinge bracket to the chassis to 11 to 15 in lb 1 2 to 1 7 N m Step 7 Tighten the four M4x8 screws that fasten the hinge bracket to the cable management frame to 11 to 15 in lb 1 2 to 1 7 N m Step 8 Align the two captive screws on the air intake frame to the two screw holes below the cable management frames on the chassis as shown in Figure 2 22 1 Four M4x8 pa...

Страница 72: ...he door until the handle clicks the handle clicks when you pull it about 30 degrees Step 11 Move the side of the door with the opened handle onto the two hinge pins as shown in Figure 2 23 Make sure that the top and bottom hinge pins on the hood and hinge bracket fit through the slots on the top and bottom of that side of the door Position the door so that the hinge pins are located at the ends of...

Страница 73: ... Figure 2 23 Attaching One Side of the Door to the Chassis Step 12 While holding the door on the hinge pins with one hand use your other hand to press the locking button on the interior side of the door See Figure 2 24 This action locks the latches around the hinge pins so that you no longer need to hold the door onto the chassis Figure 2 24 Attaching the Left Side of the Door 1 Double hinged door...

Страница 74: ...pening the door handle for the unsecured side until the handle clicks press that side of the door so that the pins are positioned all the way inside the door slots press the door latch button on the interior side of the door and then make sure that the door is firmly secured to both hinge pins Step 13 Open the door handle on the open side of the door until it clicks This action opens the latches o...

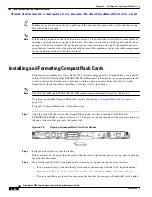
Страница 75: ...s Test the door to make sure that it is fully secured to the four hinge pins Tip Whenever you need to open the door pull one of the door handles open until it clicks and then swing that side of the door open Installing and Formatting CompactFlash Cards Each supervisor module on a Cisco Nexus 7000 Series switch is shipped with a CompactFlash card installed in the LOG FLASH reader The EXPANSION FLAS...

Страница 76: ...T logflash online If you are installing a card into the expansion flash reader the message will end with slot0 online switch 2008 Mar 15 08 00 00 switch VDC 1 IDEHSD 2 MOUNT slot0 online If you see an offline message or do not see a message either the card is not fully pushed into the reader or it is improperly formatted switch 2008 Dec 1 12 00 00 switch VDC 1 IDEHSD 2 UMOUNT logflash offline Make...

Страница 77: ...ll the Switch page 3 1 Installing the Bottom Support Rails on the Rack page 3 3 Installing the Chassis page 3 7 Grounding the Cisco Nexus 7010 Chassis page 3 11 Installing and Formatting CompactFlash Cards page 3 16 Installing the Front Doors and Frame Assembly page 3 17 Installing the Air Filter page 3 23 Preparing to Install the Switch This section includes the following topics Required Tools pa...

Страница 78: ...t 19 inch EIA data center rack or a cabinet that contains such a rack that meets the requirements listed in the Cisco Nexus 7000 Series Site Preparation Guide To maximize safety you should do the following for the rack Bolt the rack to the concrete subfloor before moving the Cisco Nexus 7010 chassis onto it Warning Stability hazard The rack stabilizing mechanism must be in place or the rack must b...

Страница 79: ...y your customer service representative and verify that you have received all of the ordered items The shipment should include boxes for the following System chassis which includes the following installed components 2 supervisor modules 1 to 8 I O modules 3 to 5 fabric modules 2 system fan trays 2 fabric fan trays 2 to 3 power supply units The power supply units are shipped with the chassis but are...

Страница 80: ...is positioned above where you will be installing the Cisco Nexus 7010 system Also you must have the bottom support rail kit which ships with the Cisco Nexus 7010 system accessory kit The distance between the front and rear mounting brackets on the rack or cabinet must be between 24 and 32 inches 60 96 and 81 28 cm to fit the bottom support rails Required Tools and Equipment You need the following ...

Страница 81: ...ure 3 1 Adjust the length of the rail so that it stretches from the outer edges of the front and rear vertical mounting rails You can expand the rail so that its mounting brackets are spaced between 24 to 32 inches 60 96 to 81 28 cm Warning To prevent bodily injury when mounting or servicing this unit in a rack you must take special precautions to ensure that the system remains stable The followin...

Страница 82: ...crews on each end of each rail using a total of 12 screws for both brackets as shown in Figure 3 2 Note Three of the screw holes on each end of the bottom support rail align to the screw holes in the mounting rail Use a screw in each of these screw holes 1 For the first and heaviest Cisco Nexus 7010 chassis installed in a rack position two bottom support rails at the lowest RU on the rack 3 Allow ...

Страница 83: ... rack and then securing the chassis to the rack This section includes the following topics Prerequisites for Installing the Chassis page 3 7 Required Tools and Equipment page 3 8 Installing the Chassis page 3 9 Prerequisites for Installing the Chassis Before you install the chassis you must make sure that the following items are available for the installation Data center ground is accessible where...

Страница 84: ...nstall the Cisco Nexus 7010 chassis Mechanical lift capable of lifting at least 550 pounds 250 kg Caution You must use a mechanical lift whenever lifting a device over 120 pounds 55 kg Number 1 Phillips screwdriver Bottom support rails kit shipped with the Cisco Nexus 7010 system accessory kit Part of this kit has already been used to install the bottom support rails Table 3 2 lists the items in t...

Страница 85: ... unobstructed so you can easily push the chassis into the rack Warning To prevent personal injury or damage to the chassis never attempt to lift or tilt the chassis using the handles on modules such as power supplies fans or cards these types of handles are not designed to support the weight of the unit Statement 1032 Caution To lift the chassis use a mechanical lift not the handles on the side of...

Страница 86: ...u need to reposition the chassis to align the screw holes you can use the handles on the sides of the chassis Tip To adjust the placement of the chassis so that the screw holes in the chassis mounting brackets align with the screw holes in the vertical mounting rails use the chassis handles shown in Figure 3 4 Step 5 Use a Phillips screwdriver to screw in four M6 x 19 mm or 12 24 x 3 4 inch screws...

Страница 87: ...rred to as the network equipment building system NEBS ground provides additional grounding for EMI shielding requirements and for the low voltage supplies DC DC converters on the modules This grounding system is active even when the AC power cables are not connected to the system You establish this ground by connecting one of the two grounding pads on the chassis to the rack if it is connected to ...

Страница 88: ...g screws Two M4 x 8 mm metric pan head screws These screws are shipped with the Cisco Nexus 7010 accessory kit Grounding wire Not supplied with the Cisco Nexus 7010 system accessory kit This wire should be sized to meet local and national installation requirements Depending on the power supply and system a 12 AWG to 6 AWG copper conductor is required for U S installations We recommend that you use...

Страница 89: ... by attempting to pull the wire out of the crimped lug Step 4 Remove the adhesive label from one of the two system grounding pads and secure the grounding wire lug to the grounding pad with two M4 screws Figure 3 6 shows the location of the grounding pads on the front side of the chassis Figure 3 7 shows the location on the rear of the chassis Ensure that the grounding lug and the grounding wire d...

Страница 90: ... other end of the grounding wire and connect it to an appropriate grounding point in your site to ensure an adequate earth ground for the switch If the rack is grounded connect the grounding wire as explained in the documentation provided by the vendor for the rack Connecting Your ESD Wrist Strap to the Chassis After you connect the chassis to the data center earth ground you can ground your ESD w...

Страница 91: ... i sc o co m 3 15 Cisco Nexus 7000 Series Hardware Installation and Reference Guide OL 23069 06 Chapter 3 Installing a Cisco Nexus 7010 Chassis Grounding the Cisco Nexus 7010 Chassis Figure 3 8 ESD Grounding Ports on the Front of the Cisco Nexus 7010 Chassis 1 ESD grounding port ...

Страница 92: ...ASH reader is left empty but you can optionally install a card in that reader For the card to function with the reader you must make sure that it is either formatted for the reader before installing it or format it after installing it Note The LOG FLASH and EXPANSION FLASH readers require different formats for their cards To replace an installed CompactFlash card see the Replacing a CompactFlash C...

Страница 93: ...slot0 online switch 2008 Mar 15 08 00 00 switch VDC 1 IDEHSD 2 MOUNT slot0 online If you see an offline message or do not see a message either the card is not fully pushed into the reader or it is improperly formatted switch 2008 Dec 1 12 00 00 switch VDC 1 IDEHSD 2 UMOUNT logflash offline Make sure that the card is fully inserted inside the reader If the card is fully inserted either format the c...

Страница 94: ...s 7010 Chassis Installing the Front Doors and Frame Assembly Figure 3 11 Installing the Bottom Frame Step 2 For each of the two front doors match the two alignment pins on the door frame to the alignment holes on the chassis Position each door frame immediately under the cable management area see Figure 3 12 1 Bottom frame assembly with screw holes aligned to screw holes in chassis 2 Four M4 x 6 m...

Страница 95: ...ce Guide OL 23069 06 Chapter 3 Installing a Cisco Nexus 7010 Chassis Installing the Front Doors and Frame Assembly Figure 3 12 Installing the Front Doors Step 3 Tighten three screws for each door frame see Figure 3 13 1 Front door frames 3 Place door frame on front edge of chassis and immediately under the cable management area 2 Cable management area ...

Страница 96: ...OL 23069 06 Chapter 3 Installing a Cisco Nexus 7010 Chassis Installing the Front Doors and Frame Assembly Figure 3 13 Attaching the Door Frames to the Chassis a Remove the EMI panel by unscrewing its four captive screws until each is free of the chassis see Figure 3 14 1 For each of two door frames tighten three captive screws to secure the frame to the chassis ...

Страница 97: ...y Figure 3 14 Removing the EMI Panel b On each side of the EMI panel align a side frame piece so that its two screw holes align to two screw holes on one side of the EMI panel Screw in a screw in each of these two screw holes so that the side frame assembly is attached to the EMI panel Repeat this step for the other side of the EMI panel See Figure 3 15 1 Unscrew four captive screws until they are...

Страница 98: ...mblies to the EMI Panel c Realign the EMI panel to the air intake area on the chassis screw its four captive screws to the chassis and tighten the captive screws to 8 in lb 0 9 N m 1 Right side frame 3 Use two 6 32 x 1 2 inch flat head screws to attach the right side frame to the right side of the EMI panel Tighten the screws to 8 in lb 0 9 N m 2 Left side frame 4 Use two 6 32 x 1 2 inch flat head...

Страница 99: ...el which covers the air intake area Step 2 Use one hand on the air filter to hold it in place while you use the other hand to pull out the spring pin on one side of the air filter Adjust the air filter so that the spring pin will be released into its hole in the EMI panel bracket Step 3 Switch hands to hold the air filter on the EMI panel and use the free hand to pull out the other spring pin on t...

Страница 100: ... c o m m en t s t o n ex u s 7 k d o c f e e d b a ck c i sc o co m 3 24 Cisco Nexus 7000 Series Hardware Installation and Reference Guide OL 23069 06 Chapter 3 Installing a Cisco Nexus 7010 Chassis Installing the Air Filter ...

Страница 101: ... Switch page 4 1 Installing the Bottom Support Rails on the Rack page 4 3 Installing the Chassis page 4 7 Grounding the Cisco Nexus 7018 Chassis page 4 12 Installing the Cable Management Frame page 4 15 Installing the Front Door and Air Intake Frame page 4 20 Installing and Formatting CompactFlash Cards page 4 30 Preparing to Install the Switch This section includes the following topics Required T...

Страница 102: ...IA data center rack or in a cabinet that contains such a rack that meets the requirements listed in the Cisco Nexus 7000 Series Site Preparation Guide To maximize safety you should do the following for the rack Bolt the rack to the concrete subfloor before moving the Cisco Nexus 7018 chassis onto it Warning Stability hazard The rack stabilizing mechanism must be in place or the rack must be bolted...

Страница 103: ...ou have received all of the ordered items The shipment should include boxes for the following System chassis which includes the following installed components 2 supervisor modules 1 to 16 I O modules 3 to 5 fabric modules 2 fan trays 2 to 4 power supply units The power supply units are shipped with the chassis but are boxed separately Cisco Nexus 7018 system accessory kit To see a list of what is ...

Страница 104: ...hips with the Cisco Nexus 7000 Series accessory kit The distance between the front and rear mounting brackets on the rack or cabinet must be between 24 and 32 inches 61 0 and 81 3 cm Required Tools and Equipment You need the following tools and equipment to attach the bottom support rails Number 1 Phillips screwdriver Rack mount kit shipped with the accessory kit Table 4 1 lists the items in the r...

Страница 105: ...mounting brackets are spaced between 24 to 32 inches 61 0 to 81 3 cm Note Make sure that the two bottom support rails are level with one another If they are not level adjust the higher rail down to the level of the lower rail Warning To prevent bodily injury when mounting or servicing this unit in a rack you must take special precautions to ensure that the system remains stable The following guide...

Страница 106: ...ck Figure 4 1 Positioning the Bottom Support Rails Step 2 Use a Phillips screwdriver to screw in at least three four if possible M6 x 19 mm or 12 24 x 3 4 inch Phillips screws on each end of each rail using a total of 16 screws for both brackets as shown in Figure 4 2 1 For the first and heaviest chassis installed in a rack position two bottom support rails at the lowest RU on the rack 2 Allow at ...

Страница 107: ...the rack using a mechanical lift pushing it onto the rack and then securing it to the rack This section includes the following topics Prerequisites for Installing the Chassis page 4 7 Required Tools and Equipment page 4 8 Installing the Chassis page 4 9 Prerequisites for Installing the Chassis Before you install the chassis you must make sure that the following items are available for the installa...

Страница 108: ...install the Cisco Nexus 7000 Series chassis Mechanical lift capable of lifting at least 700 pounds 318 kg Caution You must use a mechanical lift to lift a switch weighing over 120 pounds 55 kg Number 1 Phillips screwdriver Bottom support rails kit shipped with the Cisco Nexus 7018 accessory kit Part of this kit has already been used to install the bottom support rails Table 4 2 lists the items in ...

Страница 109: ... unobstructed so you can easily push the chassis into the rack Warning To prevent personal injury or damage to the chassis never attempt to lift or tilt the chassis using the handles on modules such as power supplies fans or cards these types of handles are not designed to support the weight of the unit Statement 1032 Caution To lift the chassis use a mechanical lift not the handles on the side of...

Страница 110: ...d to reposition the chassis to align the screw holes you can use the handles on the sides of the chassis Tip To adjust the placement of the chassis so that the screw holes in the chassis mounting brackets align with the screw holes in the vertical mounting rails use the chassis handles shown in Figure 4 4 Step 5 Use a Phillips screwdriver to screw in nine M6 x 19 mm or 12 24 x 3 4 inch screws in e...

Страница 111: ...d Reference Guide OL 23069 06 Chapter 4 Installing a Cisco Nexus 7018 Chassis Installing the Chassis Figure 4 4 Attaching the Cisco Nexus 7018 Chassis to the Rack 1 Handles used to adjust the chassis placement 2 Nine M6 x 19 mm or 10 24 x 3 4 in Phillips screws used to attach each side bracket to a front mounting rail use a total of 18 screws ...

Страница 112: ...page 4 14 Prerequisites for Grounding the Chassis Before you can ground the chassis you must have a connection to the earth ground for the data center building If you installed the Cisco Nexus 7018 chassis into a bonded rack see the rack manufacturer s instructions for more information that now has a connection to the data center earth ground you can ground the chassis by connecting its ground por...

Страница 113: ...from the end of the grounding wire Step 2 Insert the stripped end of the grounding wire into the open end of the grounding lug as shown in Figure 4 5 Figure 4 5 Inserting the Grounding Wire in the Grounding Lug Step 3 Use the crimping tool to crimp the lug to the grounding wire Verify that the ground wire is securely attached to the ground lug by attempting to pull the wire out of the crimped lug ...

Страница 114: ...us 7018 Chassis Step 5 Prepare the other end of the grounding wire and connect it to an appropriate grounding point in your site to ensure an adequate earth ground for the switch If the rack is grounded connect the grounding wire as explained in the documentation provided by the vendor for the rack Connecting Your ESD Wrist Strap to the Chassis After you connect the chassis to the earth ground you...

Страница 115: ... Front of the Cisco Nexus 7018 Chassis Installing the Cable Management Frame After you have fully installed the Cisco Nexus 7018 switch chassis in the rack or cabinet see the Installing the Chassis section on page 4 7 you can install the cable management frame on the front of the chassis When you install the cable management frame you attach four cable management assemblies to the chassis and then...

Страница 116: ...ount bracket that is attached to the Cisco Nexus 7018 switch chassis and loosely fasten the assembly to the chassis with four flat head M4x10 screws as shown in Figure 4 8 Figure 4 8 Attaching a Lower Cable Management Assembly to a Rack Mount Bracket Step 2 Repeat Step 1 to attach a lower cable management assembly to the right side of the chassis 1 Lower cable management assembly 3 Position the as...

Страница 117: ...en the assembly to the chassis with four flat head M4x10 screws as shown in Figure 4 9 Figure 4 9 Attaching a Left Cable Management Assembly to a Rack Mount Bracket Step 4 Repeat Step 3 to attach an upper cable management assembly to the upper right side of the chassis When completed the chassis will appear as shown in Figure 4 10 1 Rack mount bracket 3 Position the assembly so that the two upper ...

Страница 118: ... the Rack Mount Brackets Step 5 Place the top hood 800 31269 01 on top of the two upper cable management assemblies that are already installed Make sure that the side of the top hood that is closest to the chassis has two alignment pins that align with the alignment holes in the chassis as shown in Figure 4 11 Push the top hood toward the chassis so that its alignment pins enter the alignment hole...

Страница 119: ...nce Guide OL 23069 06 Chapter 4 Installing a Cisco Nexus 7018 Chassis Installing the Cable Management Frame Figure 4 11 Positioning the Top Hood with the Upper Cable Management Assemblies and the Switch Chassis Step 6 Use four M4x8 pan head screws to loosely fasten the top hood to the chassis as shown in Figure 4 12 1 Alignment pins 2 Alignment holes ...

Страница 120: ...7 N m Step 10 Tighten each of the 18 screws that fasten the upper and lower cable management assemblies to the rack mount brackets to 11 to 15 in lb 1 2 to 1 7 N m Installing the Front Door and Air Intake Frame If you need to install the optional double hinged door and air intake frame you must install them after installing the cable management frame on the chassis Note For the double hinged door ...

Страница 121: ...the middle of the left cable management frame and fasten it with two M3x10 pan head screws as shown in Figure 4 13 Tighten these two screws to 5 to 7 in lb 0 6 to 0 8 N m Figure 4 13 Attaching the Left Door Stopper Step 2 Position the right door stopper 700 27592 01 on the middle of the right side of the cable management frame and fasten it with two M3x10 pan head screws as shown in Figure 4 14 Ti...

Страница 122: ... the Front Door and Air Intake Frame Figure 4 14 Attaching the Right Door Stopper Step 3 Position the hinge bracket 700 28491 01 at the bottom of the cable management frame and the chassis as shown in Figure 4 15 1 Right door stopper identified with an R on the bottom of the base 3 Screw holes on the right side of the cable management frame 2 Two M3x10 screws that fasten the stopper to the right s...

Страница 123: ...Reference Guide OL 23069 06 Chapter 4 Installing a Cisco Nexus 7018 Chassis Installing the Front Door and Air Intake Frame Figure 4 15 Positioning the Hinge Bracket to the Cable Management Frame and Chassis Step 4 Attach the bracket to the chassis with eight loosely fastened M4x8 screws as shown in Figure 4 16 1 Alignment pins 2 Alignment holes ...

Страница 124: ... M4x8 screws that fasten the hinge bracket to the chassis to 11 to 15 in lb 1 2 to 1 7 N m Step 6 Tighten the four M4x8 screws that fasten the hinge bracket to the cable management frame to 11 to 15 in lb 1 2 to 1 7 N m Step 7 Fasten the four ball point studs 51 5008 01 each one with a washer 49 0430 01 to the bottom portion of the chassis one stud by each corner of the air intake area as shown in...

Страница 125: ... Installing a Cisco Nexus 7018 Chassis Installing the Front Door and Air Intake Frame Figure 4 17 Fastening Ball Point Studs to the Air Intake Area Step 8 Align the air intake frame to the four ball point studs and press the frame onto the chassis as shown in Figure 4 18 The captive screws on the air intake frame should align with their screw holes in the chassis 1 Ball headed stud ...

Страница 126: ...s of the door until the handle clicks the handle clicks when you pull it about 30 degrees Step 11 Move the side of the door with the opened handle onto the two hinge pins as shown in Figure 4 19 Make sure that the top and bottom hinge pins on the hood and hinge bracket fit through the slots on the top and bottom of that side of the door Position the door so that the hinge pins are located at the e...

Страница 127: ...oor and Air Intake Frame Figure 4 19 Attaching One Side of the Door to the Chassis Step 12 While holding the door on the hinge pins with one hand use your other hand to press the locking button on the interior side of the door See Figure 4 20 This action locks the latches around the hinge pins so that you no longer need to hold the door onto the chassis 1 Double hinged door 3 Hinge pins 2 Move one...

Страница 128: ...hinge pins are not secured behind the door latch hold the door securely with one hand while opening the door handle for the unsecured side until the handle clicks press that side of the door so that the pins are positioned all the way inside the door slots press the door latch button on the interior side of the door and then make sure that the door is firmly secured to both hinge pins Step 13 Open...

Страница 129: ...e door stopper does not close the latches press the door closed at the handle until you hear the latches click Make sure that the door is fully secured to the frames on both sides Note If a hinge pin is not secured behind a door latch open the door handle for that side of the door until it clicks open that side of the door and then press the door closed so that the pins are positioned all the way ...

Страница 130: ...optionally install a card in that reader For the card to function with the reader you must make sure that it is either formatted for the reader before installing it or format it after installing it Note The LOG FLASH and EXPANSION FLASH readers require different formats for their cards To replace an installed CompactFlash card see the Replacing a CompactFlash Card section on page 9 41 To install a...

Страница 131: ...lot0 online If you see an offline message or do not see a message either the card is not fully pushed into the reader or it is improperly formatted switch 2008 Dec 1 12 00 00 switch VDC 1 IDEHSD 2 UMOUNT logflash offline Make sure that the card is fully inserted inside the reader If the card is fully inserted either format the card see the Cisco NX OS Fundamentals Configuration Guide or replace th...

Страница 132: ...n t s t o n ex u s 7 k d o c f e e d b a ck c i sc o co m 4 32 Cisco Nexus 7000 Series Hardware Installation and Reference Guide OL 23069 06 Chapter 4 Installing a Cisco Nexus 7018 Chassis Installing and Formatting CompactFlash Cards ...

Страница 133: ...t to DC Power Sources page 5 5 Installing Power Supply Units You can install up to two power supply units in the Cisco Nexus 7009 chassis up to three power supply units in the Cisco Nexus 7010 chassis and up to four power supply units in the Cisco Nexus 7018 chassis In each type of chassis you must fill each power supply bay with one of the following to maintain the designed airflow for the chassi...

Страница 134: ...onnecting an AC Power Supply Unit to AC Power Sources section on page 5 2 If you are installing a DC power supply unit you must ground the power supply unit before connecting it to the DC power source To ground the DC power supply unit see the Grounding a 6 kW DC Power Supply Unit section on page 5 5 Connecting an AC Power Supply Unit to AC Power Sources If you are powering your Cisco Nexus 7000 S...

Страница 135: ...20 V AC circuits For 7 5 kW power supply units you must have one or two 30 A rated 220 V AC circuits You should connect each power supply input to a dedicated branch circuit For North American installations the 6 kW power supply unit requires one or two 20 A circuits and the 7 5 kW power supply unit requires one or two 30 A circuits For international installations circuits must be sized by local a...

Страница 136: ... The Input and Output LEDs for the connected power supply units should be green and the Fault LED should be off Connecting a 7 5 kW AC Power Supply Unit to AC Power Sources To connect a 7 5 kW AC power supply unit to one or more AC power sources follow these steps Step 1 Ensure that the power supply switch located on the front of the power supply is set at STBY Step 2 Plug each power cable into se...

Страница 137: ...tly to DC Power Sources page 5 7 Connecting a Power Supply Unit to DC Power Sources though a Power Interface Unit page 5 11 Grounding a 6 kW DC Power Supply Unit After you have mounted a 6 kW DC power supply unit in a Cisco Nexus 7000 Series chassis you must ground the power supply unit to the earth ground before connecting it to the DC power source You ground this power supply unit by connecting ...

Страница 138: ...lug Connecting a DC Power Supply Unit to the Earth Ground Warning Installation of the equipment must comply with local and national electrical codes Statement 1074 To connect the system ground to the data center earth ground follow these steps Step 1 Use a wire stripping tool to remove approximately 0 75 inch 19 mm of the covering from the end of the grounding wire Step 2 Insert the stripped end o...

Страница 139: ...th ground for the power supply unit To connect the power supply unit to a DC power source see the Connecting a DC Power Supply Unit to DC Power Sources section on page 5 5 Connecting a DC Power Supply Unit Directly to DC Power Sources Warning Before performing any of the following procedures ensure that power is removed from the DC circuit Statement 1003 Warning Installation of the equipment must ...

Страница 140: ...nnect two isolated inputs through one plug to the power supply unit see Figure 5 3 For 6 kW of power you connect four isolated inputs through two plugs to the power supply unit see Figure 5 4 For 3 kW of power with input source redundancy you connect the two plugs each connected to a different DC power grid see Figure 5 5 Figure 5 3 Connecting DC Power to a 3 kW DC Power Supply Unit Figure 5 4 Con...

Страница 141: ...ion on page 5 11 Note The power cables required for each DC power supply unit are shipped with the DC power supply unit If you do not have the correct cables contact Cisco TAC Warning Read the installation instructions before connecting the system to the power source Statement 1004 To connect the DC power supply unit directly to DC power sources follow these steps Step 1 Turn the power switch to s...

Страница 142: ...cts two fully isolated 1 5 kW input modules to a DC power supply for 3 kW of power Depending on your power requirements connect the cables as follows For 3 kW of output power use one set of four cables and connect its two fully isolated input modules to the DC power grid see Figure 5 3 on page 5 8 For 6 kW of output power use two sets of four cables and connect their fully isolated input modules t...

Страница 143: ...wo with the 4 6 meter power cable To connect a DC power supply unit to a distant DC power source you must connect two or four sets of isolated inputs from the DC power grid to two or four sets of contacts on the PIU and connect the matching sets of contacts on the PIU with the DC power source using another power cable For 3 kW of output power from the power supply unit you connect two isolated inp...

Страница 144: ...ces Figure 5 7 Connecting DC Power to a 6 kW DC Power Supply Unit Figure 5 8 Connecting DC Power to a 3 kW DC Power Supply Unit with 3 kW Power Redundancy 1 DC power grid 4 DC power supply unit 2 Isolated inputs from DC power grid 5 Two plugs each with two isolated inputs from the DC power grid 3 PIU 1 Separate DC power grids 4 DC power supply unit 2 Isolated inputs from DC power grid 5 Two plugs ...

Страница 145: ...wire This wire should be sized to meet local and national installation requirements For U S installations you must provide a 6 AWG copper conductor For installations outside the U S consult your local and national electrical codes The length of the grounding wire depends on the proximity of the switch to proper grounding facilities You must supply this wire Wire stripping tool to remove the insula...

Страница 146: ...IU on a rack so that you can connect it to the power supply unit with the supplied 4 6 meter 15 foot power cable Make sure that the PIU is level and its mounting holes align to holes in the mounting rails on the rack Step 3 Fasten the PIU to the rack using four M6 x 19 mm screws or four 12 24 x 3 4 inch screws as shown in Figure 5 10 Tighten each screw to 40 in lb 4 5 N m 1 Positioned at the front...

Страница 147: ...e 6 AWG grounding wire that you provide Step 3 Insert the stripped end of the grounding wire into the open end of the grounding lug as shown in Figure 5 1 on page 5 6 Step 4 Use the crimping tool to crimp the lug to the 6 AWG grounding wire Verify that the grounding wire is securely attached to the grounding lug by attempting to pull the wire out of the crimped lug Step 5 Secure the grounding lug ...

Страница 148: ...t the power supply unit and the PIU are located so that you can connect them with a 4 6 meter 15 foot power cable Note The power cables required for each DC power supply unit are shipped with the DC power supply unit If you do not have the correct cables contact Cisco TAC Warning Read the installation instructions before connecting the system to the power source Statement 1004 To connect the DC po...

Страница 149: ... Be sure uninsulated conductors are not accessible when cover is in place Statement 1075 Step 4 Insert the plug end of one or two power cables Cisco part number N7K DC CAB to the power receptacles on the DC power supply unit as follows For 3 kW output power connect one power cable to the power supply unit For 6 kW output power connect two power cables to the power supply unit For 3 kW output power...

Страница 150: ...If you are using two power cables connect each power cable to the same or separate power sources as follows For 6 kW of output power you can connect the cables to the same power source For 3 kW of output power and 3 kW redundancy connect each cable to a separate power source Note Be sure to consistently use one input color for negative connections and another input color for positive connections S...

Страница 151: ...er the connections and snap it into place see callout 4 in Figure 5 13 Step 10 Turn on the power for the power source Step 11 Turn the power switch on the DC power supply unit from STBY to ON The LEDs should flash and the input LEDS should turn on as follows If you are outputting 3 kW of power either Input 1 and Input 2 LEDs will turn green or the Input 3 and Input 4 LEDs will turn green If you ar...

Страница 152: ...n t s t o n ex u s 7 k d o c f e e d b a ck c i sc o co m 5 20 Cisco Nexus 7000 Series Hardware Installation and Reference Guide OL 23069 06 Chapter 5 Installing Power Supply Units Connecting a DC Power Supply Unit to DC Power Sources ...

Страница 153: ...sole page 6 2 Creating an Initial Switch Configuration page 6 3 Setting Up the Management Interface page 6 4 Connecting the Supervisor CMP Port page 6 5 Connecting an I O Module page 6 5 Preparing for Connections When preparing your site for network connections to the Cisco Nexus 7000 Series switch consider the following for each type of interface Cabling required for each interface type Distance ...

Страница 154: ...serial port on each Cisco Nexus 7000 Series supervisor module and a console device capable of asynchronous transmission such as a computer terminal On the supervisor modules you use one of the following two asynchronous serial ports CONSOLE SERIAL PORT This port is used for direct connections to the console COM1 AUX SERIAL PORT This port is used for modem connections to the console Note Before you...

Страница 155: ...ept the IP address You can perform the other configurations at a later time as described in the Cisco Nexus 7000 Series NX OS Fundamentals Configuration Guide Release 6 x Before you perform the initial switch configuration you must determine the IP address and netmask needed for the following interfaces Management Mgmt0 interface Connectivity management processor CMP for the supervisor module in c...

Страница 156: ... enter the same password the software accepts the password and begins asking a series of configuration questions Step 4 Until you are asked for an IP address you can enter the default configuration for each question Repeat this step for each question until you are asked for the Mgmt0 IPv4 address Step 5 Enter the IP address for the management interface The software asks for the Mgmt0 IPv4 netmask ...

Страница 157: ...ight processor that provides a second network interface to the system for use even when the Control Processor CP is not reachable You can access the CMP to perform operations such as taking over the CP console restarting the CP or restarting a particular I O module Caution To prevent an IP address conflict do not connect the CMP MGMT 10 100 1000 Ethernet port to the network until the initial confi...

Страница 158: ...ype 48 port 10 100 1000 Ethernet N7K M148GT 11 1000BASE T RJ 45 Copper 48 port 10 100 1000 Ethernet N7K M148GT 11L 1000BASE T RJ 45 Copper 48 port 1 Gigabit Ethernet N7K M148GS 11 SFP 1000BASE T CWDM SFP xxxx DWDM SFP xxxx GLC BX D GLC BX U GLC LH SM GLC LH SMD GLC SX MM GLC SX MMD GLC ZX SM SFP GE L SFP GE S SFP GE Z GLC T SFP GE T Fiber optic Copper 48 port 1 Gigabit Ethernet XL N7K M148GS 11L S...

Страница 159: ... H10GB CU3M SFP H10GB CU5M SFP H10GB ACU7M SFP H10GB ACU10M CWDM SFP xxxx DWDM SFP xxxx GLC BX D GLC BX U GLC LH SM GLC SX MM GLC T GLC ZX SM SFP GE L SFP GE S SFP GE T SFP GE Z Fiber optic Fiber optic 32 port 10 Gigabit Ethernet N7K M132XP 12 SFP FET 10G1 SFP 10G ER SFP 10G LR SFP 10G SR SFP 10GB ACUxM2 Fiber optic Copper 32 port 10 Gigabit Ethernet XL N7K M132XP 12L SFP FET 10G1 SFP 10G ER SFP 1...

Страница 160: ...rk You can connect a copper network interface cable with an RJ 45 connector to a port on a 48 port 10 100 1000 Ethernet I O module N7K M148GT 11 and N7K M148GT 11L 32 port 1 10 Gigabit Ethernet N7K F132XP 15 SFP 1000BASE T SFP GLC LH SM GLC LH SMD GLC SX MM GLC SX MMD GLC ZX SM SFP GE L SFP GE S SFP GE Z GLC T SFP GE T SFP 10G LR2 SFP 10G LRM SFP 10G SR SFP H10GB CUxM2 SFP H10GB ACUxM Fiber optic ...

Страница 161: ...emove the cable from the switch pull it out of the cable management slot Connecting or Disconnecting an SFP SFP or X2 Port Depending on the I O module model that you are using you can use SFP SFP or X2 transceivers Some of these transceivers work with fiber optic cables that you attach to the transceivers and other transceivers work with preattached copper cables When installing fiber optic cables...

Страница 162: ...ct two optical cables to the installed transceiver see the Connecting a Fiber Optic Cable to a Transceiver section on page 6 11 Note If you cannot install the cable into the transceiver insert or leave the dust plug in the cable end of the transceiver Removing a Transceiver To remove a transceiver follow these steps Step 1 Attach an ESD preventative wrist strap and follow its instructions for use ...

Страница 163: ...transceiver follow these steps Step 1 Attach an ESD preventative wrist strap and follow its instructions for use Step 2 Remove the dust cover from the port connector on the cable Step 3 Remove the dust cover from the cable end of the transceiver Step 4 Align the cable connector with the transceiver and insert the connector into the transceiver until it clicks into place see Figure 6 1 for SFP or S...

Страница 164: ...ght is increased by contamination and should be below 0 35 dB Consider the following maintenance guidelines Transceivers are static sensitive To prevent ESD damage wear an ESD preventative wrist strap that is connected to the grounded chassis Do not remove and insert a transceiver more often than is necessary Repeated removals and insertions can shorten its useful life Keep all optical connections...

Страница 165: ...g the Status of a Module page 7 19 Checking the State of a Module page 7 20 Connecting to a Module page 7 21 Accessing an I O Module Through the Console page 7 22 Shutting Down Modules page 7 23 Information About Module Temperature page 7 23 Displaying Environment Information page 7 25 Reloading Modules page 7 28 Saving the Module Configuration page 7 29 Purging the Module Configuration page 7 29 ...

Страница 166: ...108X2 12L VID 0 SN JAF1333AAJR NAME Slot 7 DESCR 1000 Mbps Optical Ethernet Module PID N7K M148GS 11 VID V02 SN JAF1409APRB NAME Slot 8 DESCR 1 10 Gbps Ethernet Module PID N7K F132XP 15 VID V01 SN JAF1424CFJR NAME Slot 9 DESCR 1 10 Gbps Ethernet Module PID N7K F132XP 15 VID V01 SN JAF1321ANHP NAME Slot 10 DESCR Fabric card module PID N7K C7009 FAB 2 VID V01 SN JAF1448ARHJ NAME Slot 11 DESCR Fabric...

Страница 167: ... 5 0 2 system version 5 0 2 BIOS compile time 03 31 09 kickstart image file is bootflash n7000 s1 kickstart 5 0 2 bin S19 kickstart compile time 12 25 2020 12 00 00 03 04 2010 19 45 32 system image file is bootflash n7000 s1 dk9 5 0 2 bin S19 system compile time 2 7 2010 3 00 00 03 04 2010 20 32 24 Hardware cisco Nexus7000 C7010 10 Slot Chassis Supervisor module 1X Intel R Xeon R CPU with 4135780 ...

Страница 168: ...pty Module2 ok Module type is 10 100 1000 Mbps Ethernet Module 1 submodules are present Model number is N7K M148GT 11 H W version is 1 3 Part Number is 73 10098 12 Part Revision is A0 Manufacture Date is Year 13 Week 6 Serial number is JAF1306AAFP CLEI code is COUIAW3CAA Module3 ok Module type is 10 100 1000 Mbps Ethernet Module 1 submodules are present Model number is N7K M148GT 11 H W version is...

Страница 169: ...ion is 1 5 Part Number is 73 10899 09 Part Revision is B1 Manufacture Date is Year 13 Week 7 Serial number is JAF1307ALCB CLEI code is COUIAWGCAA Module8 empty Module9 ok Module type is 1000 Mbps Optical Ethernet Module 1 submodules are present Model number is N7K M148GS 11 H W version is 1 2 Part Number is 73 11584 05 Part Revision is A0 Manufacture Date is Year 13 Week 11 Serial number is JAF131...

Страница 170: ...is JAF1309ACAT CLEI code is COUCAGVCAA Xbar5 ok Module type is Fabric card module 0 submodules are present Model number is N7K C7010 FAB 1 H W version is 1 0 Part Number is 73 10624 04 Part Revision is C0 Manufacture Date is Year 13 Week 6 Serial number is JAF1306ANKF CLEI code is COUCAGVCAA Chassis has 3 PowerSupply Slots PS1 ok Power supply type is 6000 00W 220v AC Model number is N7K AC 6 0KW H...

Страница 171: ...6 Serial number is FOX1306X03U CLEI code is COM8210ARA Fan3 fab_fan1 ok Model number is N7K C7010 FAN F H W version is 1 1 Part Number is 73 10967 02 Part Revision is B0 Manufacture Date is Year 12 Week 41 Serial number is FOX1241XA6Q CLEI code is IPEQABAEAA Fan4 fab_fan2 ok Model number is N7K C7010 FAN F H W version is 1 1 Part Number is 73 10967 02 Part Revision is B0 Manufacture Date is Year 1...

Страница 172: ...ture Bits 0x0 HW Changes Bits 0x0 Stackmib OID 0 MAC Addresses 00 1b 54 c2 1e 00 Number of MACs 128 OEM Enterprise 9 OEM MIB Offset 5 MAX Connector Power 0 WWN software module specific block Block Signature 0x6005 Block Version 1 Block Length 0 Block Checksum 0x66 wwn usage bits 00 00 00 00 00 00 00 00 00 00 00 00 00 00 00 00 00 00 00 00 00 00 00 00 00 00 00 00 00 00 00 00 00 00 00 00 00 00 00 00 ...

Страница 173: ...ple 7 4 This command shows the power usage for many of the modules in the switch For the older modules that do not have the capability to output this information the output is shown as N A Note In a Cisco Nexus 7000 Series switch power usage is reserved for both supervisor modules regardless of whether one or both supervisor modules are present Example 7 4 Displaying Power Management Information s...

Страница 174: ...r to provide power redundancy when there is a power loss Combined mode Provides the maximum amount of available power by utilizing the combined power output from all installed power supply units for switch operations This mode does not provide redundancy Power supply redundancy mode Allows you to replace a power supply during switch operations All power supply units are active The available power ...

Страница 175: ... supply units see Table 7 2 Table 7 1 Power Availability for 6 kW Power Supply Units Power Inputs Combined Mode Power Supply Redundancy Mode Input Source Redundancy Mode Full Redundancy Mode Dual inputs per power supply unit 220 V and 220 V inputs 1 power supply unit 6000 W 3000 W 2 power supply units 12 000 W 6000 W 6000 W 6000 W 3 power supply units 18 000 W 12 000 W 9000 W 9000 W 220 V and 110 ...

Страница 176: ... Availability for 7 5 kW Power Supply Units Power Inputs Combined Mode Power Supply Redundancy Mode Input Source Redundancy Mode Full Redundancy Mode Dual inputs per power supply unit 220 V and 220 V inputs 1 power supply unit 7500 W 3750 W 2 power supply units 15 000 W 7500 W 7500 W 7500 W 3 power supply units 22 500 W 15 000 W 11 250 W 11 250 W 4 power supply units 30 000 W 22 500 W 15 000 W 15 ...

Страница 177: ...ent is 8 784 kW The following two scenarios explain what happens for different numbers of power supply units that you install Scenario 1 If you do not add a power supply unit the available power 6 kW is insufficient for the switch power requirement so the switch powers the supervisor modules fabric modules and fan trays before powering as many I O modules as the remaining available power can suppo...

Страница 178: ...puts 3 kW the reserve power remains 6 kW and available power becomes 6 kW The available power is still insufficient because it does not meet the switch power requirement so you can power more modules than you could with Scenario 1 but you still cannot power the entire switch Scenario 3 If you add a power supply unit that outputs 7 5 kW the reserve power becomes 7 5 kW and the available power becom...

Страница 179: ... the switch usage requirement so you cannot power the entire switch Scenario 2 If you add a power supply that outputs 3 kW the reserve power is 9 kW 3 kW for three power supply units and the available power is 6 kW 3 kW for each of two power supply units The available power does not meet the system usage requirement so you cannot power the entire switch Scenario 3 If you add a power supply unit th...

Страница 180: ...h Scenario 2 If you add a 3 kW power supply unit the reserve power is 9 kW 3 kW for three power supply units on one grid and the available power is 6 kW 3 kW for two power supply units on a second grid The available power does not meet the switch usage requirement so you cannot power up the entire switch Scenario 3 If you add a 6 kW power supply unit the reserve power is 9 kW 3 kW for three power ...

Страница 181: ...ent the standby supervisor automatically becomes active To understand the terms used for the supervisors see Table 7 7 Supervisor modules are automatically powered up and started with the switch Table 7 6 Full Redundancy Mode Scenarios Scenario Power Supply 1 kW Power Supply 2 kW Power Supply 3 kW System Usage kW Input Source Mode Power Supply Mode Result Available Power kW Reserve Power kW Availa...

Страница 182: ... slot 2 Cisco Nexus 7010 sup 1 refers to the supervisor module in slot 5 sub 2 refers to the supervisor module in slot 6 Cisco Nexus 7018 sup 1 refers to the supervisor module in slot 9 sup 2 refers to the supervisor module in slot 10 sup active and sup standby Relative usage Cisco Nexus 7009 7010 and Cisco Nexus 7018 sup active refers to the active supervisor module relative to the slot that cont...

Страница 183: ...Nexus 7009 chassis uses the Series 2 N7K C7009 FAB 2 fabric modules Cisco Nexus 7010 chassis uses the Series 1 N7K C7010 FAB 1 or Series 2 N7K C7010 FAB 2 fabric modules Cisco Nexus 7018 chassis uses the Series 1 N7K C7018 FAB 1 or Series 2 N7K C7018 FAB 2 fabric modules Note You can replace a Series 1 fabric module with a Series 2 module in the Cisco Nexus 7010 and 7018 switches during operations...

Страница 184: ...92 88 to 00 24 f7 18 92 90 JAF1309AEFE 7 00 24 98 e9 29 60 to 00 24 98 e9 29 84 JAF1307ALCB 9 00 24 f7 1c d5 50 to 00 24 f7 1c d5 84 JAF1311AEMM Mod Online Diag Status 2 Pass 3 Pass 4 Pass 5 Pass 6 Pass 7 Pass 9 Pass switch The Status column in the output should display an ok status for switching modules and an active or standby or HA standby status for supervisor modules If the status is either o...

Страница 185: ...hardware has electrical power When the hardware is powered up the software begins booting testing The switching module has established connection with the supervisor and the switching module is performing bootup diagnostics initializing The diagnostics have completed successfully and the configuration is being downloaded failure The switch detects a switching module failure upon initialization and...

Страница 186: ... a slot number of 1 to 8 or 11 to 18 SUMMARY STEPS 1 attach console module slot_number DETAILED STEPS Command Purpose Step 1 attach module slot_number Example switch attach module 6 switch standby Provides direct access to the specified module in this example the standby supervisor module is in slot 6 Step 2 dir bootflash Example switch dir bootflash 80667580 Feb 21 22 04 59 2008 is855 S7 22168064...

Страница 187: ...utdown of a fabric module use the out of service xbar command to specify the fabric slot with that module as follows switch out of service xbar slot Information About Module Temperature This section includes the following topics Overview of Module Temperatures page 7 23 Displaying the Module Temperature page 7 24 Overview of Module Temperatures Built in automatic sensors are provided in all switch...

Страница 188: ...ages as configured Tip We recommend that you install dual supervisor modules If you are using a Cisco Nexus 7000 Series switch without dual supervisor modules we recommend that you immediately replace the fan module if just one fan is not working Note A threshold value of 127 indicates that no thresholds are configured or applicable Displaying the Module Temperature You can display temperature rea...

Страница 189: ...05 56 Ok 5 QEng1Sn4 s13 115 105 57 Ok xbar 1 Outlet s1 125 125 38 Ok xbar 1 Intake s2 60 42 32 Ok xbar 1 Crossbar s3 105 95 56 Ok xbar 2 Outlet s1 125 125 39 Ok xbar 2 Intake s2 62 42 31 Ok xbar 2 Crossbar s3 105 95 56 Ok switch Displaying Environment Information You can display all of the environment related switch information by using the show environment command See Example 7 7 Example 7 7 Disp...

Страница 190: ...115 105 44 Ok 3 QEng1Sn4 s21 115 105 43 Ok 3 L2Lookup s22 120 110 44 Ok 3 L3Lookup s23 120 110 50 Ok 4 Crossbar s5 105 95 44 Ok 4 CTSdev4 s9 115 105 56 Ok 4 CTSdev5 s10 115 105 54 Ok 4 CTSdev7 s12 115 105 54 Ok 4 CTSdev9 s14 115 105 51 Ok 4 CTSdev10 s15 115 105 51 Ok 4 CTSdev11 s16 115 105 48 Ok 4 CTSdev12 s17 115 105 47 Ok 4 QEng1Sn1 s18 115 105 49 Ok 4 QEng1Sn2 s19 115 105 48 Ok 4 QEng1Sn3 s20 1...

Страница 191: ...k 9 QEng1Sn2 s19 115 105 54 Ok 9 QEng1Sn3 s20 115 105 52 Ok 9 QEng1Sn4 s21 115 105 51 Ok 9 L2Lookup s22 120 110 52 Ok 9 L3Lookup s23 120 110 60 Ok xbar 1 Intake s2 60 42 27 Ok xbar 1 Crossbar s3 105 95 59 Ok xbar 2 Intake s2 60 42 26 Ok xbar 2 Crossbar s3 105 95 50 Ok xbar 3 Intake s2 60 42 26 Ok xbar 3 Crossbar s3 105 95 54 Ok xbar 4 Intake s2 60 42 26 Ok xbar 4 Crossbar s3 105 95 53 Ok xbar 5 In...

Страница 192: ...2259 W Total Power Allocated budget 4750 W Total Power Available for additional modules 4250 W switch Reloading Modules You can reload the entire switch reset specific modules in the switch or reload the image on specific modules in the switch This section includes the following topics Reloading the Switch page 7 28 Power Cycling Modules page 7 28 Reloading the Switch To reload the switch use the ...

Страница 193: ...ule was in that slot some parts of the configuration may have been stored in the running configuration and cannot be reused for example IP addresses unless you clear that from the running configuration For example suppose you create an IP storage configuration with a 48 port 10 100 1000 Ethernet I O module in slot 3 in Switch A This module uses an IP address You decide to remove this I O module an...

Страница 194: ...s are in the first n fabric module slots where n is the new maximum number of fabric modules For example if you are limiting the maximum number of fabric modules to 4 you must make sure that the four powered on fabric modules are in fabric slots 1 through 4 Note If you are powering on more fabric modules than allowed by the current maximum number of fabric modules then make sure that the fabric mo...

Страница 195: ...umber of fabric modules you must make sure that the fabric modules that you are using are in slots 1 through 4 Also make sure that any empty fabric module slots have blank modules installed in them Make sure that each of the installed fabric modules is powered up by using the power fabric slot_number command see the Powering Fabric Modules Off or On section on page 7 30 Power down the unused slots...

Страница 196: ...in the remaining system fan tray increase their speeds as needed for the current temperature until you replace the missing fan tray Cisco Nexus 7010 Series fabric fan tray The fan in the remaining fabric fan tray increases its speed to the maximum speed until you replace the missing fabric fan tray Cisco Nexus 7018 Series fan tray If you do not replace the fan tray within three minutes the system ...

Страница 197: ...S1 Ok Fan_in_PS2 Ok Fan Air Filter Absent switch Example 7 9 Displaying Fan Information for a Cisco Nexus 7010 Series Chassis switch show environment fan Fan Fan Model Hw Status ChassisFan1 N7K C7010 FAN S 0 410 Ok ChassisFan2 N7K C7010 FAN S 0 410 Ok ChassisFan3 N7K C7010 FAN F 0 209 Ok ChassisFan4 N7K C7010 FAN F 0 209 Ok Fan_in_PS1 Ok Fan_in_PS2 Ok Fan_in_PS3 Ok Fan Air Filter Absent switch Exa...

Страница 198: ...LDs field programmable gate arrays FPGAs and complex programmable logic devices CPLDs but they do not include ASICs In this document the term EPLD is used for FPGA and CPLDs The advantage of having EPLDs for some module functions is that when you need to upgrade those functions you just upgrade their software images instead of replacing their hardware Note EPLD image upgrades for an I O module dis...

Страница 199: ... to upgrade EPLD images however when new EPLD images are available the upgrades are always recommended if your network environment allows for a maintenance period in which some level of traffic disruption is acceptable If such a disruption is not acceptable at this time then you might consider postponing the upgrade until a better time Table 7 10 provides high level guidelines to help network admi...

Страница 200: ...for CSCsu50821 Cisco Nexus 7018 Required for CSCsq28232 and CSCsu50821 48 port 10 100 1000 Ethernet I O modules N7K M148GT 11 Cisco Nexus 7010 Required for CSCsq97271 CSCsr42519 and CSCsr44846 Cisco Nexus 7018 Required for CSCsq28232 CSCsq97271 CSCsr42519 and CSCsr44846 Moving 32 port 10 Gigabit Ethernet I O modules from a Cisco Nexus 7010 switch to a Cisco Nexus 7018 switch 32 port 10 Gigabit Eth...

Страница 201: ...se 4 1 2 was not performed Supervisor modules N7K SUP1 Cisco Nexus 7010 Required for CSCsr03766 and to fix a kernel booting failure Cisco Nexus 7018 Required for CSCsq28232 CSCsr03766 CSCsu55410 and to fix a kernel booting problem 48 port 10 100 1000 Ethernet I O modules N7K M148GT 11 Cisco Nexus 7010 Required for CSCsq97271 CSCsr42519 and CSCsr44846 Cisco Nexus 7018 Required for CSCsq28232 CSCsq9...

Страница 202: ...a bundle of EPLD upgrades To see the updated EPLD versions for each release see Table 7 11 Table 7 11 EPLD Upgrades for Cisco NX OS Releases Module Type Release EPLD Device 4 0 x 4 1 2 4 2 4 4 2 6 5 0 2 5 0 3 5 1 1 5 2 1 6 0 1 Supervisor module N7K SUP1 Power Manager IO INBAND Local Bus and CPLD CMP CPLD 3 6 3 25 1 7 2 1 6 0 3 7 3 26 3 0 3 009 3 028 1 008 48 port 10 100 1000 Ethernet I O module N7...

Страница 203: ... N A1 N A1 N A1 N A1 N A1 N A1 N A1 N A1 N A1 N A1 N A1 N A1 N A1 N A1 N A1 4 008 2 006 2 004 1 006 2 007 Fabric 1 module Cisco Nexus 7010 N7K C7010 FAB1 Power Manager 2 8 2 9 2 010 Fabric 1 module Cisco Nexus 7018 N7K C7018 FAB1 Power Manager N A1 1 1 1 2 1 003 Fabric 2 module Cisco Nexus 7009 N7K C7009 FAB2 Power Manager N A1 N A1 N A1 N A1 N A1 N A1 N A1 1 003 Fabric 2 module Cisco Nexus 7010 N...

Страница 204: ...rver To download the EPLD images follow these steps Step 1 From a browser go to the following URL http www cisco com The browser will display the Cisco web site Step 2 From the Products Services tab choose Switches The Switches page opens Step 3 In the Data Center area click the arrow next to View Products The page lists the Data Center products Step 4 Click Nexus 7000 The Cisco Nexus 7000 Series ...

Страница 205: ...e As dialog box appears Step 14 Indicate where to save the Tar file and click Save The Tar file saves to the location that you specified You are ready to prepare the EPLD images for Installation see the Preparing the EPLD Images for Installation section on page 7 43 EPLD Images Needed for vPCs The virtual port channel vPC feature is available beginning with Cisco NX OS Release 4 1 3 When you enabl...

Страница 206: ...disruptive operation You should execute this operation only at a programmed maintenance time The system kickstart ISSU upgrade is a nondisruptive upgrade If you are working with an N7K M132XP 12 module that was shipped before July 2011 you might need to upgrade the EPLD version To determine the EPLD version for all N7K M132XP 12 and N7K M132XP 12L modules enter the show version module module_id ep...

Страница 207: ... upgrade the active supervisor but this will disrupt its operations during the upgrade If you interrupt an upgrade you must upgrade the module that is being upgraded again The upgrade process disrupts traffic on the targeted module Do not insert or remove any modules while an EPLD upgrade is in progress Preparing the EPLD Images for Installation Before you can update the EPLD images for each of yo...

Страница 208: ...7000 s1 kickstart 6 0 1 bin Usage for bootflash sup local 542175232 bytes used 1296683008 bytes free 1838858240 bytes total switch show module Mod Ports Module Type Model Status 6 8 10 Gbps Ethernet XL Module N7K M108X2 12L ok 7 48 1 10 Gbps Ethernet Modul N7K F248XP 24 ok 8 48 1000 Mbps Optical Ethernet XL Mo N7K M148GS 11L ok 9 0 Supervisor module 1X N7K SUP1 ha standby 10 0 Supervisor module 1X...

Страница 209: ...lot0 memory in the active supervisor module The following example shows how to copy from the FTP server to the bootflash memory switch copy ftp 10 1 7 2 n7000 s1 epld 6 0 1 img bootflash n7000 s1 epld 6 0 1 img Step 6 Copy the EPLD image to the standby supervisor switch copy bootflash n7000 s1 epld 6 0 1 img bootflash sup standby n7000 s1 epld 6 0 1 img You are ready to upgrade the EPLD images see...

Страница 210: ...mages for all of the I O and supervisor modules and the fan tray module in fan tray slot 1 switch install all epld bootflash n7000 s1 epld 6 0 1 img parallel module all fan module 1 For Release 4 0 2 or earlier releases if you updated the power management EPLD image you must reset the power for the module so that EPLD can take effect this action is not required for Release 4 0 3 or later releases ...

Страница 211: ...ower for the module or switch To confirm the EPLD upgrades see the Verifying the EPLD Upgrades section on page 7 47 Verifying the EPLD Upgrades You can verify the EPLD upgrades for each slot in the switch by using the commands listed in Table 7 14 This example shows how to verify the EPLD images for the Cisco Nexus 7018 supervisor module in slot 9 switch show version module 9 epld This example sho...

Страница 212: ...hernet Module Forwarding Engine 1 006 10 Gbps Ethernet Module FE Bridge 186 008 10 Gbps Ethernet Module Linksec Engine 2 007 1000 Mbps Optical Ethernet Module Power Manager 4 008 1000 Mbps Optical Ethernet Module IO 1 006 1000 Mbps Optical Ethernet Module Forwarding Engine 1 006 1000 Mbps Optical Ethernet Module SFP 1 004 Fabric Module 2 Power Manager 1 003 Fabric Module 2 Power Manager 1 003 Fan ...

Страница 213: ...o Nexus 7000 Series Hardware Installation and Reference Guide OL 23069 06 Chapter 7 Managing the Switch Hardware Default Settings Default Settings Table 7 15 lists the default hardware settings bv Table 7 15 Default Hardware Parameters Parameters Default Power supply mode Power supply redundancy mode ...

Страница 214: ...u m e n t c o m m en t s t o n ex u s 7 k d o c f e e d b a ck c i sc o co m 7 50 Cisco Nexus 7000 Series Hardware Installation and Reference Guide OL 23069 06 Chapter 7 Managing the Switch Hardware Default Settings ...

Страница 215: ...bric modules and I O modules During the startup phase the STATUS LEDs on the supervisor and I O modules are amber to indicate that the initialization process is in progress When the system is operational the component LEDs indicate that either the system is operational or you need to troubleshoot for system problems The key to troubleshooting the system is to isolate a problem to a specific system...

Страница 216: ...least one fan in the tray is running at a slow speed or not running If the LED is not lit no power is going to the fan tray Step 2 Check if the power supply units are providing power to the chassis components The Output LED on each power supply unit should be lit and green Step 3 Make sure that the fan tray is properly seated in the chassis by following these steps a Loosen the captive screws on t...

Страница 217: ...ply bay by performing the following steps a Turn the power switch to STBY b Loosen the four captive screws on the power supply unit so that they are no longer in contact with the chassis c Pull the power supply unit part way out of the chassis and then push it back into the power supply bay Make sure that the captive screws on the power supply unit align with their holes in the chassis d Tighten t...

Страница 218: ...DC circuit by manually shutting it down at the circuit breaker Warning Before performing any of the following procedures ensure that power is removed from the DC circuit Statement 1003 c Verify that the power cord is securely connected to the DC source or the DC power interface unit PIU Warning Hazardous voltage or energy may be present on DC power terminals Always replace cover when terminals are...

Страница 219: ... removed from the DC circuit Statement 1003 c Loosen the four captive screws on the power supply unit so that they are no longer in contact with the chassis d Pull the power supply unit part way out of the chassis and then push it back into the power supply bay Make sure that the captive screws on the power supply unit align with their holes in the chassis e Tighten the four captive screws to 8 in...

Страница 220: ...a minor amber or critical flashing red overtemperature condition exists Contact TAC for assistance see the Contacting Customer Service section on page 8 8 If the STATUS LED is red the initialization process detected a parity error condition Contact TAC for assistance see the Contacting Customer Service section on page 8 8 Step 2 If the STATUS and CMP STATUS LEDs are unlit check the module seating ...

Страница 221: ...he fabric module is properly seated in the chassis as follows a Loosen the captive screws on the fabric module until they are no longer in the chassis b Press the eject buttons on either end of the module and simultaneously rotate out both ejector levers until the module is unseated from the midplane c Place one hand on the module handle and pull the module part way out of the chassis d Push the m...

Страница 222: ...the chassis until it is seated on the midplane f Simultaneously rotate both ejector levers to the front of the module to fully seat the module g Make sure that each of the captive screws on the module is aligned with its holes in the chassis h Securely tighten each captive screw to 8 in lb 0 9 N m to the chassis Step 4 Contact TAC for assistance see the Contacting Customer Service section on page ...

Страница 223: ...exus 7010 System Fan Tray During Operations page 9 38 Replacing a Cisco Nexus 7010 Fabric Fan Tray During System Operations page 9 39 Replacing a Cisco Nexus 7018 Fan Tray During System Operations page 9 40 Replacing a CompactFlash Card page 9 41 Replacing the Front Doors and Frame Assembly on the Cisco Nexus 7010 Chassis page 9 42 Replacing the Cable Management Frame on the Cisco Nexus 7018 Chass...

Страница 224: ...ns page 9 2 Installing an AC Power Supply Unit During Operations page 9 6 Required Tools Before you replace an AC power supply unit make sure that you have the following tools and equipment Number 1 Phillips screwdriver with torque capability Shipping materials Antistatic mat Replacement AC power supply unit Caution When you handle the Cisco Nexus 7000 Series components you must follow ESD protoco...

Страница 225: ...are no longer in contact with the chassis Step 5 With one hand on the handle of the power supply unit pull the unit part way out of the chassis Step 6 Place your other hand underneath the power supply unit to support its weight and then pull the unit fully out of the chassis Step 7 Place the power supply unit on an antistatic mat or repack it in its original shipping materials To repack a 6 kW AC ...

Страница 226: ... Power Supply Unit During Operations 1 Open the box 5 Insert a foam cushion onto the top of the power supply unit 2 Insert a foam cushion 6 Fold the two narrow flaps over the top cushion 3 Insert the cardboard holder with the U shaped end facing upwards 7 Fold the two wide flaps over the top of the box 4 Insert the power supply unit with the small end going in the box first 8 Tape the wide flaps t...

Страница 227: ...7 k d o c f e e d b a ck c i sc o co m 9 5 Cisco Nexus 7000 Series Hardware Installation and Reference Guide OL 23069 06 Chapter 9 Replacement Procedures Replacing an AC Power Supply Unit During Operations Figure 9 2 Repacking a 7 5 kW Power Supply Unit ...

Страница 228: ...witch is operating follow these steps Step 1 Unpack the replacement power supply unit and place it on an antistatic mat If you are unpacking a 6 kW power supply unit you must also unpack one or two power cords If you are unpacking a 7 5 kW power supply unit two power cords are already attached to the power supply unit 1 Open the smaller of two boxes 10 Fold the two narrow box flaps over the paddin...

Страница 229: ... lb 0 9 N m Step 5 Plug the power cables into the power jacks on the front of the power supply unit For 6 kW of power plug two power cables into the two power jacks For 3 kW of power plug one power cable into one of the two power jacks Note The 6 kW AC power supply unit does not ship with power cables attached to it so you must attach one or two of those cables If necessary you can remove the cabl...

Страница 230: ...ts inside the chassis they contain electromagnetic interference EMI that might disrupt other equipment and they direct the flow of cooling air through the chassis Do not operate the system unless all cards faceplates front covers and rear covers are in place Statement 1029 This section describes how to replace a DC power supply unit and includes the following topics Removing a DC Power Supply Unit...

Страница 231: ...lug from the power supply unit Step 7 Disconnect the grounding lug from the lower front side of the power supply unit by unscrewing the two M6 nuts and removing the lug from the power supply unit For the location of the grounding pad on the DC power supply unit see Figure 5 2 on page 5 7 Warning When installing or replacing the unit the ground connection must always be made first and disconnected ...

Страница 232: ...ll a DC power supply unit while a Cisco Nexus 7000 Series switch is operating follow these steps Step 1 Unpack the replacement DC power supply unit and place it on an antistatic mat Also unpack the power cables Step 2 Ensure that the power switch on the replacement DC power supply unit is in the standby STBY position Step 3 Ensure that the DC power source for the new power supply unit is turned of...

Страница 233: ...wer circuit For 6 kW of power connect two sets of power cables four sets of positive and negative cables attached to two plugs to the DC power circuit For information on how to connect the power supply unit to DC power sources for input source redundancy see the Connecting a DC Power Supply Unit Directly to DC Power Sources section on page 5 7 Note If the power source is not within reach of the po...

Страница 234: ... front of the module but the module remains operational and connected to the system If you press the other ejector button on the same module at the same time as you press the first button or while the lever for the first button is released the lever for the second button releases and the module powers down and disconnects from the system To minimize the chance of accidentally disconnecting a modul...

Страница 235: ...arning Hazardous voltage or energy is present on the backplane when the system is operating Use caution when servicing Statement 1034 Caution Handle each supervisor or I O module carefully using an ESD wrist strap holding the module only on its carrier edges without touching any electronic circuitry and placing the module on antistatic mats or repacking it in its original packing materials when it...

Страница 236: ...edures Replacing a Supervisor Module Figure 9 4 Removing the Plastic Protector from the Supervisor Module Caution To prevent ESD damage avoid touching the electronic circuitry and prevent anything else from coming in contact with the circuitry Step 3 On the currently installed supervisor module the module that you are going to remove loosen the two captive screws identified in View A of Figure 9 5...

Страница 237: ...e and the other supervisor automatically becomes the active supervisor Step 5 Disconnect the cables attached to the front of the module to be removed Make sure that each cable is labelled for its port on the module Step 6 Simultaneously rotate the two ejector levers outward to unseat the module from the midplane connector see View C of Figure 9 5 Step 7 With a hand on each ejector pull the module ...

Страница 238: ... touching the electronic circuitry and prevent anything else from coming in contact with the circuitry Step 9 If you are removing the module from a Cisco Nexus 7010 chassis rotate the module 90 degrees counterclockwise so that it is horizontal and you can see its circuitry from above Step 10 Place the removed module in an antistatic bag Step 11 Repack the bagged I O module in its original packing ...

Страница 239: ...le section on page 6 2 Step 19 If the previous supervisor module was connected to an asynchronous device through a modem connect the modem cable to the COM1 AUX SERIAL PORT as explained in the Connecting to the Console section on page 6 2 Step 20 Reconnect the network management cable to the MGMT ETH port as explained in Setting Up the Management Interface section on page 6 4 Step 21 Reconnect the...

Страница 240: ... Cisco NX OS that is compatible with using 8 GB of memory you must use only one DIMM do not install an additional DIMM Warning Hazardous voltage or energy is present on the backplane when the system is operating Use caution when servicing Statement 1034 Caution Handle the supervisor module carefully using an ESD wrist strap holding the module only on its carrier edges without touching any electron...

Страница 241: ...taneously rotate the two ejector levers outward to unseat the module from the midplane connector see View C of Figure 9 5 on page 9 15 Step 8 With a hand on each ejector pull the module part way out of its slot in the chassis Step 9 Grasp the front edge of the module with your left hand and place your right hand under the lower side of the module to support its weight Pull the module out of its sl...

Страница 242: ...xplained in the Connecting to the Console section on page 6 2 Step 21 Reconnect the network management cable to the MGMT ETH port as explained in the Setting Up the Management Interface section on page 6 4 Step 22 Reconnect the CMP cable to the CMP MGMT ETH port as explained in the Connecting the Supervisor CMP Port section on page 6 5 Upgrading Memory for Supervisor Modules The Cisco Nexus 7000 S...

Страница 243: ... wrist strap and placing antistatic foam or antistatic padding where you will place the supervisor module while working with it Step 2 Disconnect the cables attached to the front of the module to be removed If there are two supervisors in the switch disconnect the cables from the standby supervisor Note If the chassis has two supervisor modules and you disconnect the active supervisor module that ...

Страница 244: ...Callout 2 in Figure 9 8 Step 11 Place an 8 GB label on the front of the module and to the right of the N7K SUP 1 identifier Step 12 Rotate both ejector levers away from the front of the supervisor module Step 13 Grasp the front of the supervisor module with one hand and place your other hand under the module to support its weight Step 14 Align the module to the open supervisor slot in the chassis ...

Страница 245: ...ystem resources command Step 23 If you need to upgrade another supervisor module to 8 GB both supervisor modules in a switch with two supervisors must have the same amount of memory repeat Steps 2 through 22 Removing 4 GB of Memory from a Supervisor Module If you need to remove 4 GB of memory from the supervisor modules so that they each have only 4 GB of memory you must remove the DIMM from the s...

Страница 246: ...the lower side of the module to support its weight Pull the module out of its slot Caution To prevent ESD damage avoid touching the electronic circuitry and prevent anything else from coming in contact with its circuitry Step 8 If you are removing the module from a Cisco 7010 chassis rotate the module 90 degrees counterclockwise so that it is horizontal and you can see the circuitry from above Ste...

Страница 247: ... Up the Management Interface section on page 6 4 Step 21 Reconnect the CMP cable to the CMP MGMT ETH port as explained in the Connecting the Supervisor CMP Port section on page 6 5 Step 22 Verify that the module has 4 GB of memory by using the system switchover command to make the downgraded module active and using the show system resources command Step 23 If you need to downgrade the other superv...

Страница 248: ...move an I O module from the chassis and then install a new or replacement I O module in the newly vacated slot within a couple of minutes to maintain the designed airflow Warning Hazardous voltage or energy is present on the backplane when the system is operating Use caution when servicing Statement 1034 Caution Make sure that you wear an ESD wrist strap while you handle each I O module Hold the m...

Страница 249: ...abit Ethernet types of I O modules N7K M132XP 12 N7K M132XP 12L and N7K F132XP 15 remove the fiber optic cables and then remove the SFP transceivers For the 8 port 10 Gigabit Ethernet I O module N7K M108X2 12L remove the fiber optic cables and then remove the X2 transceivers Note To prevent contaminants from entering the fiber optic lines or transceivers cover the fiber optic openings with a plug ...

Страница 250: ...tep 8 Grasp the front edge of the module and place your other hand under the module to support its weight Pull the module out of its slot Do not touch the module circuitry Caution To prevent ESD damage avoid touching the electronic circuitry and prevent anything else from coming in contact with the circuitry Step 9 If you are removing the module from a Cisco Nexus 7010 chassis rotate the module 90...

Страница 251: ...ap to the box 2 Place the bagged module on the foam pad 8 Insert the two box sides into foam blocks 3 Attach a side pad to each of the long sides of the module 9 Place the box and its foam blocks into the larger box 4 Fold the side flaps up along the side pads 10 Fold the narrow flaps over the smaller box and foam blocks 5 Fold the long flaps up along the ends of the module and then over the top o...

Страница 252: ... 90 degrees clockwise Step 13 Align the module to the chassis guides for the vacated slot and slide the module part way into the slot 1 Put the I O module in an ESD bag not shown and then place it between the raised portions of the flattened box 6 Place the box and foam blocks into the larger box 2 Fold the shorter flaps along the front and back of the module and then fold them over the module 7 F...

Страница 253: ...c module you must fill the slot with a blank module Warning Hazardous voltage or energy is present on the backplane when the system is operating Use caution when servicing Statement 1034 Caution Make sure that you wear an ESD wrist strap while you handle each fabric module Hold the module only on its carrier edges without touching any electronic circuitry and place it on antistatic mats or repack ...

Страница 254: ... a Series 2 fabric module during operations the switch must be running NX OS Release 6 0 x or later release and you must replace all of the Series 1 fabric modules in the switch with Series 2 fabric modules within 12 hours or you will see a syslog message that reminds you about the mixed series of modules While you are replacing Series 1 modules with Series 2 modules the Series 2 modules will perf...

Страница 255: ...talled in the chassis To replace a fabric module follow these steps Step 1 Place an antistatic mat or antistatic foam where you can place the fabric modules Choose a place that prevents damage to the module while it is outside the chassis Step 2 Unpack and place the replacement fabric module on the antistatic mat or antistatic foam Step 3 Loosen the two captive screws on the module that you are re...

Страница 256: ...dule to support its weight Pull the module out of its slot Do not touch the module circuitry Caution To prevent ESD damage avoid touching the electronic circuitry and prevent anything else from coming in contact with the circuitry Step 8 If you are removing the module from a Cisco Nexus 7010 chassis turn the module counterclockwise so that it is horizontal Step 9 Place the module on the antistatic...

Страница 257: ...e N7K C7010 FAB 1 1 Open the box 6 Place the foam padding on top of the module 2 Place the foam padding on the bottom 7 Fold the narrow flaps over the top of the box 3 Place the foam padding with the middle cut out on top of the foam padding in the box 8 Fold the wide flaps over the top of the box 4 Place the trifold piece of cardboard inside the hole in the foam padding 9 Tape the wide flaps toge...

Страница 258: ...B 1 Step 10 On the replacement module rotate the two ejector levers fully away from the face of the module 1 Open the box 5 Place the two foam pads on top of the module 2 Place the foam padding on the bottom 6 Fold the narrow flaps over the top of the box 3 Place the foam padding with the middle cut out on top of the foam padding in the box 7 Fold the wide flaps over the top of the box 4 Put the f...

Страница 259: ...e replaced all of the Series 1 fabric modules with Series 2 fabric modules you can then install the F2 I O modules see the Replacing an I O Module section on page 9 25 Replacing a Cisco Nexus 7009 Fan Tray During Operations The Cisco Nexus 7009 switch has one fan tray part number N7K C7009 FAN that is located on the backside of the chassis Warning Hazardous voltage or energy is present on the back...

Страница 260: ... located on the upper backside of the chassis see Figure 1 5 on page 1 8 Warning Hazardous voltage or energy is present on the backplane when the system is operating Use caution when servicing Statement 1034 This section describes how to replace a system fan tray N7K C7010 FAN S and includes the following topics Required Tools page 9 38 Replacing a Cisco Nexus 7010 System Fan Tray page 9 38 Requir...

Страница 261: ...h the fan tray to support it lift the fan tray to the open fan tray slot in the chassis align the fan tray to the chassis guides and push the fan tray into the slot until the power connector seats in the backplane and the captive screws are aligned to their holes in the chassis Step 8 Tighten the captive screws to 8 in lb 0 9 N m Step 9 Make sure that the STATUS LED turns on and is green Replacing...

Страница 262: ...lacement fan tray in one hand and orient it so that the side with two captive screws is on the left Place your other hand under the fan tray to support its weight Step 6 Lift the fan tray to the open fabric fan tray slot and push the fan tray into the slot until the power connector seats in the backplane and the captive screws are aligned to their holes in the chassis Step 7 Tighten the captive sc...

Страница 263: ...tering on the LED labels is upright and readable Step 8 Place one hand under the bottom side of the fan tray lift the fan tray to the open fan tray slot align the fan tray with the top and bottom chassis guides for the slot and push the fan tray into the chassis until the power connector seats in the backplane and the captive screws are aligned to their holes in the chassis Step 9 Tighten the capt...

Страница 264: ... the card is not fully pushed into the reader or it is improperly formatted switch 2008 Dec 1 12 00 00 switch VDC 1 IDEHSD 2 UMOUNT logflash offline Make sure that the card is fully inserted inside the reader If the card is fully inserted either format the card see the Cisco NX OS Fundamentals Configuration Guide Release 5 x or replace the card with another card that is properly formatted for the ...

Страница 265: ...ame assemblies follow these steps Step 1 Remove the two lower side frames from the EMI air filter frame by first removing the EMI panel from the chassis and then unscrewing the side frame pieces When done replace the EMI frame on the chassis The following steps explain each of these tasks a On the EMI panel which covers the air intake area on the lower front side of the chassis loosen and complete...

Страница 266: ...k of the EMI panel unscrew each of the four screws that attach the two side frame pieces to the EMI panel and remove the side frame pieces see Figure 9 17 Figure 9 17 Removing the Side Frame Assemblies From the EMI Panel 1 Unscrew four captive screws from the chassis 2 Remove the EMI panel from the chassis 1 Right side frame 3 Unscrew two 6 32 x 1 2 inch flat head screws to remove the right side f...

Страница 267: ...o the air intake area on the chassis and tighten its four captive screws to 8 in lb 0 9 N m Step 2 Remove the front doors by following these steps a Unscrew the three screws that hold one door frame assembly to the chassis until the screws are no longer in the chassis Remove the door assembly from the chassis See Figure 9 18 b Repeat step 4a for the other door assembly Figure 9 18 Removing the Fro...

Страница 268: ... the Front Doors and Frame Assembly on the Cisco Nexus 7010 Chassis Step 3 Remove the bottom frame assembly by completely unscrewing the four M4 x 6 mm screws identified in Figure 9 19 Figure 9 19 Removing the Bottom Frame Step 4 If you are returning the frame components to Cisco repack them in their original packing materials 1 Bottom frame 2 Unscrew four M4 x 6 mm screws that hold the bottom fra...

Страница 269: ...d Frame Assembly After you have finished moving the chassis to its rack or after you have removed the doors and frame for their replacement you can install the front doors and frame assemblies To install the front doors and frame assembly follow these steps Step 1 Align the bottom frame assembly so that its four screw holes align to screw holes in the bottom of the chassis and then screw in four M...

Страница 270: ...tch the two alignment pins on the door frame to the alignment holes on the chassis Position each door frame immediately under the cable management area see Figure 9 21 Figure 9 21 Installing the Front Doors Step 3 Tighten three captive screws for each door frame see Figure 9 22 1 Bottom frame assembly with screw holes aligned to screw holes in chassis 2 Tighten four M4 x 6 mm screws 1 Front door f...

Страница 271: ...Reference Guide OL 23069 06 Chapter 9 Replacement Procedures Replacing the Front Doors and Frame Assembly on the Cisco Nexus 7010 Chassis Figure 9 22 Attaching the Door Frames to the Chassis Step 4 On the EMI panel unscrew four captive screws and remove the panel from the chassis see Figure 9 23 1 Tighten three captive screws for each door frame ...

Страница 272: ...n one of the two extensions so that its two screw holes align to two screw holes on one side of the EMI panel and secure the side frame to the panel with two 6 32 x 1 2 inch flat head screws Tighten the screws to 8 in lb 0 9 N m See Figure 9 24 Step 6 On the left side of the EMI panel align the left frame piece no notch on its extensions so that its two screw holes align to two screw holes on one ...

Страница 273: ...e Assemblies to the EMI Panel Step 7 Realign the EMI panel to the air intake area on the chassis screw its four captive screws to the chassis and tighten the captive screws to 8 in lb 0 9 N m 1 Right side frame 3 Use two 6 32 x 1 2 inch flat head screws to attach the right side frame to the right side of the EMI panel Tighten the screws to 8 in lb 0 9 N m 2 Left side frame 4 Use two 6 32 x 1 2 inc...

Страница 274: ...nt Frame page 9 56 Required Tools You need a flat blade or number 2 Phillips head screwdriver to loosen or tighten the screws that hold the cable management assemblies to the chassis Removing the Cable Management Frame When you remove the cable management frame from the Cisco Nexus 7018 chassis you must remove a top cover and four cable management assemblies Note Before you can remove the cable ma...

Страница 275: ...r from the Upper Cable Management Assemblies and Chassis Step 2 Remove the top cover from the chassis and the two upper cable management assemblies Step 3 For the upper cable management assembly on the left loosen and remove five M4x10 screws and then lift off the assembly as shown in Figure 9 26 Step 4 Repeat Step 3 for the upper cable management assembly on the right side 1 Four M4x8 pan head sc...

Страница 276: ...e Management Frame on the Cisco Nexus 7018 Chassis Figure 9 26 Removing an Upper Cable Management Assembly Step 5 For the lower cable management assembly on the left loosen and remove four M4x10 screws and then lift off the assembly as shown in Figure 9 27 1 Rack mount bracket 3 Loosen and remove five M4x10 screws 2 Upper cable management assembly 4 Lift the upper cable management assembly off the...

Страница 277: ...ssis Figure 9 27 Removing a Lower Cable Management Assembly Step 6 Repeat Step 5 for the lower cable management assembly on the right side Step 7 Pack the two lower cable management assemblies two upper cable management assemblies the top cover and their screws in their original packing materials 1 Lower cable management assembly 3 Loosen and remove four M4x10 screws 2 Left rack mount bracket 4 Li...

Страница 278: ...anagement frame on the Cisco Nexus 7018 switch chassis follow these steps Step 1 Open the Cable Management kit 69 1961 01 and verify that you have the following parts 2 lower cable management assemblies 800 31343 01 2 upper cable management assemblies 800 31342 01 1 top cover 800 31269 01 8 M4x8 pan head screws 48 0398 01 18 M4x10 flat head screws 48 2518 01 If the kit is not complete contact TAC ...

Страница 279: ...chassis Step 4 Attach an upper cable management assembly onto the two hooks that protrude from the upper half of the left rack mount bracket that is attached to the Cisco Nexus 7018 switch chassis and loosely fasten the assembly to the chassis with four flat head M4x10 screws as shown in Figure 9 29 1 Lower cable management assembly 3 Position the assembly so that the two lower hooks on the rack m...

Страница 280: ... a Rack Mount Bracket Step 5 Repeat Step 3 to attach an upper cable management assembly to the upper right side of the chassis When completed the chassis will appear as shown in Figure 9 30 1 Rack mount bracket 3 Position the assembly so that the two upper hooks on the rack mount bracket fit inside the two holes on the assembly and then slide the assembly down so that it is held by the hooks 2 Upp...

Страница 281: ... Attached to the Rack Mount Brackets Step 6 Place the top cover on top of the two upper cable management assemblies that are already installed Make sure that the side of the top cover that is closest to the chassis has two alignment pins that align with the alignment holes in the chassis as shown in Figure 9 31 Push the top cover toward the chassis so that its alignment pins enter the alignment ho...

Страница 282: ...L 23069 06 Chapter 9 Replacement Procedures Replacing the Cable Management Frame on the Cisco Nexus 7018 Chassis Figure 9 31 Positioning the Top Cover with the Upper Cable Management Assemblies and the Switch Chassis Step 7 Use four M4x8 pan head screws to loosely fasten the top cover to the chassis see Callout 1 in Figure 9 32 1 Alignment pins 2 Alignment holes ...

Страница 283: ...1 Tighten each of the 18 screws that fasten the upper and lower cable management assemblies to the rack mount brackets to 11 to 15 in lb 1 2 to 1 7 N m ReplacingtheFrontDoorandAirIntakeAssembliesontheCisco Nexus 7018 Chassis If you are going to move the Cisco Nexus 7018 chassis or if you need to replace the door and air intake assembly you must first remove the installed door and air intake assemb...

Страница 284: ...he Front Door and Air Intake Assemblies When you remove the front door and air intake assemblies you remove the door air intake assembly and the hardware used to hold those components to the chassis To remove the front door and air intake assemblies on the Cisco Nexus 7018 chassis follow these steps Step 1 Remove the front door by following these steps a Open the door by pulling one of its latch h...

Страница 285: ...oor behind the opened latch handle so that the latch handle flattens to the front side of the door see Figure 9 34 Figure 9 34 Flattening the Latch Handle to the Door c Hold the opened side of the door with one hand and use your other hand to open the latch handle on the hinged side of the door see Callout 1 in Figure 9 35 until the handle clicks 1 If you opened the right side of the door as shown...

Страница 286: ...ding the door with both hands pull the door away from the chassis see Callout 2 in Figure 9 35 e Press the locking button on the inside surface of the door behind the opened latch to flatten the latch handle to the front side of the door see Figure 9 34 f Open the box for the front door You can find this box in the box that contains the front door and air frame kit Align the four side cushions to ...

Страница 287: ... Four of the screws are attached to the left and right side of the cable management frame two screws on each side and four of the screws are attached to the chassis see Figure 9 37 Place the screws in the small parts bag 1 Align the two shorter side cushions to the shorter inside crease in the center panel of the box 4 Fold the two short flaps up along the end side cushions and then fold them over...

Страница 288: ... hold the right door stopper to the right cable management frame Place the two screws and the door stopper in the small parts bag m Loosen and remove the two M3 x 10 screws that hold the left door stopper to the left cable management frame Place the two screws and the door stopper in the small parts bag n Fold the box flaps over the top and tape them in place o While holding the air intake frame i...

Страница 289: ...nt Door and Air Intake Assemblies on the Cisco Nexus 7018 Chassis Figure 9 38 Removing the Air Intake Assembly p Pull the air intake assembly off the chassis q Loosen and remove the four ball point studs shown in Figure 9 39 r Repack the air intake frame and ball point studs in their original packing materials 1 Loosen two captive screws until they are clear of the chassis 2 Remove the air intake ...

Страница 290: ...the Front Door and Air Intake Assemblies on the Cisco Nexus 7018 Chassis Figure 9 39 Removing the Four Ball Headed Studs s Repack the air intake frame and ball point studs in their original packing box then fold over the box flaps and tape them shut t Open the box for the front door and air intake frame kit and insert the components as shown in Figure 9 40 u Close the box flaps and tape them shut ...

Страница 291: ...ck c i sc o co m 9 69 Cisco Nexus 7000 Series Hardware Installation and Reference Guide OL 23069 06 Chapter 9 Replacement Procedures Replacing the Front Door and Air Intake Assemblies on the Cisco Nexus 7018 Chassis Figure 9 40 Packing the Front Door and Air Intake Frame Kit ...

Страница 292: ... these steps Step 1 Open the Front Door and Air Intake kit 69 1962 01 and verify that it includes the following components 1 front door 800 31268 01 1 air intake frame 800 31270 01 1 bottom hinge bracket 700 28491 02 1 left door stopper has an L on its base 700 27454 01 1 right door stopper has an R on its base 700 27592 01 8 M4x8 pan head screws 48 0398 01 4 M3x14 pan head screws 48 1699 01 4 bal...

Страница 293: ...e 9 41 Attaching the Left Door Stopper Step 3 Position the right door stopper has an R on its base on the middle of the right side of the cable management frame and fasten it with two M3x14 pan head screws as shown in Figure 9 42 Tighten these two screws to 8 4 to 11 in lb 0 9 to 1 2 N m 1 Left door stopper identified with an L on the bottom of the base 3 Screw holes on the cable management assemb...

Страница 294: ... the bottom of both sides of the cable management frame Make sure that the side of the bracket that is closest to the chassis has two alignment pins that align with the alignment holes in the chassis as shown in Figure 9 43 Push the bracket toward the chassis so that its alignment pins enter the alignment holes and the bracket rests against the chassis 1 Right door stopper identified with an R on ...

Страница 295: ...oor and Air Intake Assemblies on the Cisco Nexus 7018 Chassis Figure 9 43 Positioning the Hinge Bracket to the Cable Management Frame and Chassis Step 5 Attach the bottom hinge bracket to the chassis with eight loosely fastened M4x8 screws see Callout 1 in Figure 9 44 Step 6 Attach the bottom hinge bracket to the bottom of both sides of the cable management frame see Callout 2 in Figure 9 44 1 Ali...

Страница 296: ...e four M4x8 screws that fasten the bottom hinge bracket to the chassis to 11 to 15 in lb 1 2 to 1 7 N m Step 8 Tighten the four M4x8 screws that fasten the bottom hinge bracket to the cable management frame to 11 to 15 in lb 1 2 to 1 7 N m Step 9 Fasten the four ball point studs to the bottom portion of the chassis one stud by each corner of the air intake area as shown in Figure 9 45 1 Four M4x8 ...

Страница 297: ...Procedures Replacing the Front Door and Air Intake Assemblies on the Cisco Nexus 7018 Chassis Figure 9 45 Fastening Ball Point Studs to the Air Intake Area Step 10 Align the air intake frame to the four ball point studs and press the frame onto the chassis as shown in Figure 9 46 The two captive screws on the air intake frame should align with their screw holes in the chassis 1 Ball point stud ...

Страница 298: ...he two sides of the door until the handle clicks the handle clicks when you pull it out about 30 degrees Step 13 Move the side of the door with the opened handle onto the two hinge pins as shown in Figure 9 47 Make sure that the hinge pins on the top cover and bottom hinge bracket fit through the slots on the top and bottom of that side of the door Position the door so the hinge pins are located a...

Страница 299: ...hassis Figure 9 47 Attaching One Side of the Door to the Chassis Step 14 Use one hand to hold the door on the hinge pins and use your other hand to press the locking button on the interior side of the door see Figure 9 48 This action locks the latches on one side of the door to the hinge pins so that you no longer need to hold the door 1 Open the latch handle until it clicks 3 Hinge 2 Move one sid...

Страница 300: ... the hinge pins are not secured behind the door latch hold the door securely with one hand while opening the door handle for the unsecured side until the handle clicks press that side of the door so that both of the pins are positioned all the way inside the door slots press the door latch button on the interior side of the door and then make sure that the door is firmly secured to both hinge pins...

Страница 301: ...cked on the hinge pins If the door stopper does not close the latches press the door closed at the handle until you hear the latches click Make sure that the door is fully secured to the frames on both sides Note If a hinge pin is not secured behind a door latch open the door handle for that side of the door until it clicks open that side of the door and then press the door closed so that the pins...

Страница 302: ... left and right side of the existing air filter loosen the two captive screws so they are no longer attached to the chassis The air filter can be found covering the air intake area at the bottom of the front side of the chassis see Figure 1 4 on page 1 7 Step 2 With one hand holding the air filter in place use the other hand to pull out the spring pin on one side of the air filter Pull that side o...

Страница 303: ... en t s t o n ex u s 7 k d o c f e e d b a ck c i sc o co m 9 81 Cisco Nexus 7000 Series Hardware Installation and Reference Guide OL 23069 06 Chapter 9 Replacement Procedures Replacing the Air Filter on the Cisco Nexus 7010 Chassis ...

Страница 304: ... en t s t o n ex u s 7 k d o c f e e d b a ck c i sc o co m 9 82 Cisco Nexus 7000 Series Hardware Installation and Reference Guide OL 23069 06 Chapter 9 Replacement Procedures Replacing the Air Filter on the Cisco Nexus 7010 Chassis ...

Страница 305: ...ble Specifications page A 9 Chassis Clearances page A 14 Facility Cooling Requirements page A 15 Chassis Airflow page A 16 Environmental Specifications for the Cisco Nexus 7000 Series Systems Table A 1 lists the environmental specifications for the Cisco Nexus 7000 Series systems Table A 1 Environmental Specifications for the Cisco Nexus 7000 Series Switches Description Cisco Nexus 7009 Cisco Nexu...

Страница 306: ...o Nexus 7009 Cisco Nexus 7010 Cisco Nexus 7018 Table A 2 Dimensions for the Cisco Nexus 7000 Series Chassis Chassis Width Depth1 1 This is the measure from the mounting bracket to the rear of the chassis this includes the module handles at the rear For the cable management system on either chassis add 6 0 inches 15 4 cm in front of the mounting brackets The six inches in front of the mounting brac...

Страница 307: ... 7 5 kW AC power supply unit N7K AC 7 5KW INT and N7K AC 7 5KW US 26 lb 11 8 kg 204 053 6 kW DC power supply unit N7K DC 6 0KW 21 lb 9 5 kg 200 000 DC Power Interface Unit 5 lb 2 3 kg 0 to 2 Door and air frame optional 0 or 1 1 The predicted mean time between failure MTBF is based on the Bellcore Methodology Table A 3 Weights Quantities and MTBF for the Cisco Nexus 7009 Switch Components continued...

Страница 308: ...le N7K M148GT 11 14 0 lb 6 4 kg 1 to 16 can mix I O module types 75 116 48 port 10 100 1000 I O module with XL option N7K M148GT 11L 14 0 lb 6 4 kg 73 974 48 port 1 Gigabit Ethernet I O module N7K M148GS 11 15 5 lb 7 0 kg 75 064 48 port 1 Gigabit Ethernet I O module with XL option N7K M148GS 11L 15 5 lb 7 0 kg 73 228 48 port 1 and 10 Gigabit Ethernet I O module N7K F248XP 25 14 0 lb 6 4 kg 83 477 ...

Страница 309: ...and power requirements for each Cisco Nexus 7000 Series switch see Table A 6 for the Cisco Nexus 7009 switch see Table A 7 for the Cisco Nexus 7010 switch and see Table A 8 for the Cisco Nexus 7018 switch 1 The predicted mean time between failure MTBF is based on the Bellcore Methodology Table A 6 Power Requirements for the Cisco Nexus 7009 Switch Component Quantity Maximum Typical Supervisor modu...

Страница 310: ...1 W 32 port 1 and 10 Gigabit Ethernet I O module N7K F132XP 15 385 W 283 W 8 port 10 Gigabit Ethernet I O module with XL option N7K M108X2 12L 650 W 520 W Fabric 1 module N7K C7010 FAB 1 3 to 5 60 W 55 W Fabric 2 module N7K C7010 FAB 2 80 W 60 W All fan trays total N7K C7010 FAN F and N7K C7010 FAN S 1680 W 300 W Table A 8 Power Requirements for the Cisco Nexus 7018 System Components Component Qua...

Страница 311: ... kW 1 2 kW 1 2 kW and the reserve power would be 9 0 kW 3 0 kW 3 0 kW 3 0 kW Full redundancy mode Provides both power supply redundancy and input source redundancy This mode allows you to replace a power supply unit without interrupting switch operations or continue powering the switch if one of two grids goes down The available power is the lesser amount of output power for power supply redundanc...

Страница 312: ...unit can be added to only the Cisco Nexus 7018 switch The Cisco Nexus 7010 holds up to three power supply units Table A 9 Power Availability for 6 kW AC Power Supply Units continued Combined Mode Power Supply Redundancy Mode Input Source Redundancy Mode Full Redundancy Mode Table A 10 Power Availability for 7 5 kW AC Power Supply Units Combined Mode Power Supply Redundancy Mode Input Source Redund...

Страница 313: ... supply unit 6 000 W 12 000 W 18 000 W 24 000 W 6 000 W 12 000 W 18 000 W 3 000 W 6 000 W 9 000 W 12 000 W 6 000 W 9 000 W 12 000 W Single input per power supply unit 1 power supply unit 2 power supply unit 3 power supply unit 4 power supply unit 3 000 W 6 000 W 9 000 W 12 000 W 3 000 W 6 000 W 9 000 W Table A 12 6 kW AC Power Supply Power Cords Locale Power Cord Part Number Cord Set Rating Power ...

Страница 314: ...rence Guide OL 23069 06 Appendix A Technical Specifications Power Supply Cable Specifications Figure A 1 CAB AC 16A AUS Power Cord and Connectors for the 6 kW AC Power Supply Unit Figure A 2 CAB AC 16A CH Power Cord and Connectors for the 6 kW AC Power Supply Unit Figure A 3 CAB AC 2500W EU Power Cord and Connectors for the 6 kW AC Power Supply Unit ...

Страница 315: ...e Guide OL 23069 06 Appendix A Technical Specifications Power Supply Cable Specifications Figure A 4 CAB AC 2500W INT Power Cord and Connectors for the 6 kW AC Power Supply Unit Figure A 5 CAB AC 2500W ISRL Power Cord and Connectors for the 6 kW AC Power Supply Unit Figure A 6 CAB AC 2500W US1 Power Cord and Connectors for the 6 kW AC Power Supply Unit ...

Страница 316: ...eference Guide OL 23069 06 Appendix A Technical Specifications Power Supply Cable Specifications Figure A 7 CAB AC C6K TWLK Power Cord and Connectors for the 6 kW AC Power Supply Unit Figure A 8 CAB 7513AC Power Cord and Connectors for the 6 kW AC Power Supply Unit Figure A 9 CAB C19 CBN Power Cord and Connectors for the 6 kW AC Power Supply Unit ...

Страница 317: ...ACS 16 Power Cord and Connectors for the 6 kW AC Power Supply Unit Figure A 11 NEMA L6 30 Power Connector for the 7 5 kW AC Power Supply Unit Figure A 12 IEC 603090 Power Connector for the 7 5 kW AC Power Supply Unit Table A 13 7 5 kW AC Power Supply Power Cords Local Power Supply Part Number Cord rating Power cord reference illustration Japan and North America N7K AC 7 5KW US 30 A 250 VAC Figure ...

Страница 318: ...s section includes the following topics Cisco Nexus 7009 Chassis Clearances page A 14 Cisco Nexus 7010 Chassis Clearances page A 15 Cisco Nexus 7018 Chassis Clearances page A 15 Cisco Nexus 7009 Chassis Clearances The Cisco Nexus 7009 chassis requires the following clearances If you are using a four post rack or cabinet you must have 7 inches 17 8 cm between the chassis and the front and back of a...

Страница 319: ...ed for cabling 38 inches 96 5 cm open passageway between the front of the rack or cabinet and the next rack cabinet or wall in the cold aisle required for installing or replacing the chassis or its modules 30 inches 76 2 cm between the rear of the rack or cabinet and the next rack cabinet or wall in the hot aisle required for replacing the fan tray Cisco Nexus 7018 Chassis Clearances The Cisco Nex...

Страница 320: ... power supplies as shown in Table A 14 The Cisco Nexus 7010 switch uses front to back airflow as shown in Figure A 15 The Cisco Nexus 7018 switch uses side to side airflow to cool its modules and front to back airflow to cool its power supply units as shown in Figure A 16 All Cisco Nexus 7000 Series switches are designed to work in a hot aisle cold aisle environment but the Cisco Nexus 7018 switch...

Страница 321: ...7000 Series Hardware Installation and Reference Guide OL 23069 06 Appendix A Technical Specifications Chassis Airflow Figure A 15 Airflow for the Cisco Nexus 7010 Chassis 1 Airflow for cooling the supervisor and I O modules 3 Airflow for cooling the power supply units 2 Airflow for cooling the fabric modules ...

Страница 322: ...ide open to cooling air from the cold aisle in front of the chassis By having the cables on the left side and leaving the left rear side unobstructed the exhaust is directed to the hot aisle in back For the clearances required on each side of the switch see the Chassis Clearances section on page A 14 To determine the maximum amount of airflow for a fully configured switch see Table A 15 for the Ci...

Страница 323: ... 47ºC 1044 189 1233 118 to 125ºF 48 to 52ºC 1203 203 1406 127 to 136ºF 53 to 58ºC 1326 221 1547 136ºF 58ºC 1203 250 1576 Table A 16 Airflow for a Fully Configured Cisco Nexus 7010 Switch Temperature System Airflow cfm Fabric Airflow cfm Total Airflow cfm 55ºF 13ºC 406 37 443 55 to 62ºF 13 to 17ºC 493 44 537 64 to 71ºF 18 to 22ºC 534 50 584 73 to 80ºF 23 to 27ºC 576 56 632 82 to 89ºF 28 to 32ºC 659...

Страница 324: ...2ºC 1459 89 1548 73 to 80ºF 23 to 27ºC 1459 95 1554 82 to 89ºF 28 to 32ºC 1459 124 1583 91 to 98ºF 33 to 37ºC 1583 153 1736 100 to 107ºF 38 to 42ºC 1713 180 1893 109 to 116ºF 43 to 47ºC 2158 195 2353 118 to 125ºF 48 to 52ºC 2461 207 2668 127 to 136ºF 53 to 58ºC 2770 207 2977 136ºF 58ºC 2770 207 2977 Table A 17 Airflow for a Fully Configured Cisco Nexus 7018 Switch continued Temperature System Airf...

Страница 325: ... N7K F248XP 25 32 port 10 Gigabit Ethernet I O module N7K M132XP 12 32 port 10 Gigabit Ethernet I O module with XL option N7K M132XP 12L 32 port 1 and 10 Gigabit Ethernet I O module N7K F132XP 15 8 port 10 Gigabit Ethernet I O module N7K M108X2 12L requires the OneX Converter Module to adapt the SFP transceiver to the X2 ports on this I O module The 10 Gigabit Fabric Extender Transceiver FET is us...

Страница 326: ...odule Transceiver I O Module 8 port 10 Gigabit N7K M108X2 12L 32 port10 Gigabit N7K M132XP 12 32 port 10 Gigabit with XL option N7K M132XP 12L 32 port 1 and 10 Gigabit N7K F132XP 15 48 port 1 and 10 Gigabit N7K F248XP 25 SFP 10G FET X1 X1 X1 SFP 10G ER X X X X SFP 10G LR X X X2 X SFP 10G LRM X X X SFP 10G SR X3 X X X X SFP H10GB CU1M X3 X2 X X SFP H10GB CU3M X3 X2 X X SFP H10GB CU5M X3 X2 X X SFP ...

Страница 327: ...G 652 fiber 24 9 miles 40 km SFP 10G LR SMF Dual LC PC 1310 G 652 fiber 6 2 miles 10 km SFP 10G LRM MMF SMF Dual LC PC 1310 62 5 50 50 G 652 500 400 500 722 feet 220 meters 328 feet 100 meters 722 feet 220 meters 984 feet 300 meters SFP 10G SR MMF Dual LC PC 850 62 5 62 5 50 0 50 0 50 0 160 200 400 500 2000 85 feet 26 meters 108 feet 33 meters 216 feet 66 meters 269 feet 82 meters 984 feet 300 met...

Страница 328: ...F 4 0 maximum 4 7 minimum 1 0 maximum 15 8 minimum 1530 to 1565 SFP 10G LR 10GBASE LR 1310 nm SMF 0 5 maximum 8 2 minimum 0 5 maximum 14 4 minimum 1260 to 1355 SFP 10G LRM 10GBASE LRM 1310 nm MMF and SMF 0 5 maximum 6 5 minimum 0 5 maximum 8 4 minimum in average 6 4 minimum in OMA 1 1260 to 1355 SFP 10G SR 10GBASE SR 850 nm MMF 1 2 maximum 2 7 3 minimum 1 0 maximum 9 9 minimum 840 to 860 1 Both th...

Страница 329: ...FP 10G SR SFP H10GB CUxM For information on the SFP 10GB transceivers see the 10 Gigabit SFP Transceivers and Fabric Extender Transceivers section on page B 1 Figure B 2 identifies the major features of the X2 transceivers and Figure B 3 shows the transceiver with its latching sleeve extended you pull the sleeve out to remove the transceiver from the I O module Figure B 2 10 Gigabit X2 Transceiver...

Страница 330: ...eive specifications see Table B 6 For the physical and environmental specifications see Table B 7 For the environmental specifications that apply to these transceivers see Table B 7 1 Latching sleeve extended to remove transceiver 2 Latch retracted to enable you to remove the transceiver Table B 5 X2 Transceiver Cabling Specifications X2 Transceiver Product Number Cable Type Connector Type Wavelen...

Страница 331: ...pecifications X2 Transceiver Product Number Transceiver Type Transmit Power dBm Receive Power dBm Transmit and Receive Wavelength nm X2 10GB ER 10GBASE ER 1550 nm SMF 4 0 maximum 4 7 minimum 1 0 maximum 15 8 minimum 1530 to 1565 X2 10GB LR 10GBASE LR 1310 nm SMF 0 5 maximum 8 2 minimum 0 5 maximum 14 4 minimum 1260 to 1355 X2 10GB LRM 10GBASE LRM 1310 nm MMF and SMF 0 5 maximum 6 5 minimum 0 5 max...

Страница 332: ...tiate the 10GBASE DWDM X2 transceivers see Table B 8 Table B 7 X2 Transceiver Physical and Environmental Specifications Characteristic Specification Dimensions H x W x D 0 53 x 1 41 x 3 58 inches 13 46 x 36 x 91 mm Operating temperature X2 10GB ER X2 10GB LR X2 10GB LRM X2 10GB LX4 X2 10GB SR X2 10GB ZR 32º to 122ºF 0º to 50ºC 32º to 122ºF 0º to 50ºC 32º to 158ºF 0º to 70ºC 32º to 158ºF 0º to 70ºC...

Страница 333: ...1548 51 nm X2 DWDM X2 47 72 37 10GBASE DWDM 1547 72 nm X2 DWDM X2 46 92 38 10GBASE DWDM 1546 92 nm X2 DWDM X2 46 12 39 10GBASE DWDM 1546 12 nm X2 DWDM X2 44 53 41 10GBASE DWDM 1544 53 nm X2 DWDM X2 43 73 42 10GBASE DWDM 1543 73 nm X2 DWDM X2 42 94 43 10GBASE DWDM 1542 94 nm X2 DWDM X2 42 14 44 10GBASE DWDM 1542 14 nm X2 DWDM X2 40 56 46 10GBASE DWDM 1540 56 nm X2 DWDM X2 39 77 47 10GBASE DWDM 1539...

Страница 334: ...eivers that you plug into SFP compatible I O modules The 1000BASE T transceiver shown in Figure B 4 provides an RJ 45 connection for copper cables and the 1000BASE X transceiver shown in Figure B 5 provides an optical connection for fiber optic cables Table B 9 SFP Transceivers Used with Each I O Module Transceiver I O Modules 48 port 1 Gigabit N7K M148GS 11 48 port 1 Gigabit with XL option N7K M1...

Страница 335: ...s and Module Connectors 1 Gigabit SFP Transceivers Figure B 4 1000BASE T SFP Transceiver Figure B 5 1000BASE X SFP Transceiver For the 1000BASE T and 1000BASE X transceiver cable specifications see Table B 10 1 RJ 45 connector 3 Bail clasp shown in the open unlocked position 2 Bail clasp shown in the closed locked position 1 Receive optical bore 3 Bail clasp 2 Transmit optical bore 4 Dust plug ...

Страница 336: ... G 6524 6 2 miles 10 km 1000BASE BX10 GLC BX D SMF1 Single LC PC 1490 G 6524 6 2 miles 10 km 1000BASE SX GLC SX MMD GLC SX MM and SFP GE S MMF2 2 Multimode fiber optic MMF LC duplex 850 62 5 62 5 50 0 50 0 160 200 400 500 722 feet 220 m 902 feet 275 m 1640 feet 500 m 1804 feet 550 m 1000BASE LX GLC LH SMD GLC LH SM and SFP GE L MMF2 LC duplex 1310 62 5 50 0 50 500 400 500 1804 feet 550 m 3 1804 fe...

Страница 337: ...e fiber optic cable used CWDM SFP transceivers are color coded to indicate their designated optical wavelength Figure B 6 shows the CWDM transceiver which looks like a standard 1000BASE X SFP transceiver with a colored arrow and bail clasp to indicate the designated wavelength Note Whenever the transceiver receive optical bores are not filled with optical cables you should minimize the chance of c...

Страница 338: ... fixed wavelength DWDM SFP transceivers that support the International Telecommunications Union ITU 100 GHz wavelength grid These transceivers have duplex SC connectors DWDM SFP transceivers can transmit and receive optical signals up to 50 miles 80 km depending on the quality of the fiber optic cable used DWDM SFP transceivers look like the typical 1000BASE X transceivers as shown in Figure B 5 o...

Страница 339: ...DM SFP 5575 27 Longwave 1555 75 nm laser DWDM SFP 5494 28 Longwave 1554 94 nm laser DWDM SFP 5413 29 Longwave 1554 13 nm laser DWDM SFP 5332 30 Longwave 1553 33 nm laser DWDM SFP 5252 31 Longwave 1552 52 nm laser DWDM SFP 5172 32 Longwave 1551 72 nm laser DWDM SFP 5092 33 Longwave 1550 92 nm laser DWDM SFP 5012 34 Longwave 1550 12 nm laser DWDM SFP 4931 35 Longwave 1549 32 nm laser DWDM SFP 4851 3...

Страница 340: ...000 Ethernet I O modules N7K M148GT 11 and N7K M148GT 11L 10 100 1000 ports Cisco Nexus 2248TP Fabric Extender 100 1000 ports that connect to servers Caution To comply with GR 1089 intrabuilding lightning immunity requirements you must use foil twisted pair FTP cable that is properly grounded at both ends Figure B 7 shows the RJ 45 connector DWDM SFP 3582 52 Longwave 1535 82 nm laser DWDM SFP 3504...

Страница 341: ...n ex u s 7 k d o c f e e d b a ck c i sc o co m B 17 Cisco Nexus 7000 Series Hardware Installation and Reference Guide OL 23069 06 Appendix B Transceivers and Module Connectors RJ 45 Module Connectors Figure B 7 RJ 45 Connector 1 Pin 1 2 Pin 8 ...

Страница 342: ... t c o m m en t s t o n ex u s 7 k d o c f e e d b a ck c i sc o co m B 18 Cisco Nexus 7000 Series Hardware Installation and Reference Guide OL 23069 06 Appendix B Transceivers and Module Connectors RJ 45 Module Connectors ...

Страница 343: ...sory Kit Contents This document lists and illustrates the Cisco Nexus 7018 system accessory kit contents See Table C 1 Table C 1 Cisco Nexus 7009 System Accessory Kit Contents Part Number Illustration Description Quantity 69 2210 01 Front mount bottom support rails kit includes the following parts 12 24 x 3 4 in Phillips screws M6 x 19 mm Phillips screws Adjustable bottom support rails Crossbar M4...

Страница 344: ...cords for the 6 kW power supplies are as follows CAB AC 16A AUS power cord 250 VAC 16A C19 Australia CAB AC16A CH power cord 16 A China CAB AC 2500W EU power cord 250 VAC 16A Europe CAB AC 2500W INT power cord 250 VAC 16A International CAB AC 2500W ISRL power cord 250 VAC 16 A Israel CAB AC 2500W US1 power cord 250 VAC 16A straight blade NEMA 6 69 1815 01 Ground lug kit includes the following part...

Страница 345: ...S Cisco Nexus 7010 Switch Accessory Kit Contents This document lists and illustrates the Cisco Nexus 7010 system accessory kit contents see Table C 2 Table C 2 Cisco Nexus 7010 System Accessory Kit Contents Part Number Illustration Description Quantity 69 1779 01 Bottom support rails kit includes the following parts 12 24 x 3 4 in Phillips screws M6 x 19 mm Phillips screws Adjustable bottom suppor...

Страница 346: ...he available power cords for the 6 kW power supplies are as follows CAB AC 16A AUS power cord 250 VAC 16A C19 Australia CAB AC16A CH power cord 16 A China CAB AC 2500W EU power cord 250 VAC 16A Europe CAB AC 2500W INT power cord 250 VAC 16A International CAB AC 2500W ISRL power cord 250 VAC 16 A Israel CAB AC 2500W US1 power cord 250 VAC 16A straight blade NEMA 6 CAB AC C6K TWLK power cord 250 VAC...

Страница 347: ...s document lists and illustrates the Cisco Nexus 7018 system accessory kit contents See Table C 3 Table C 3 Cisco Nexus 7018 System Accessory Kit Contents Part Number Illustration Description Quantity 69 1913 01 Bottom support rails kit includes the following parts 12 24 x 3 4 in Phillips screws M6 x 19 mm Phillips screws Adjustable bottom support rails 1 kit 34 per kit 34 per kit 2 per kit 72 087...

Страница 348: ...he available power cords for the 6 kW power supplies are as follows CAB AC 16A AUS power cord 250 VAC 16A C19 Australia CAB AC16A CH power cord 16 A China CAB AC 2500W EU power cord 250 VAC 16A Europe CAB AC 2500W INT power cord 250 VAC 16A International CAB AC 2500W ISRL power cord 250 VAC 16 A Israel CAB AC 2500W US1 power cord 250 VAC 16A straight blade NEMA 6 CAB AC C6K TWLK power cord 250 VAC...

Страница 349: ... 7 Cisco Nexus 7000 Series Hardware Installation and Reference Guide OL 23069 06 Appendix C Accessory Kits Cisco Nexus 7018 Switch Accessory Kit Contents CAB C19 CBN cabinet jumper power cord 250 VAC 16A C20C CAB ACS 16 power cord 16 A Switzerland CAB L520P C19 US NEMA L5 20 to IEC C19 6ft US ...

Страница 350: ...t c o m m en t s t o n ex u s 7 k d o c f e e d b a ck c i sc o co m C 8 Cisco Nexus 7000 Series Hardware Installation and Reference Guide OL 23069 06 Appendix C Accessory Kits Cisco Nexus 7018 Switch Accessory Kit Contents ...

Страница 351: ... located on the chassis Table D 1 System LEDs LED Color Condition PSU Green Power supply units are all operational Amber One of the following problems has occurred Any power supply unit LED is red Any power supply unit is down FAN Green Fan tray modules are all operational Amber At least one fan tray module has a red STATUS LED SUP Green Supervisor modules are all operational Amber At least one su...

Страница 352: ...d or The module is resetting and both ejector levers are out Off The module is not receiving power ID Blinking blue The operator has activated this LED to identify this module in the chassis Off This module is not being identified SYSTEM Green All chassis environmental monitors are reporting okay Amber At least one power supply has failed or the power supply fan has failed Red The temperature of t...

Страница 353: ... management port is operational Amber The management port link has been disabled through the software Flashing amber The management port link is bad and has been disabled due to a hardware failure Off The module does not detect a signal CMP STATUS Green All diagnostics pass The CMP is operational normal initialization sequence Amber Sufficient power is not available for all modules Flashing amber ...

Страница 354: ... down Blinking red The switch has just been powered on and the module is resetting or The module is resetting and both ejector levers are out or The module has been inserted during the initialization process or The module could not power up because of insufficient power or An overtemperature condition has occurred A major temperature threshold has been exceeded during environmental monitoring Off ...

Страница 355: ...nmental warning The card has been shut down to prevent permanent damage Blinking red The fabric module has just been inserted and is booting up or An overtemperature condition has occurred and the module has powered down or The power was turned off with a CLI command or The module is resetting and both ejector levers are out ID Blinking blue The operator has activated this LED to identify this mod...

Страница 356: ...ly failure has occurred ID Blinking blue The operator has activated this LED to identify this module in the chassis Off This module is not being identified Table D 5 Power Supply LEDs continued LED Color Condition Table D 6 Fan Tray LEDs LED LED Indication Condition STATUS Green The fan tray is operational Flashing red One or more fans is running below the threshold speed The fan tray is receiving...

Страница 357: ...Disconnecting the System from the Console page E 1 Disconnecting the System from the Network page E 2 Caution When you are handling the Cisco Nexus 7000 Series switch or switch components you must follow the ESD protocol at all times to prevent ESD damage This protocol includes but is not limited to wearing an ESD wrist strap that you connect to the earth ground in the data center building Powerin...

Страница 358: ...s Prerequisites for Repacking the System page E 2 Required Tools and Equipment for Repacking the System page E 2 Repacking the Cisco Nexus 7010 Switch page E 3 Repacking the Cisco Nexus 7018 Switch page E 11 Prerequisites for Repacking the System You must power down and disconnect the system from the network before you begin removing the switch from the rack or cabinet see the Disconnecting the Ci...

Страница 359: ...s as follows a Remove the one or two power plugs from the power source The Input LEDs turn off b If you are removing a 6 kW AC power supply unit unscrew the screw on the cable retention device and pull the one or two plugs off the power supply unit Note For a 7 5 kW power supply unit you cannot remove the power cords from them because they are permanently attached Step 3 For each DC power supply u...

Страница 360: ... 5 2 on page 5 7 Warning When installing or replacing the unit the ground connection must always be made first and disconnected last Statement 1046 Step 4 Remove each power supply unit and repack it as follows Note These instructions are for the multi unit power supply box that comes with newer Cisco Nexus 7010 switches If you have the single unit box for the 6 kW AC power supply unit see Figure E...

Страница 361: ...ck c i sc o co m E 5 Cisco Nexus 7000 Series Hardware Installation and Reference Guide OL 23069 06 Appendix E Repacking the Cisco Nexus 7000 Series Switch for Shipment Repacking the System Components Figure E 1 Packing Power Supply Units in a Cisco Nexus 7010 Multi Unit Box ...

Страница 362: ...f you are packing two units place them in the large slots at each end of the box h Coil the power cables and insert them in the slots next to the power supply unit see Callout 7 in Figure E 1 i If there is another power supply unit to pack repeat Steps 4a through 4h j Place the top padding above the power supply units see Callout 8 in Figure E 1 k Fold the two narrow flaps of the box over the padd...

Страница 363: ... frame and chassis Step 8 If the chassis includes the optional midframe doors remove the doors and their frames as follows a Remove the EMI panel which holds the lower side frame pieces by loosening the four captive screws on the EMI frame until they no longer connect with the chassis b Remove each of the two side frames from the EMI panel by loosening and removing the two screws that hold each si...

Страница 364: ...djusting the position of the chassis in the rack or cabinet Step 13 After you securely position the chassis on the mechanical lift use the mechanical lift to move the chassis to its pallet Step 14 Lower the chassis to the level of the pallet or no more than 0 25 inches 0 6 cm above the pallet Caution You need four persons for the following step Step 15 Use at least four persons to push the chassis...

Страница 365: ...securely tightening the four screws for each bracket See Figure E 2 Step 18 Attach two more angle brackets to the pallet on the other side of the chassis Make sure that the four screw holes on the vertical side of each bracket align with four holes in the chassis Step 19 Use four screws to securely attach each of the additional two brackets to the chassis Step 20 Securely fasten the two bolts on e...

Страница 366: ...the chassis packing cushion on top of the bagged chassis as shown in View A in Figure E 3 Figure E 3 Packing the System Components Step 23 Place the larger of the two three segment dividers beside the chassis see Callout 1 in Figure E 3 1 Three segment divider 6 Corrugated cardboard lid 2 Polyethylene cushion 7 Corro clips 3 Power supply box one box for three power supply units or three boxes for ...

Страница 367: ...ides of the pallet see Callout 5 in Figure E 3 Step 31 Place the other J box half on the other two sides see Callout 5 in Figure E 3 Step 32 Connect the two J box pieces with six corro clips three on each seam see Callout 7 in Figure E 3 Step 33 Place the corrugated cardboard lid on top of the package see Callout 6 in Figure E 3 Step 34 Place each of the four edge protectors on one of the top edge...

Страница 368: ... when terminals are not in service Be sure uninsulated conductors are not accessible when cover is in place Statement 1075 d Unscrew the two screws that secure each of the power plugs to the power supply unit e Unplug each of the power plugs from the power supply unit f Disconnect the power supply grounding cable by unscrewing its two M6 nuts and removing the grounding lug from the power supply un...

Страница 369: ...the power supply unit so that they no longer connect with the chassis d With one hand on the handle of the power supply unit pull the unit partially out of the chassis 1 Open the power supply box 5 Place the top pad on top of the power supply units 2 Make sure that the bottom pad and cardboard holders are in place in the box 6 Fold the narrow flap over the top of the top pad 3 Place AC power suppl...

Страница 370: ... them in the large slots at each end of the box If you are packing three units place one in the middle of the box and the other two in slots at either end of the box g Coil the power cables and insert them in the slots next to the power supply unit see Callout 4 in Figure E 4 h If there is another AC power supply unit to repack repeat Steps 4b through 4g i Place the packing cushion above the power...

Страница 371: ...power cables and place them on the bottom of the opened box 6 Place the padded power supply unit inside the box and on top of the trifold 2 Place the trifold cover over the coiled cables 7 Fold the narrow flaps over the power supply unit pads 3 Place the power supply unit in its ESD bag and hold the filler box outside the bag in the notched portion of the power supply unit 8 Fold the wide flaps ov...

Страница 372: ...nd the other foam block by pulling its two sides apart and fit the block around the front of the power supply unit before bringing the two sides together again see Callout 5 in Figure E 5 j Place the power supply unit and its foam blocks in the box see Callout 6 in Figure E 5 k Fold the narrow flaps over the power supply unit see Callout 7 in Figure E 5 l Fold the wide flaps over the narrow flaps ...

Страница 373: ...Appendix E Repacking the Cisco Nexus 7000 Series Switch for Shipment Repacking the System Components Figure E 6 Removing One Side of the Front Door b Press the locking button on the back side of the door behind the opened latch handle so that the latch handle flattens to the front side of the door see Figure E 7 1 Open the latch handle until it clicks 2 Swing open the door ...

Страница 374: ...00 Series Switch for Shipment Repacking the System Components Figure E 7 Location of the Latch Locking Button c Hold the opened side of the door with one hand and use your other hand to open the latch handle on the hinged side of the door until the handle clicks see Callout 1 in Figure E 8 Use both hands to remove the door from the chassis 1 Locking button for the right latch 2 Locking button for ...

Страница 375: ...ng the Front Door d Press the locking button on the inside surface of the door behind the opened latch to flatten the latch handle to the front side of the door see Figure E 7 e Open the box for the front door You can find this box in the box that contains the front door and air intake frame kit Make sure that four side cushions are aligned to the edges of the center panel of the box see Callouts ...

Страница 376: ...ach side and four of the screws are attached to the chassis see Figure E 10 Place the screws in a small parts bag Note Do not remove the top cover at this time The top cover is part of the cable management frame 1 Align the two shorter side cushions to the shorter inside crease in the center panel of the box 4 Fold the two short flaps up along the end side cushions and then fold them over the top ...

Страница 377: ...ght cable management frame Place the two screws and the door stopper in the small parts bag for the door k Loosen and remove the two M3x10 screws that hold the left door stopper to the left cable management frame Place the two screws and the door stopper in the small parts bag for the door l Fold the short box flaps over the top fold the long box flaps over the short flaps and then tape the long f...

Страница 378: ... Appendix E Repacking the Cisco Nexus 7000 Series Switch for Shipment Repacking the System Components Figure E 11 Removing the Air Intake Assembly n Pull the air intake assembly off the chassis o Loosen and remove the four ball point studs shown in Figure E 12 1 Loosen two captive screws until they are clear of the chassis 2 Remove the air intake assembly from the chassis ...

Страница 379: ...2 Removing the Ball Point Alignment Studs p Repack the air intake frame in its original packing box and put the ball point alignment screws in the small parts bag for the door q Fold the two short box flaps over the air intake frame fold the two long box flaps over the short flaps and then tape the long flaps together and to the box with packing tape r Open the box for the front door and air intak...

Страница 380: ...d b a ck c i sc o co m E 24 Cisco Nexus 7000 Series Hardware Installation and Reference Guide OL 23069 06 Appendix E Repacking the Cisco Nexus 7000 Series Switch for Shipment Repacking the System Components Figure E 13 Packaging the Front Door and Air Intake Frame Kit ...

Страница 381: ...semblies and Chassis b Remove the top cover from the chassis and the two upper cable management assemblies 1 Open the box 6 Place the bag of small parts bag in one of the filler boxes 2 Insert the front door box into the main box 7 Fold the two short flaps over the top of the box 3 Insert the air intake frame box next to the front door box and at the bottom of the main box 8 Fold the two long flap...

Страница 382: ...sen and remove five M4x10 screws and then lift off the assembly as shown in Figure E 15 d Repeat Step 3c for the upper cable management assembly on the right side Figure E 15 Removing an Upper Cable Management Assembly e For the lower cable management assembly on the left loosen and remove four M4x10 screws and then lift off the assembly as shown in Figure E 16 1 Rack mount bracket 3 Loosen and re...

Страница 383: ... 16 Removing a Lower Cable Management Assembly f Repeat Step 3e for the lower cable management assembly on the right side g Open the box for the cable management frames and remove the packing materials h Place the packing cushion and cardboard dividers in the box as shown with Callouts 2 and 3 in Figure E 17 1 Lower cable management assembly 3 Loosen and remove four M4x10 screws 2 Left rack mount ...

Страница 384: ...epacking the System Components Figure E 17 Packing the Cisco Nexus 7018 Cable Management System 1 Open the cable management box 5 Place the flat cardboard divider on top of the cable management frames 2 Insert a packing cushion at the bottom of the box 6 Place the top cover box 3 Insert the cable management frame dividers 7 Insert a packing cushion above the top cover box 4 Insert each of four cab...

Страница 385: ...al lift when lifting anything weighing over 120 pounds 55 kg Step 14 Lay the shipping pallet flat on the floor This pallet includes a raised portion that is bolted to the larger pallet Make sure that the raised portion is on top Caution You need four persons for the following step Step 15 Use at least four persons to push the chassis onto the mechanical lift Caution Be sure to push the chassis onl...

Страница 386: ...t See Figure E 18 Step 21 Attach two more angle brackets to the pallet on the other side of the chassis Make sure that the four screw holes on the vertical side of each bracket align with four holes in the chassis Step 22 Use four screws to securely attach each of the additional two brackets to the chassis Step 23 Securely fasten the two bolts on each of the four angle brackets to the pallet Step ...

Страница 387: ...area above the power supply box as shown in View A in Figure E 19 Step 28 Remove each of the two bottom support rails from the rack or cabinet by loosening the eight screws that secure each of them to the vertical mounting rails on the rack or cabinet Step 29 Reassemble the accessory kit by placing the following components in the accessory kit box Bottom support rails two and mounting screws 34 Co...

Страница 388: ...ther J box half on the other two sides as shown in View A of Figure E 19 Step 32 Connect the two J box pieces with six corro clips three on each seam as shown in View A of Figure E 19 Step 33 If your system included the optional front door and air intake frame pack those items in their original packing materials and place them in the open area above the power supply box Step 34 Place the corrugate...

Страница 389: ...mation page F 3 Site Preparation Checklist Planning the location and layout of your equipment rack or cabinet is essential for successful switch operation ventilation and accessibility Table F 1 lists the site planning tasks that we recommend that you complete before you install the Cisco Nexus 7000 Series switch Your completion of each task ensures a successful switch installation Table F 1 Site ...

Страница 390: ...ipment Dedicated separate circuits for power redundancy UPS for power failures Grounding proper gauge wire and lugs Circuit breaker size Grounding evaluation Data center ground Cable and interface equipment evaluation Cable type Connector type Cable distance limitations Interface equipment transceivers EMI evaluation Distance limitations for signaling Site wiring RFI levels Table F 1 Site Planning...

Страница 391: ...heets Table F 3 Table F 4 and Table F 5 to record information about the chassis and modules Contract Number Chassis serial number Product number ZIP code Country Table F 2 Contact and Site Information continued Table F 3 Network Related Information Switch IP address Switch IP netmask Hostname Domain name IP broadcast address Gateway router address DNS address Table F 4 Module Information for the C...

Страница 392: ...ries Hardware Installation and Reference Guide OL 23069 06 Appendix F Site Preparation and Maintenance Records Chassis and Module Information Table F 5 Module Information for the Cisco Nexus 7018 Chassis Slot Module Type Module Serial Number Notes 1 2 3 4 5 6 7 8 9 Supervisor 10 Supervisor 11 12 13 14 15 16 17 18 ...

Страница 393: ... 4 48 port 10 100 1000 Ethernet I O module MTBF A 3 A 4 power requirements A 5 A 6 RJ 45 connectors B 16 weight A 3 A 4 48 port 10 100 1000 Ethernet I O module with XL MTBF A 3 power requirements A 6 weight A 3 48 port 1 and 10 Gigabit Ethernet I O module MTBF A 3 A 4 power requirements A 5 A 6 weight A 3 A 4 48 port 1 Gigabit Ethernet I O module MTBF A 3 A 4 power requirements A 5 A 6 weight A 3 ...

Страница 394: ... Cisco Nexus 7018 4 20 altitude specifications A 1 appendix E 1 attach module command 7 21 7 44 B blank power supply module installing 5 1 bootflash memory 7 44 bottom support rails installing Cisco Nexus 7009 2 4 Cisco Nexus 7010 3 3 Cisco Nexus 7018 4 3 C cabinet bolting Cisco Nexus 7009 2 2 Cisco Nexus 7010 3 2 Cisco Nexus 7018 4 2 grounding Cisco Nexus 7009 2 19 Cisco Nexus 7010 3 11 Cisco Nex...

Страница 395: ...mensions A 2 clearances A 15 component power specifications A 6 components 1 5 component weights A 3 door installation 3 17 equipment 1 5 installation 3 7 mounting on a rack 1 9 MTBF A 3 overview 1 5 power specifications A 5 system fan tray replacing 9 38 Cisco Nexus 7018 airflow A 18 cable management assembly installation 4 15 chassis installing 4 7 chassis dimensions A 2 clearances A 15 componen...

Страница 396: ...splaying 7 25 EPLD images downloading 7 40 preparing for installation 7 43 reporting 7 47 required for LISP 7 42 required for VPCs 7 41 running on switch 7 40 upgrades reporting 7 48 ESD port Cisco Nexus 7009 2 23 Cisco Nexus 7010 3 14 Cisco Nexus 7018 4 14 exhaust area for fan 1 8 expandable shelf brackets 2 7 2 10 3 6 4 6 expansion flash reader 2 35 3 16 F fabric modules Cisco Nexus 7009 locatio...

Страница 397: ...6 11 finished 9 47 flash memory installation Cisco Nexus 7009 2 35 Cisco Nexus 7010 3 16 Cisco Nexus 7018 4 30 four post rack See rack 1 4 1 9 1 16 free memory displaying 7 44 front mount bottom support rails 2 4 full redundancy mode 7 16 G grounding Cisco Nexus 7009 2 19 Cisco Nexus 7010 3 11 Cisco Nexus 7018 4 12 power interface unit 5 15 grounding pad Cisco Nexus 7009 2 21 Cisco Nexus 7010 3 13...

Страница 398: ... 3 Cisco Nexus 7010 3 3 Cisco Nexus 7018 4 3 module configuration purging 7 29 saving to NVRAM 7 29 modules connecting to 7 21 fabric locations 1 8 purging configurations 7 29 saving the configuration 7 29 state descriptions 7 20 verifying status 7 19 version reporting 7 41 7 42 MTBF 32 port 10 Gigabit Ethernet I O module A 3 A 4 32 port 10 Gigabit Ethernet I O module with XL A 3 32 port 1 and 10 ...

Страница 399: ...r redundancy mode combined command 7 13 power redundancy mode command 7 13 power redundancy mode insrc_redundant command 7 15 power redundancy mode ps redundant command 7 14 power redundancy mode redundant command 7 16 power requirements A 5 A 6 Cisco Nexus 7009 A 5 Cisco Nexus 7010 chassis A 5 A 6 fan tray Cisco Nexus 7009 A 5 supervisor module A 5 power specifications Cisco Nexus 7009 A 5 Cisco ...

Страница 400: ...d 7 48 show inventory command 7 1 show module xbar command reserved power for fabric modules 7 31 show sprom backplane 1 command 7 7 show version epld command 7 47 show version module epld command 7 40 images needed for vPCs 7 41 7 42 site preparation checklist F 1 Specifications A 5 STATUS LED fan tray D 6 supervisor modules active state 7 21 Cisco Nexus 7009 location 1 2 Cisco Nexus 7010 locatio...

Страница 401: ...modules 8 7 supervisor modules 8 5 U used memory displaying 7 44 V VPCs EPLDs required 7 41 W weight 32 port 10 Gigabit Ethernet I O module A 3 A 4 32 port 10 Gigabit Ethernet I O module with XL A 3 32 port 1 and 10 Gigabit Ethernet I O module A 3 A 4 48 port 10 100 1000 Ethernet I O module A 3 A 4 48 port 10 100 1000 Ethernet I O module with XL A 3 48 port 1 and 10 Gigabit Ethernet I O module A 3...

Страница 402: ...Se n d d o c u m e n t c o m m en t s t o n ex u s 7 k d o c f e e d b a ck c i sc o co m Index IN 10 Cisco Nexus 7000 Series Hardware Installation and Reference Guide OL 23069 06 ...

Отзывы: