background image

7

Chapter 3: Getting to Know the Compact Wireless-G Broadband Router
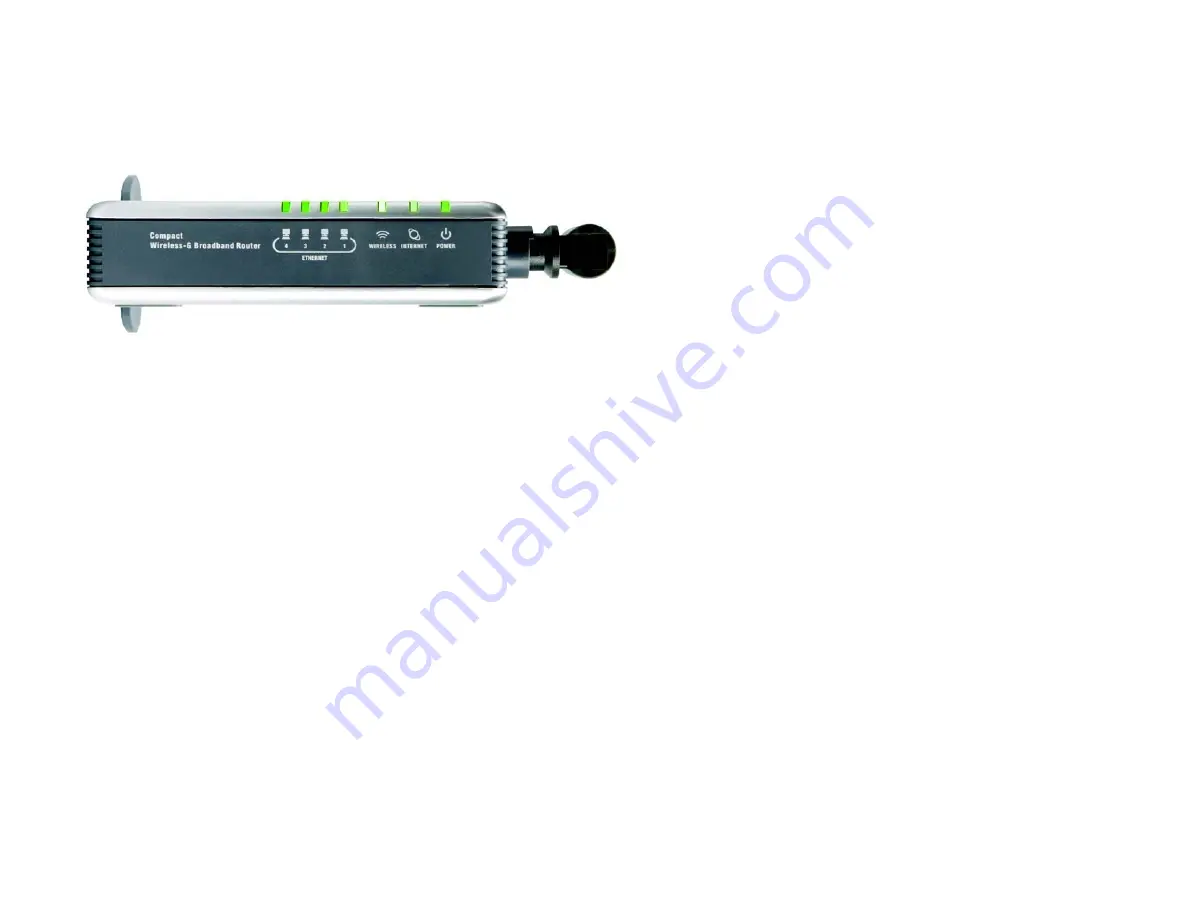
The Front Panel

Compact Wireless-G Broadband Router

The Front Panel

The Router’s LEDs, which indicate the status of the Router and network activities, are located on the front panel.

ETHERNET 1-4

Green. These numbered LEDs, corresponding with the numbered ports on the Router’s back 
panel, serve two purposes. If the LED is continuously lit, the Router is connected to a device 
through that port. A flashing LED indicates network activity over that port.

WIRELESS

Green. The 

WIRELESS 

LED flashes when there is a successful wireless connection.

INTERNET

Green. The 

INTERNET

 LED lights up when there is a connection through the Internet port.

POWER

Green. The 

POWER

 LED lights up and will stay on while the Router is powered on. When the 

Router goes through its self-diagnostic mode during every boot-up, this LED will flash. When 
the diagnostic is complete, the LED will be solidly lit.

Figure 3-2: The Router’s Front Panel

Содержание Linksys WRT54GCV2

Страница 1: ......

Страница 2: ...Also each figure diagram screenshot or other image is provided with a figure number and description like this Figure numbers and descriptions can also be found in the List of Figures section in the Table of Contents This exclamation point means there is a caution or warning and is something that could damage your property or the Compact Wireless G Broadband Router This checkmark means there is a n...

Страница 3: ... for Connection to Another Router 11 Chapter 5 Configuring the Compact Wireless G Broadband Router 13 Overview 13 How to Access the Web based Utility 14 The Setup Tab Basic Setup 14 The Setup Tab DDNS 18 The Setup Tab MAC Address Clone 19 The Setup Tab Advanced Routing 20 The Wireless Tab Basic Wireless Settings 21 The Wireless Tab Wireless Security 22 The Wireless Tab Wireless MAC Filter 24 The W...

Страница 4: ...ms and Solutions 42 Frequently Asked Questions 50 Appendix B Wireless Security 57 Security Precautions 57 Security Threats Facing Wireless Networks 57 Appendix C Upgrading Firmware 60 Appendix D Windows Help 61 Appendix E Finding the MAC Address and IP Address for Your Ethernet Adapter 62 Windows 98SE or Me Instructions 62 Windows 2000 or XP Instructions 62 For the Router s Web based Utility 63 Ap...

Страница 5: ...ic Setup 14 Figure 5 4 Static IP Connection Type 15 Figure 5 5 PPPoE Connection Type 15 Figure 5 6 PPTP Connection Type 16 Figure 5 7 Static DHCP Client List 17 Figure 5 8 DHCP Client Table 17 Figure 5 9 DynDNS org 18 Figure 5 10 TZO com 19 Figure 5 11 Setup Tab MAC Address Clone 19 Figure 5 12 Setup Tab Advanced Routing Gateway 20 Figure 5 13 Setup Tab Advanced Routing Router 20 Figure 5 14 Wirel...

Страница 6: ...b DMZ 33 Figure 5 30 Administration Tab Management 34 Figure 5 31 Administration Tab Log 36 Figure 5 32 Incoming Log 36 Figure 5 33 Administration Tab Diagnostics 37 Figure 5 34 Ping Test 37 Figure 5 35 Traceroute Test 37 Figure 5 36 Administration Tab Factory Defaults 38 Figure 5 37 Administration Tab Firmware Upgrade 38 Figure 5 38 Status Tab Router 39 Figure 5 39 Status Tab Local Network 40 Fig...

Страница 7: ...is sometimes called a WLAN or Wireless Local Area Network The Compact Wireless G Broadband Router bridges wireless networks of 802 11a 802 11b and 802 11g standards and wired networks allowing them to communicate with each other With your wired and wireless networks connected to each other and the Internet you can now share files and Internet access and even play games All the while the Compact Wi...

Страница 8: ...ettings on the Compact Wireless G Broadband Router Appendix A Troubleshooting This appendix describes some problems and solutions as well as frequently asked questions regarding installation and use of the Compact Wireless G Broadband Router Appendix B Wireless Security This appendix explains the risks of wireless networking and some solutions to reduce the risks Appendix C Upgrading Firmware This...

Страница 9: ...ions for the Router Appendix H Warranty Information This appendix supplies the warranty information for the Router Appendix I Regulatory Information This appendix supplies the regulatory information regarding the Router Appendix J Contact Information This appendix provides contact information for a variety of Linksys resources including Technical Support ...

Страница 10: ...the Router You can arrange the Router and multiple access points to work in succession to extend the roaming range and you can set up your wireless network to communicate with your Ethernet hardware as well If the wireless network is relatively small and needs to share resources only with the other computers on the wireless network then the Ad Hoc mode can be used Ad Hoc mode allows computers equi...

Страница 11: ...o communicate with the Wireless PrintServer and Wireless Ethernet Bridges When you wish to connect your wireless network with your wired network you can use the Compact Wireless G Broadband Router s four LAN ports To add more ports any of the Compact Wireless G Broadband Router s LAN ports can be connected to any of Linksys s switches With these and many other Linksys products your networking opti...

Страница 12: ... Router ETHERNET 1 2 3 4 These ports 1 2 3 4 connect the Router to your networked PCs and other Ethernet network devices INTERNET The Internet port is where you will connect your broadband Internet connection POWER The POWER port is where you will connect the power adapter Figure 3 1 The Router s Back Panel broadband an always on fast Internet connection port the connection point on a computer or ...

Страница 13: ... continuously lit the Router is connected to a device through that port A flashing LED indicates network activity over that port WIRELESS Green The WIRELESS LED flashes when there is a successful wireless connection INTERNET Green The INTERNET LED lights up when there is a connection through the Internet port POWER Green The POWER LED lights up and will stay on while the Router is powered on When ...

Страница 14: ... RESET Button There are two ways to reset the Router s factory defaults Either press the RESET button for approximately eight seconds or restore the defaults from the Administration tab Factory Defaults in the Router s Web based Utility IMPORTANT If you reset the Router all of your settings including Internet connection wireless and security will be deleted and replaced with the factory defaults D...

Страница 15: ...ware Installation for Connection to Your Broadband Modem If you want to install the Compact Wireless G Broadband Router behind another router in your network then follow the instructions in Hardware Installation for Connection to Another Router Hardware Installation for Connection to your Broadband Modem 1 Power down your network devices 2 Locate an optimum location for the Router The best place f...

Страница 16: ...r to the Router s Power port Then connect the other end to an electrical outlet Only use the power adapter supplied with the Router Use of a different adapter can cause product damage Now that the hardware installation is complete proceed to Chapter 5 Configuring the Compact Wireless G Broadband Router Figure 4 2 Connecting Your Network Devices Figure 4 3 Connecting the Power IMPORTANT Make sure y...

Страница 17: ...rs will display the Setup tab In the Network Setup section there is a setting called Local IP Address also called Router IP which is set to 192 168 1 1 Change this to 192 168 2 1 4 Click the Save Settings button to save your change and then exit the Web based Utility 5 Power down your network devices Now you will begin the hardware installation of the Router 6 Locate an optimum location for the Ro...

Страница 18: ...andard Ethernet network cabling 9 Connect the AC power adapter to the Router s Power port and the other end into an electrical outlet Only use the power adapter supplied with the Router Use of a different adapter may result in product damage Now that the hardware installation is complete proceed to Chapter 5 Configuring the Compact Wireless G Broadband Router Figure 4 6 Connecting Your Network Dev...

Страница 19: ...f the Utility Basic Setup On the Basic Setup screen enter the settings provided by your ISP Management Click the Administration tab and then the Management tab The Router s default password is admin To secure the Router change the Password from its default There are seven main tabs Setup Wireless Security Access Restrictions Applications Gaming Administration and Status Additional tabs will be ava...

Страница 20: ... The first screen that appears displays the Setup tab This allows you to change the Router s general settings Internet Setup The Internet Setup section configures the Router to your Internet connection Most of this information can be obtained from your ISP Internet Connection Type Choose the type of Internet connection your ISP provides from the drop down menu Automatic Configuration DHCP By defau...

Страница 21: ...access the Internet again If you wish to activate Connect on Demand click the radio button In the Max Idle Time field enter the number of minutes you want to have elapsed before your Internet connection terminates Keep Alive Option Redial Period If you select this option the Router will periodically check your Internet connection If you are disconnected then the Router will automatically re establ...

Страница 22: ...s may be required by your ISP Verify with your ISP before making any changes Host Name and Domain Name These fields allow you to supply a host and domain name for the Router Some ISPs usually cable ISPs require these names as identification You may have to check with your ISP to see if your broadband Internet service has been configured with a host and domain name In most cases leaving these field...

Страница 23: ...able button On the DHCP Client Table screen you will see a list of DHCP clients with the following information Client Names Interfaces IP Addresses and MAC Addresses From the To Sort by drop down menu you can sort the table by Client Name Interface IP Address or MAC Address To view the most up to date information click the Refresh button To exit this screen click the Close button Start IP Address ...

Страница 24: ... you are hosting your own website FTP server or other server behind the Router Before you can use this feature you need to sign up for DDNS service at one of two DDNS service providers DynDNS org or TZO com If you do not want to use this feature keep the default setting Disable DDNS DDNS Service If your DDNS service is provided by DynDNS org then select DynDNS org from the drop down menu If your D...

Страница 25: ...to a unique piece of hardware for identification Some ISPs will require you to register a MAC address in order to access the Internet If you do not wish to re register the MAC address with your ISP you may assign the MAC address you have currently registered with your ISP to the Router with the MAC Address Clone feature MAC Address Clone Enabled Disabled To have the MAC Address cloned select Enabl...

Страница 26: ...ting for both networks as well as data from the Internet Static Routing To set up a static route between the Router and another network select a number from the Static Routing drop down list A static route is a pre determined pathway that network information must travel to reach a specific host or network Enter the information described below to set up a new static route Click the Delete This Entr...

Страница 27: ...e and must not exceed 32 keyboard characters in length Make sure this setting is the same for all devices in your wireless network For added security you should change the default SSID linksys to a unique name Channel Select the appropriate channel from the list provided to correspond with your network settings All devices in your wireless network must broadcast on the same channel in order to com...

Страница 28: ...and click the Generate button If you want to enter the WEP key manually then enter it in the WEP Key 1 4 field s To indicate which WEP key to use select the appropriate TX Key number WPA Personal This method offers two encryption methods TKIP and AES with dynamic encryption keys Select the type of encryption method you want to use TKIP or AES Enter the Passphrase which can have 8 to 63 characters ...

Страница 29: ...hod AES with dynamic encryption keys Enter a Passphrase of 8 63 characters Then enter a Group Key Renewal period which instructs the Router how often it should change the encryption keys WPA2 Mixed Mode WPA2 gives you TKIP AES encryption Enter a Passphrase of 8 63 characters Then enter a Group Key Renewal period which instructs the Router how often it should change the encryption keys Figure 5 17 ...

Страница 30: ...s Permit PCs listed below to access the wireless network Clicking this radio button will allow wireless access by MAC Address Wireless Client List Wireless Client List Click the Wireless Client MAC List button to display a list of network users by MAC Address From the To Sort by drop down menu you can sort the table by Client Name IP Address or MAC Address To view the most up to date information c...

Страница 31: ...used The Router will also advertise that it will automatically select the best rate for transmission The default setting is Default when the Router can transmit at all standard wireless rates 1 2Mbps 5 5Mbps 11Mbps 18Mbps and 24Mbps Other options are 1 2Mbps for use with older wireless technology and All when the Router can transmit at all wireless rates The Basic Rate is not the actual rate of da...

Страница 32: ...m will not be enabled The Router sends Request to Send RTS frames to a particular receiving station and negotiates the sending of a data frame After receiving an RTS the wireless station responds with a Clear to Send CTS frame to acknowledge the right to begin transmission The RTS Threshold value should remain at its default value of 2347 Beacon Interval The default value is 100 The Beacon Interva...

Страница 33: ...ticast packets to be forwarded to the appropriate computers Select Enable to filter multicasting or Disable to disable this feature Filter Internet NAT Redirection This feature uses port forwarding to block access to local servers from local networked computers Check the box to enable filter Internet NAT redirection or uncheck the box to disable this feature Web Filters Proxy Use of WAN proxy serv...

Страница 34: ...lows you to block or allow specific kinds of Internet usage and traffic such as Internet access designated applications websites and inbound traffic during specific days and times Internet Access Policy Access Policy Access can be managed by a policy Use the settings on this screen to establish an access policy after the Save Settings button is clicked Selecting a policy from the drop down menu wi...

Страница 35: ...s to cancel your changes Then click the Close button 5 Click the appropriate option Deny or Allow depending on whether you want to block or allow Internet access for the PCs you listed on the List of PCs screen 6 Decide which days and what times you want this policy to be enforced Select the individual days during which the policy will be in effect or select Everyday Then enter a range of hours an...

Страница 36: ...ing DNS Domain Name System The way that Internet domain names are located and translated into IP addresses A domain name is a meaningful and easy to remember handle for an Internet address Finger A UNIX command widely used on the Internet to find out information about a particular user such as a telephone number whether the user is currently logged on and the last time the user was logged on The p...

Страница 37: ...l File Transfer Protocol A version of the TCP IP FTP protocol that has no directory or password capability Web The Internet Start End This is the port range Enter the port number or range of external ports used by the server or Internet application Check with the software documentation of the Internet application for more information Protocol Select the protocol s used for this application TCP and...

Страница 38: ...mber range Check with the Internet application documentation for the port number s needed In the first field enter the starting port number of the Triggered Range In the second field enter the ending port number of the Triggered Range Forwarded Range For each application list the forwarded port number range Check with the Internet application documentation for the port number s needed In the first...

Страница 39: ...one computer exposing the computer to the Internet Any PC whose port is being forwarded must have its DHCP client function disabled and should have a new static IP address assigned to it because its IP address may change when using the DHCP function DMZ To expose one PC select Enable then enter a WAN IP Address or Host IP Address in the field Wan IP Address The Internet IP address of the computer ...

Страница 40: ... enabled as well Otherwise keep the default setting Disabled Allow Remote IP Address If you want to be able to access the Router from any external IP address select Any IP Address If you want to specify an external IP address or range of IP addresses then select the second option and complete the fields provided Remote Management Port Enter the port number that will be open to outside access UPnP ...

Отзывы: