background image


7

Cisco Aironet 6-dBi Patch Antenna (AIR-ANT2460P-R)

78-16940-02

  Obtaining Documentation

The antenna terminates with a RP-TNC plug after a short, 3-ft (0.91-m) cable. The mating connector to 
the antenna is an appropriate RP-TNC jack. The connector on the opposite end will vary according to 
the type of equipment used.

After the cable is attached to the antenna, make sure that the connections are sealed (if outdoors) to 
prevent moisture and other weathering elements from affecting performance. Cisco recommends using 
a coax seal (such as CoaxSeal) for outdoor connections. Silicon sealant or electrical tape are 

not


recommended for sealing outdoor connections.

Grounding the Antenna

Follow these steps to ground the antenna in accordance with national electrical code instructions.

Step 1

Use No. 10 AWG copper or No. 8 or larger copper-clad steel or bronze wire as a ground wire.

Step 2

Secure the ground wire to a static discharge unit (lightning arrestor, Cisco Aironet AIR-ACC245LA-R 
or equivalent) and then to a suitable building ground. If possible, route the ground wire from the 
discharge unit to the ground using stand-off insulators spaced from 4 ft (1.2 m) to 8 ft (2.4 m) apart.

Step 3

Mount the antenna discharge unit as close as possible to where the antenna cable enters the building.

Step 4

Drill a hole in the building’s wall as close as possible to the access point to which you will connect the 
antenna cable.

Caution

There may be wires in the wall. Make sure your drilling location is clear of any obstructions or other 
hazards.

Step 5

Pull the cable through the hole and form a drip loop close to where it enters the building.

Step 6

Thoroughly waterproof the lead-in area.

Step 7

Connect the antenna cable to the access point.

Obtaining Documentation

Cisco documentation and additional literature are available on Cisco.com. This section explains the 
product documentation resources that Cisco offers.

Cisco.com

You can access the most current Cisco documentation at this URL:

http://www.cisco.com/techsupport

You can access the Cisco website at this URL:

http://www.cisco.com

You can access international Cisco websites at this URL:

http://www.cisco.com/public/countries_languages.shtml

Содержание Aironet AIR-ANT2460P-R

Страница 1: ...instructions for mounting it The antenna operates in the 2 4 GHz frequency range and is designed for use in both indoor and outdoor environments The following information is provided in this document Technical Specifications page 2 System Requirements page 3 Installation Guidelines page 4 Installing the Antenna page 5 Documentation Feedback page 8 Cisco Product Security Overview page 8 Obtaining T...

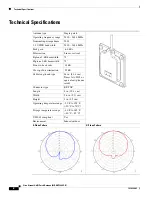
Страница 2: ...on Linear vertical E plane 3 dB beamwidth 73 H plane 3 dB beamwidth 75 Front to back ratio 18 dB Cross pol discrimination 15 dB Cable length and type 36 in 91 4 cm Times AA 9303 or equivalent plenum rated Connector type RP TNC Length 4 in 10 1 cm Width 3 6 in 9 1 cm Height 1 in 2 5 cm Operating temperature range 22 F to 158 F 30 C to 70 C Storage temperature range 40 F to 185 F 40 C 85 C UL2043 co...

Страница 3: ...er it is recommended that the user limit exposure time Statement 254 Warning Do not work on the system or connect or disconnect cables during periods of lightning activity Statement 1001 Warning Do not locate the antenna near overhead power lines or other electric light or power circuits or where it can come into contact with such circuits When installing the antenna take extreme care not to come ...

Страница 4: ...e susceptible to RF obstructions and common sources of interference that can reduce throughput and range of the device to which they are connected Follow these guidelines to ensure the best possible performance Mount the antenna to utilize its propagation characteristics One way to do this is to orient the antenna vertically and mount it as high as possible Keep the antenna away from metal obstruc...

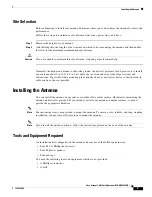
Страница 5: ... from all power lines and obstructions If possible find a mounting place directly above your wireless device so that the lead in cable can be as short as possible Installing the Antenna You can install the antenna on any indoor or outdoor flat vertical surface Hardware for mounting the antenna on drywall is provided If you intend to install your antenna on another surface you must provide the appr...

Страница 6: ...ounting holes with the anchors Step 7 Start a 8 x screw into each antenna mounting hole Step 8 Use a Phillips screwdriver to secure the antenna to the wall Do not overtighten Step 9 Install the end caps into the antenna mounting holes Step 10 Remove the yellow installation warning label from the antenna radome Outdoor Installations You can mount this antenna outdoors If you mount the antenna outdo...

Страница 7: ...t and then to a suitable building ground If possible route the ground wire from the discharge unit to the ground using stand off insulators spaced from 4 ft 1 2 m to 8 ft 2 4 m apart Step 3 Mount the antenna discharge unit as close as possible to where the antenna cable enters the building Step 4 Drill a hole in the building s wall as close as possible to the access point to which you will connect...

Страница 8: ...do not have a user ID or password you can register at this URL http tools cisco com RPF register register do Documentation Feedback You can provide feedback about Cisco technical documentation on the Cisco Technical Support Documentation site area by entering your comments in the feedback form available in every online document Cisco Product Security Overview Cisco provides a free online Security ...

Страница 9: ...crypted with PGP versions 2 x through 9 x Never use a revoked encryption key or an expired encryption key The correct public key to use in your correspondence with PSIRT is the one linked in the Contact Summary section of the Security Vulnerability Policy page at this URL http www cisco com en US products products_security_vulnerability_policy html The link on this page has the current PGP key ID ...

Страница 10: ...sco Product Identification Tool to locate your product serial number before submitting a request for service online or by phone You can access this tool from the Cisco Technical Support Documentation website by clicking the Tools Resources link clicking the All Tools A Z tab and then choosing Cisco Product Identification Tool from the alphabetical list This tool offers three search options by prod...

Страница 11: ...uest Severity To ensure that all service requests are reported in a standard format Cisco has established severity definitions Severity 1 S1 An existing network is down or there is a critical impact to your business operations You and Cisco will commit all necessary resources around the clock to resolve the situation Severity 2 S2 Operation of an existing network is severely degraded or significan...

Страница 12: ...s and other networking professionals Join a discussion at this URL http www cisco com discuss networking What s New in Cisco Documentation is an online publication that provides information about the latest documentation releases for Cisco products Updated monthly this online publication is organized by product category to direct you quickly to the documentation for your products You can view the ...

Отзывы: