Step 7
If the phone is on a desk, adjust the footstand. For more information, see
Connect the Footstand, on page 84
.
With a wall-mounted phone, you might need to adjust the handset rest to ensure that the receiver cannot slip
out of the cradle.
Step 8
Monitor the phone startup process. This step verifies that the phone is configured properly.
Step 9
If you are configuring the network settings on the phone, you can set up an IP address for the phone by either
using DHCP or manually entering an IP address.
See
Configure the Network from the Phone, on page 35
.
Step 10
Upgrade the phone to the current firmware image.
Firmware upgrades over the WLAN interface may take longer than upgrading over the wired interface,
depending on the quality and bandwidth of the wireless connection. Some upgrades may take more than one
hour.
Step 11
Make calls with the Cisco IP Phone to verify that the phone and features work correctly.
Step 12
Provide information to end users about how to use their phones and how to configure their phone options.
This step ensures that users have adequate information to successfully use their Cisco IP Phones.
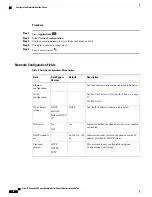
Configure the Network from the Phone
The phone includes many configurable network settings that you may need to modify before it is functional
for your users. You can access these setting through the phone menus.
The Network configuration menu provides you with options to view and configure a variety of network
settings.
You can control whether a phone has access to the Settings menu or to options on this menu by modifying
the value in the Phone-UI-User-Mode field in the
Voice
>
System
>
System Configuration
section of
the Phone Configuration Utility page. Also, you must modify the attribute of ua in the Resync file of the
phone to control the access. For example, when Phone-UI_User_mode is set to Yes and in the resync file
the attribute for Speed_Dial_2 are:
Note
•
Speed_Dial_2 ua="rw", you can read and write on web of user model and lcd.
•
Speed_Dial_2 ua="na", you can only read on web of user model and lcd.
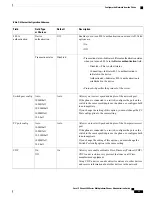
The Phone-UI-User-Mode field accepts these values:
•
Yes: Allows access to the Settings menu. It also allows access to the Phone Configuration Utility
page for user-mode.
•
No: Prevents access to the Settings menu. It also restricts access to the Phone Configuration Utility
page for user-mode.
If you cannot access an option on the Admin Settings menu, check the Phone-UI-User-Mode field.
You can configure settings that are display-only on the phone in your Third-Party Call Control system.
Cisco IP Phone 8800 Series Multiplatform Phones Administration Guide
35
Configure the Network from the Phone
Содержание 8851
Страница 23: ...P A R T I About the Cisco IP Phone Technical Details page 9 Cisco IP Phone Hardware page 21 ...
Страница 24: ......
Страница 36: ...Cisco IP Phone 8800 Series Multiplatform Phones Administration Guide 20 USB Port Information ...
Страница 48: ......
Страница 96: ...Cisco IP Phone 8800 Series Multiplatform Phones Administration Guide 80 Administrator and User Accounts ...
Страница 98: ......
Страница 118: ...Cisco IP Phone 8800 Series Multiplatform Phones Administration Guide 102 Troubleshoot the Key Expansion Module ...
Страница 134: ...Cisco IP Phone 8800 Series Multiplatform Phones Administration Guide 118 Adjust the Handset Rest ...
Страница 136: ......
Страница 142: ...Cisco IP Phone 8800 Series Multiplatform Phones Administration Guide 126 Documentation Support and Security Guidelines ...
Страница 168: ...Cisco IP Phone 8800 Series Multiplatform Phones Administration Guide 152 XML Services ...
Страница 204: ...Cisco IP Phone 8800 Series Multiplatform Phones Administration Guide 188 Capture Packets ...
Страница 208: ...Cisco IP Phone 8800 Series Multiplatform Phones Administration Guide 192 Configure the XML Directory Service ...
Страница 210: ......
Страница 292: ...Cisco IP Phone 8800 Series Multiplatform Phones Administration Guide 276 Cisco IP Phone Web Page ...

