Flip Solutions Ltd t/a Flip Connect
Phone: 020 3056 5060 | Fax: 0870 421 5411 | E-Mail: [email protected]
3
User Guide | Cisco 232D & 302D
| 02/07/2014
How to set up the Polycom Cisco 232D and 302D
The handset and base station will arrive pre-configured and simply needs to be connected to the internet and powered up.
Your Administrator or installer should know how to do this for you. There are some network/router level settings that must
be applied, or the Horizon service will not work - for further details on these please refer to the Horizon user guide.
Using your phone
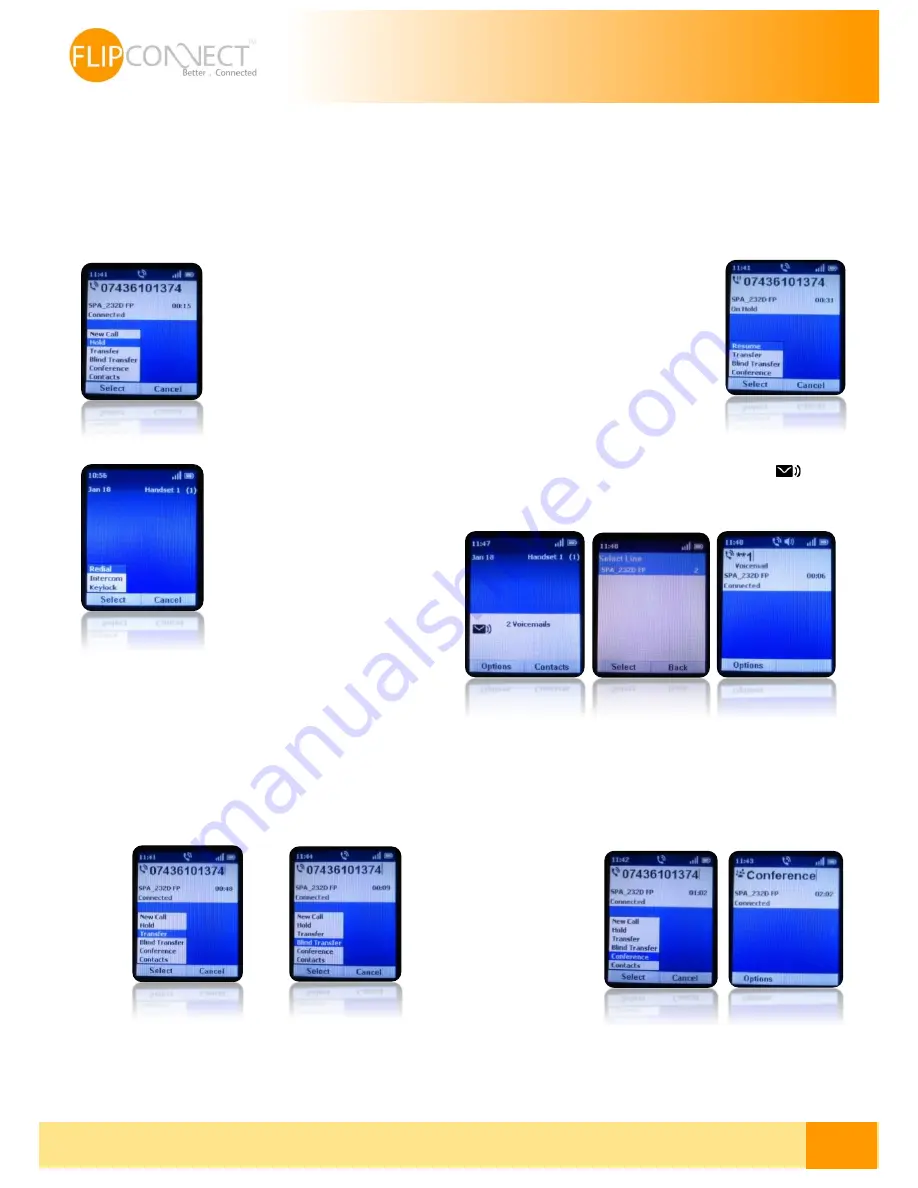
Hold Call
Resume Call
To put a call on hold, press the
left softkey to select Options.
Scroll to Hold and press the
centre Select button. The Hold
icon and on-screen message
indicates a call is on hold.
To resume the call, press the Left
softkey to select Options. Scroll to
Resume and press the centre Select
button. The Active Call icon indicates
the call is active again.
Redial a call
Voice Mail
To redial the last number called,
press the left Softkey to select
Options. From here, the option
to redial will appear and this can
now be selected.
To access the voice mail press and hold the “1
” and
then press the Select option on the left softkey. Then follow
the instructions in order to access your voice mail.
Transfer (Attended/Blind) a call
Conference Call
Press the left softkey to select Options. Scroll to
Transfer or Blind Transfer and press the Select
button. Enter the number that the call is being
transferred to. The Cisco SPA302D automatically dials
the number.
For attended transfer you can wait to speak to the
called number. To transfer, press the left softkey to
select Options, scroll to Transfer, and then press the
left softkey button.
Press the Options softkey during an active call and then
Conference. The first call is placed on hold, a second line is
opened, and you hear a tone. Enter the second telephone
number on the keypad. The number is automatically dialled.
When the second party answers, press the Options softkey
and
choose
Conference.
The
three calls are
connected and the
display
screen
shows
that
a
conference call is in
progress.
When
you hang up, the
conference call is
ended for all parties.
Note: There is a limitation regarding the conference call
since the device is not using the “Network Centric Method”.
Also up to 3 participants can be in a conference call.