


11
Cisco 12016, Cisco 12416, and Cisco 12816 Router Blower Module and Air Filter Replacement Instructions
78-16083-02
Cleaning or Replacing the Chassis Air Filter
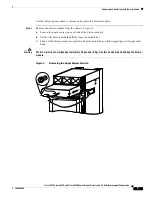
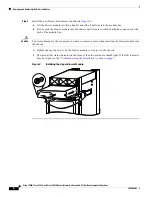
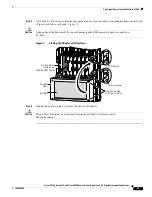
Step 5
Lift up the air filter door so that the four guide pins are inserted in the corresponding holes on each side
of the switch fabric card cage (
Figure 7
).
Caution
Align and seat the door carefully to avoid damaging the EMI-preventive gasket contacts on
the door.
Figure 7
Closing the Chassis Air Filter Door
Step 6
Tighten the captive screws to secure the door to the chassis.
Caution
The air filter door must be closed and secured at all times to maintain correct
EMI performance.
ALARM
CSC
0
FA
IL
1
0
1
2
ENABLED
SFC
Q OC-3/STM-POS
6DS3–SMB P
/
H
/
F
12DS3–SMB P
/
H
/
F
RX
TX
11
RX
OC-48/STM-16-SCPOS
OC-12/STM-4 A
T
M
F
AST ETERNET
R
O
UTE PR
OCESSOR
27962
Switch fabric
card cage
(behind filter door)
Air filter
door
Guide pin
Air filter
Captive screw
Captive screws
(2 on each side)


