


SAFETY TIPS
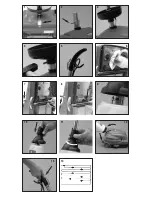
•Ensure that the voltage indicated on
the rating plate is same as your supply
voltage. The machine may only be
connected to an earthed/grounded
socket (drg. 1).
•When operating the machine be
careful not to damage the power
supply cable.
•
Using or cleaning up explosive,
inflammable, or corrosive materials
with this equipment is strictly
forbidden.
•Caution: before cleaning the machine
or removing either the water tank,
squeegee, or pads/brushes, please
ensure that the machine is
disconnected from the mains.
•Do not run the appliance over the
cord.
•The manufacturer canot accept
responsability for damage caused to
objects or people caused by the
incorrect use of any of the equipment.
MACHINE ASSEMBLY
After opening the cover of the
packing box, check that the following
accessory is included:
•Iron pin (drg. 2)
Remove the machine from the
carton/packaging.
Insert the chromium-plated tube into
the aluminium bolt, connect the PVC
solution pipe (drg. 3).
Lock the chromium-plated tube and the
plastic part in their footing and by
means of a hammer insert the iron pin
that you find in the box (drg. 4).
Fix the cable to the hook ring (drg. 5).
INSTRUCTIONS FOR USE
Floorcleaning and removal of dirty
water.
Before starting sweep the floor.
•Set the two brushes (drg. 6).
•Set the central squeegee keeping the
lever for height adjustment in position
(drg. 7), press the squeegee and
lock it by taking the lever in position
1
(drg. 8). In position
1
we have the
maximum suction, in position
2
minimum suction. In position
the
squeegee is unlocked.
•Fill the solution tank with clean
water and a
mild solution
, especially
designed for floorscrubbers; then
without filling it completely, fit it in the
lower tank footing, and clamp the thin
water release control rod to the upper
lift fork (drg. 9).
•Lock the clean water tank in position
by pushing down the upper support
and turning the ring to fix it (drg. 10
– 11).
•Insert the plug into the electrical
outlet, depress the black pedal on the
right side and pull the handle towards
you to start the machine (drg. 12) start
to wash the floor by depressing the
liquid discharge lever to release the
cleaning solution (drg. 13); wash the
room as shown (drg. 14).
•In case of too little or too much
quantity of fluid adjust the valve collar
flange (drg.15).
The dirty water is collected in the
waste tank positioned on the back of
the base.
The waste tank must be emptied
before it is fully filled up (drg.
16) in order to avoid liquid escaping
and damaging the suction fans.
Be sure the waste capture tank is fully
inserted in its footing and the
retaining clamp is down, in order to
ensure the maximum vacuum power.
HOW TO USE
Washing dirty surfaces
Very dirty or porous floors should be
washed in two passes to avoid
marks/lines. Proceed as follows:
•Set the lever in position
2
to prevent
the squeegee from touching the floor
(drg. 17).
•Start washing, releasing generous
amounts of detergent solution.
•Set the lever on position
1
(drg.18) to
lower the squeegee. Pick up the dirty
water. Then use clean water to rinse
the floor fully and leave no residues.
Daily washing
Wash the floor with the squeegee
down releasing the detergent liquid as
you go. The machine will wash the
floor and pick up the dirt leaving the
floor dry all in one pass.
Carpet washing
You will need two clear bristle
brushes with white disks, and one
steel roller squeegee.
Before washing the carpet, vacuum
the carpet thoroughly.
•Fit the carpet brushes and replace the
rubber squeegee with the steel roller
one. Lock it with the lever in position
2
(drg. 19).
•Fill the solution tank with water and
shampoo; create a lot of foam during
the washing phase; before starting it
is advisable to put some drops of
anti-foam product in the waste tank
to lower the dirty foam picked up.
•
To avoid a great deal of friction
due to dry brushes and therefore
damage the drive belt, let the
solution flow and wet the brushes
before starting.
•Then, follow the same instructions as
for daily washing; wait some hours to
allow the carpet to dry up fully.
•If necessary use a carpet vacuum
beater to pick up the dried foam.
Floor polishing
This floorscrubber can polish any
floor with your current wax/finish.
•Floor should be dry before applying
wax/finish. Apply the finish in your
normal way.
•Be sure that the machine is
completely dry as well.
•Remove both the waste water tank
and the suction squeegee.
•Replace the floor washing brushes
with the softer black ones.
•Then polish the floor. For a second
p a s s , r e p l a c e t h e b l a c k b r u s h e s
with pad holders, using white pads
to obtain a bright mirror finish.
MACHINE CARE
After use the machine is dirty and
should be cleaned to ensure
continuos effective and relaible
cleaning.
If you follow our advice your
turbolava
will enjoy long service with a minimum
of repairs.
•Di s c o n n e c t t h e p l u g f r o m t h e
mains.
•Unplug the lead, remove the waste
water tank, clean them, take out the
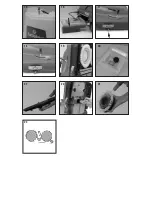
filter (drg. 20), wash it with clean
water. The filter must be changed
when it begins to crumble.
•Take out and carefully clean the
squeegee (drg. 21).
•Clean the bottom of the machine and
the connection between the squeegee
as well as the suction pipe with a
damp cloth (drg. 22).
•Rinse the brushes with clean water
(drg. 23).
•
Take out remaining liquid from the
clean water tank and rinse it.
•From time to time grease the brush
attachment fittings and the aluminium
parts.
•
turbolava
is an electrical appliance,
keep it in a dry and not sunny place.
Keep off corrosive liquids.
MINOR TROUBLESHOOTING
The liquid does not release.
•Check the thin rod water release
attachment and its’ connection to the
upper lift fork (drg. 9).
•Ensure the clean water tank is
locked-in properly by pushing down
the upper hood and then fix it by
turning the clamp (drg. 10 - 11).
The vacuum is not picking up. The
floor remains wet.
•Check to see that the squeegee is
down and the rubbers touch the floor.
The lever of the squeegee should be
in position
1
(drg. 18).
•Clean the squeegee, the connection
between squeegee, and the suction
pipe (drg. 21 - 22).
•Clean the filter in side the cover of
the waste tank (drg. 20).
The brushes do not turn.
•Replace the belt in a service center.
Scheme (drg. 24).
!
!
!
Содержание Trubolava facile 35
Страница 2: ...5 10 9 14 1 7 6 4 11 8 13 12 2 3 ...
Страница 3: ...15 18 17 19 20 22 24 23 21 16 ...


