background image

51 

-

Metal Dog Tag 500 / Metal Dog Tag 500 Plus

Manuale Operatore

rev 04-2008

Operator Manual

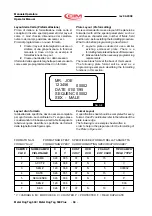
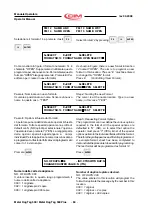
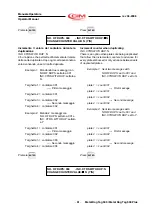
FM: 00 NAME: ADMIT

FM: 01 NAME: EMER

FM: 02 NAME: EMPLOY FM: 03 NAME: OPEN

S=SELECT

E=EDIT

D=DELETE

FORMAT NO:01 FORM  NAME:ADMIT SELECT:S

FORMAT:01 NAME: OPEN F7 TO ON-LINE
ACCT#: 

S=SELECT

E=EDIT

D=DELETE

FORMAT NO:00 FORM  NAME:ADMIT SELECT:S

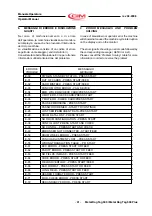
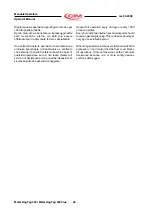
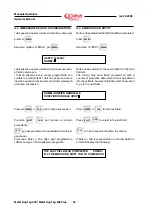
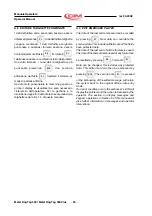
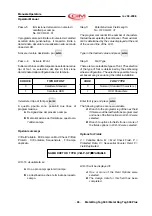
A.3 LISTA DEI FORMATI

Ai 20 formati memorizzati nella punzonatrice si può
assegnare un numero di 2 cifre da 00 a 19. Ad ogni
formato può essere associato un nome di 8 lettere.

Premendo il tasto di funzione 

F 2

 il display

visualizza la lista dei formati .

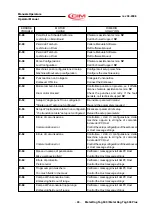
Premere  

F 2

.

Premendo 

ENTER

 il cursore si sposta al formato

successivo.

Premendo 

TAB

 il cursore si sposta alla line

successiva.

Premendo 

SHIFT


TAB

  si ritorna alla linea

precedente

Premendo 

F 2

 si esce dalla lista dei formati.

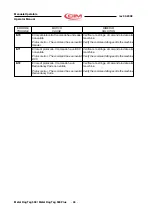
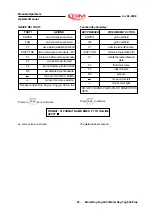
A.4 CAMBIO DEL FORMATO

Premere 

F 4

 digitare il numero poi 

ENTER

Esempio: per selezionare il  formato 1 premere 01,

poi 

ENTER

Il cursore si trova nella funzione di selezione
(SELECT).

Premere 

ENTER

 per selezionare il formato.

Premere 

ENTER

 visualizzerà:

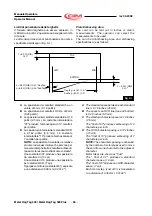
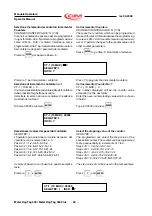
A.3 FORMAT MENU

The twenty formats stored in the embosser are
assigned a two digit number, 00 - 19. Each format can
be assigned a name of up to 8 digits during the
formatting procedure.
A format menu can be displayed on the LCD by

pressing 

F 2

.

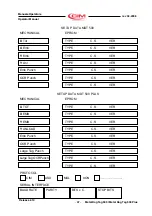
Press 

F 2

.

Use the 

ENTER

 key to move the cursor to the next

format.

Use the 

TAB

 key to skip to the next line.

Use 

SHIFT

 - 

TAB

 to return to the last formatted line.

Press 

F 2

 to return to the main menu.

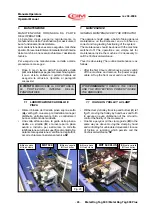
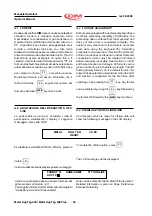
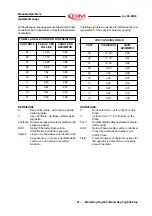
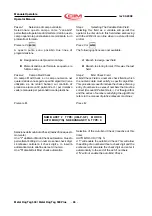
A.4 FORMAT CHANGE

Press 

F 4

, Format # desired and 

ENTER

.

Example:
Select format 01

Press 01, 

ENTER

The cursor is now on the function 'SELECT '.

Pressing 

ENTER

 will select the format.

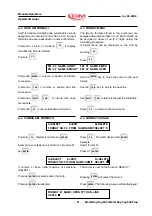
Press 

ENTER

. The following screen will be displayed:

Содержание MDT500

Страница 1: ...al Dog Tag 500 Plus Manuale Operatore rev 04 2008 Operator Manual Manuale Operatore Operator Manual Macchine punzonatrici per targhette metal dog tag e medic alert tag Machines for embossing metal dog tag and medical alert tag ...

Страница 2: ...one Modifiche complete o parziali traduzioni di questo manuale sono severamente vietate senza approvazione della CIM IMPORTANTE CIMnone responsabilepererrori o danni causati dall uso di accessori e parti di ricambio non approvati o garantiti da CIM Reproduction Modification complete or partial translation of this manual is strictly forbidden without prior written approval of CIM IMPORTANT CIMcanno...

Страница 3: ...i MDT 500 4 5 1Menu regolazione parametri meccanici MDT 500 PLUS 4 6 Menu programmazione protocolli di comunicazione 5 Produzione targhette 5 1 Caricamento targhette 5 2 Installazione software BLADE 5 3 Primo avvio 5 4 Apertura del job 5 5 Avvio della produzione 6 Messaggidierroreerisoluzioneguasti GENERAL INDEX 1 General information 1 1 Operating phases 1 2 Electrical specification 1 3 Equipment ...

Страница 4: ... dei Formati A 4 Cambio del Formato A 5 Immissione dei dati di Punzonatura A 6 Editare Targhette punzonate A 7 Formati A 8 Settaggio di un formato A 9 Designazione dei campi A 10 Memorizzazione del Formato 7 Maintenance 7 1 Oiling on trolley clamp A LCD EDIT A 1 LCD Edit Availability A 2 Enabling the Off Line Mode A 3 Format Menu A 4 Format Change A 5 Emboss Data Entry A 6 Edit Embossed Plates A 7...

Страница 5: ...TO La targhetta viene espulsa dal caricatore e presa dalla pinza del carrello 2 PUNZONATURA La targhetta viene incisa medianteicaratteriinrilievopresentisultamburo 3 SCARICO La fase di scarico chiude il ciclo operativo della targhetta 1 GENERAL INFORMATION The METAL DOG TAG 500 is an automatic personalization system for Dog Tag plates It can work connected to a Computer eg PC compatible The data i...

Страница 6: ...a Punzonabile 5 linee 55 caratteri Max Capacità Tramoggia 180 Targhette D T di Carico 220 Targhette M A T Capacità Tramoggia 70 Targhette D T di Scarico 80 Targhette M A T Valore Targhette 90 Targhette ora Prodotte Power Supply 230V 50Hz 117V 60Hz Current Max Absorption 4Amax 117V 1 5Amax 230V Absorption Power 250 W Fuse 5x20 T 4 A 117V T 2 5 A 230V Logic 16 bit Microprocessor Backup Lithium Batte...

Страница 7: ...uenze derivate dall inosservanza delle regole di utilizzo in caso di guasto chiamare l assistenza tecnica NON RIMUOVEREASSOLUTAMENTE O FARE MODIFICHE ALLE PROTEZIONI INTERNE 1 7 SAFETY REGULATIONS AND OPERATING PRECAUTIONS The machine should work in a closed room protected from dust and excessive humidity The machine should be positioned in such a way that its distance from the walls doors windows...

Страница 8: ...lsolosportellofrontalechepermette il carico targhette CONNESSIONE DI TERRA Il simbolo indica che i cavi connessi sono tutti a lo stesso potenziale comune di terra 1 8 SIMBOLS USED ON MACHINE AND IN THE MANUAL DESCRIPTION IT IS STRICTLY FORBIDDEN TO REMOVE THE SAFETY PROTECTION These safety guards should be removed only by specialized and authorized technicalpersonswhohavetakencareto adopt all secu...

Страница 9: ... o riciclo dei materiali di cui è composta l apparecchiatura Lo smaltimento abusivo del prodotto da parte del detentore comporta l applicazione delle sanzioni amministrative previste dalla normativa vigente 1 9 DIRECTIVE WEEE INFORMATION FOR USERS pursuant to art 13 of Italian Legislative Decree n 151 of 25 July 2005 Implementation of Directives 2002 95 EC 2002 96 EC and 2003 108 EC on the restric...

Страница 10: ... 10 Metal Dog Tag 500 Metal Dog Tag 500 Plus Manuale Operatore rev 04 2008 Operator Manual QUESTA PAGINA E BIANCA PER ESIGENZA DI IMPAGINAZIONE THIS PAGE HAS BEEN LEFT BLANK FOR REASONS OF CLARITY ...

Страница 11: ...grafo successivo per la verifica degli accessori in dotazione Conservare il materiale dell imballo per eventuali usifuturioppuresmaltirlonegliappositicontenitori per la raccolta differenziata 2 UNPACKING The machine is delivered in a wooden packing case This is due to its dimensions and weight and avoids the risk of dammage to the machine All displacement should be done by a forklift or therefore ...

Страница 12: ... 12 Metal Dog Tag 500 Metal Dog Tag 500 Plus Manuale Operatore rev 04 2008 Operator Manual QUESTA PAGINA E BIANCA PER ESIGENZA DI IMPAGINAZIONE THIS PAGE HAS BEEN LEFT BLANK FOR REASONS OF CLARITY ...

Страница 13: ...PERSONE CAVO ALIMENTATORE CON SPINA CD SOFTWARE BUSTA CON CHIAVE PER USO TECNICO CAVO SERIALE BORSA ACCESSORI MOUSEPAD TARGHETTE DI TEST CHIAVE HARDWARE USB POWER SUPPLY CABLE PLUG CD SOFTWARE ENVELOPE WITH KEY FOR TECHNICAL USE SERIAL CABLE ACCESSORY BAG MOUSEPAD TEST PLATES 3 INSTALLATION 3 1 CHECKING THE ACCESSORIES Before installing the machine the operator is advised to check that all the acc...

Страница 14: ...ICOLA E MARCHIO UL 4 FORI DI VENTILAZIONE 5 CHIAVE PER MANUTENZIONE TECNICA 6 PRESA PA 80 PER CAVO RETE 7 SCATOLA FUSIBILE 8 INTERUTTORE DI ALIMENTAZIONE 3 2 ELECTRIC CONNECTIONS TheinstallationoftheMDT500iseasilydone Examine the rear control panel of the cover Ref fig 3 there are all the sockets for the various connections Continue as follows Connect the serial cable to the Computer and the Embos...

Страница 15: ...sione di Rete Hz Frequenza di Rete A Correntemassimaass SN Matricola Anno di Fabbricazione Fusibile 3 5 CONSOLLE La consolle di MDT 500 è costituita da un display frontale e da una tastiera a membrana 3 3 CONNECTING TO A COMPUTER MDT 500 is supplied with a 2 m serial cable If this length is insufficient an extension can be added The total length should not exceed 15 meters 3 4 WARNINGS AND ADVISE ...

Страница 16: ...TART sul pannello frontale a fianco del display per eseguire il reset generale A fine ciclo sul display appare il messaggi di fig 8 per indicare lo stato attivo della macchina The following list describes the structure of the front control panel An LCD display 2 rows with 40 characters per row whichisusedtoindicatetheoperatingstates of the machine A PAUSE START key A FEED key A red coloured LED to...

Страница 17: ...i per il controllo della pressione 11 Punzona sul bordo superiore la serie OCR7B per il controllo della pressione 15 Punzona una targhetta con tutti i valori di setup della macchina Solo MDT 500 PLUS 3 7 KEYBOARD DESCRIPTION The following list describes the 6 function keys and their actions SETUP This key is used to access the programming menu or other internal functionsofthemachine APasswordenabl...

Страница 18: ... MDT 500 esegue il ciclo operativo non eseguendo test sulla presenza della targhetta PAUSE MDT 500 esegue un movimento alla volta E necessariopremereilpulsantediSTART per attivare ogni movimento ABORT If this key is pressed the current operating cycle will be halted and the plate will be unloaded DUP If this key is pressed during a READY stateanditisfollowedbyENTERthemachine will repeat the last p...

Страница 19: ...cicli operativi con o senza errore Digitando in sequenza Si visualizza la seguente maschera CNT è il contatore parziale per l utilizzo operativo TOTAL è il contatore totale non azzerabile Digitando in sequenza Si azzera il contatore parziale ATTENTION If there are errors on the plate X Motor Error Y Motor Error etc there are two possible solutions Pressing START clears the error condition without ...

Страница 20: ...A NON IDONEA PER LA SOSTITUZIONE UTILIZZAREESCLUSIVAMENTE UNA BATTERIA DELLO STESSO TIPO O DI TIPO V EQUIVALENTE CONSIGLIATO DAL FABBRICANTE PER LO SMALTIMENTO DELLE BATTERIE VECCHIE ATTENERSI ALLE ISTRUZIONI DEL FABBRICANTE 3 9 STORED CONFIGURATION AND REPLACING LITHIUM BATTERY The LCD EDIT format and the SETUP configuration parameters see Annex A are stored into a memory providedofalithiumbackup...

Страница 21: ... una voce è necessario selezionare con i tasti numerici l opzione desiderata tra quelle disponibili e premere per confermare ATTENZIONE La procedura di SETUP provoca il RESET del ciclo operativo e quindi l interruzione di qualsiasi produzione di targhette in automatico utilizzando il Software di corredo 4 THE MACHINE S SETUP 4 1 SETUP PROCEDURE The machine is configured by accessing the setup rout...

Страница 22: ...aud Rate da 4800 a 9600 1 Posizionarsi sulla voce 2 Premere 8appariràalladestradell LCD l opzione selezionata 3 Premere per memorizzare la selezione 4 Premere 2 volte per terminare il setup e tornare allo stato di READY An example To modify the Baud Rate from 4800 to 9600 Bauds 1 Choose the desired rate 2 Press 8 to select the eigth element the following LCDscreenwillappearshowingthechoiceonthe ri...

Страница 23: ...RAMETERS PROTOCOLS PASSWORD EMBOSSING WHEEL KEYPAD LCD EMBOSSER SETUP SETUP 4 2 INIZIO PROGRAMMAZIONE a Premere b Digitare la password c Premere d Premere e Premere f Premere g Premere h Premere i Premere Stato iniziale 4 2 GENERAL PROGRAMMING OF THE MACHINE a Press b Enter the password c Press the key d Press the key e Press the key f Press the key g Press the key h Press the key i Press the key ...

Страница 24: ... voci del menu selezionato premere NOTA Se durante la procedura di setup non viene premuto un tasto per 2 minuti la macchina ritorna allo stato di READY j Press the key This is the last menu to select another use the direction keys To enter the menu items selected press NOTE The Setup program includes a keyboard Timeout If there is a pause of keyboard input for more than 2 minutes the machine retu...

Страница 25: ...di coordinate gestite dall embosser b Premere Selezionailtipodisequenzadipunzonaturaperlinea o per carattere Abilita il buzzer in caso di errore c Premere e Premere d Premere Selezione del tipo di aggiustamento per punzone singolo Seleziona se i dati protetti di LDC EDIT sono visualizzati o nascosti 4 3 SET UP CONFIGURATION PARAMETERS Set up Configuration Parameters allows to set the following gen...

Страница 26: ... Seleziona 150 Baud Rate 3 Seleziona 300 Baud Rate 6 Seleziona 600 Baud Rate 12 Seleziona 1200 Baud Rate 24 Seleziona 2400 Baud Rate 48 Seleziona 4800 Baud Rate 96 Seleziona 9600 Baud Rate d Premere Seleziona 1 Stop bit Seleziona 2 Stop bit c Premere e Premere 4 4 SET UP SERIAL PORT The Serial Interface menu enables the configuring of the machine s serial port Choose this menu a Press Selects 7 bi...

Страница 27: ...se X b Premere Regolare la posizione X dell embossing con punzoni c Premere Regolare la posizione Y dell embossing con punzoni d Premere Regolare il sollevatore per lo scarico e Premere Regolazione del punzone per embossing f Premere Regolazione del punzone per embossing OCR 4 5 MECHANICAL PARAMETERS MDT500 This menu permits to adjust some mechanical parameters of the machine The value are setted ...

Страница 28: ...b Premere Regolare la posizione X dell embossing con punzoni c Premere Regolare la posizione Y dell embossing con punzoni d Premere Regolare i passi di carico per targhette dog tag e Premere Regolare il sollevatore per lo scarico f Premere Regolazione del punzone per embossing 4 5 1 MECHANICAL PARAMETERS MDT 500 PLUS This menu permits to adjust some mechanical parameters of the machine The value a...

Страница 29: ...OCR PUNCH ADJUSTMENT 99 99 00 g Premere Regolazione del punzone per embossing OCR Regolazione del punzone per embossing LARGE TAG i Premere Regolazione del punzone per embossing LARGE TAG OCR h Premere g Press the key Adjustement for OCR embossing punch h Press the key Adjustement for LARGE TAG embossing punch i Press the key AdjustementforLARGETAGOCRembossing punch ...

Страница 30: ...ocollo STD 6 selezione il protocollo MULTI EMBOSSER 7 selezione il protocollo POUND POUND I protocolli XON ASY e POUND POUND utilizzano le specifiche dei protocolli USA Ora per impostare i valori richiesti dal proprio protocollo seguire le prossime istruzioni b Premere Imposta il valore di Inizio Testo 002 STX Start of Text 4 6 COMMUNICATIONS PROTOCOLS MENU If a comunication Protocol which differs...

Страница 31: ...colli USA f Premere Imposta il valore di Apertore Campo OCR 040 28hex UsatosoloneiprotocolliUSA g Premere ImpostailvalorediChiusoreCampoOCR 041 29 hex Usato solo nei protocolli USA h Premere Impostal indirizzonelprotocolloAsyncronous i Premere Impostal indirizzoneiprotocolliMULTIeCHIP c Press the key Set the value of End of Text 003 ETX End of Text d Press the key Set the value of Field Separator ...

Страница 32: ...ato solo per il protocollo XON OFF m Premere ON Attiva l invio del carattere XON ogni 3 sec OFF Protocollo standard n Premere Imposta il valore di Apertore Format nel protocollo CIMLIKE Impostare il valore 000 OFF per il protocollo CIM standard j Press the key 1 NORM Normal setstheinterlinespacing at 4mm andtheintercharacterspacingat 2 5mm This is the standard measure 2 BLOC Block sets the inter l...

Страница 33: ...T 500 Fig 9 This is designed to contain Dog Tag plates only MDT 500 PLUS Fig 10 This is designed to contain Dog Tag and Medical Red Alert Tag plates Fig 9 Fig 10 MDT 500 MDT 500 PLUS Le targhette devono essere poste nel magazzini orientate con il foro d appensione verso l interno della macchina e la bordatura per la targhetta Dog Tag rivolta verso l alto MDT 500 PLUS Agire sul pomello Fig 11 Rif a...

Страница 34: ...ftware Conclusa l installazione avrete sulla vostra finestra di desktop l icona del blade e nella lista Avvio Programmi noterete la presenza della nuova voce di programma BLADE 5 2 BLADE SOFTWARE INSTALLATION Insert the BLADE installation CD in the CD_ROM driver If the CD ROM driver does not launch the Autorun exe file automatically from the START menu of Windows select Run and digit X Autorun exe...

Страница 35: ...ick sull icona BLADE presente sul desktop Alla richiesta di Login inserire la Password Cliccare su OK per iniziare la prima sessione di lavoro con BLADE Fig 13 5 3 FIRST START When the installation of all the software components is completed install the USB hardware key supplied with the machine on the USB Port located on your computer Start BLADE with a double click on the BLADE icon present on t...

Страница 36: ...15 5 4 APERTURA DEL JOB A partire dalla finestra principale di BLADE Fig 14 premere il pulsante Open Job All apertura della finestra Fig 15 scegliere il Job 5 4 OPENING THE JOB Starting from the main video page of BLADE Fig 14 press the Open Job pushbutton When the video page opens Fig 15 select the Job ...

Страница 37: ...PremereilpulsantePrintSingleperprodurreuna targhetta con il testo visualizzato al momento Selezionareunaltrorecordneldatabaseperprodurre la targhetta successiva Fig 16 5 5 STARTING PRODUCTION A PLATE PRODUCTION FROM DATABASE The main BLADE video page now displays in the Database area in the upper part of the page the database relative to the Job the Preview area in thelowerpartofthepage displaysth...

Страница 38: ... la finestra Print Job Fig 19 Impostare il parametro richiesto Nr di copie all interno della finestra Print Job quindi premere il pulsante Print per procedere alla stampa delle targhette When the Print Multiple pushbutton is pressed the Print Job video page Fig 17 opens Set the parameters requested in the Print Job video page then press the Print pushbutton to print the plates B PLATE PRODUCTION W...

Страница 39: ... 39 Metal Dog Tag 500 Metal Dog Tag 500 Plus Manuale Operatore rev 04 2008 Operator Manual Fig 18 Fig 19 ...

Страница 40: ...gnala sul display il codice di errore ed esegue comunqueloscaricodellatarghettaprimadiarrestarsi la targhetta errata sarà da rimuovere manualmente Levariesituazionid erroresonodescrittenelcapitolo Messaggi d errore e Risoluzioni guasti NOTE to edit the print format and send the card customisation data refer to the BLADE ON LINE use and LCD Edit OFF LINE use manuals IMPORTANT inbothcases notethatth...

Страница 41: ...MASK PRESS START FEED E 64 CODE ERROR PRESS START OR FEED E 65 FIELDS OVERFLOW PRESS START FEED E 66 BAD FORMAT PRESS START OR FEED E 68 LONG FIELD PRESS START OR FEED E 70 HEADER FORMAT ERROR PRESS START E 71 MOD CHECK ERROR PRESS START E 72 REDUNDANCY ERROR PRESS START ERRORE TROUBLE MESSAGGIO MESSAGE 6 MESSAGGI DI ERRORE E RISOLUZIONE GUASTI Nel caso di malfunzionamento o di errore dell operato...

Страница 42: ...ica Call the Technical Support Controllare Punzoni e riprovare se il difetto rimane chiamare assistenza tecnica Controlthepunchesandiftheproblempersists call the Technical Support Pulire e lubrificare il binario del carrrello pinza e controllare che si muova bene vedi fig 13 capitolo 9 1 Clean and oil the trolley guide and control that it moves freely Ref fig 13 chapter 9 1 La pinza ha colpito una...

Страница 43: ...assistenza tecnica Call Technical Support Vedere Manuale Software Ref Software Manual Vedere Manuale Software Ref Software Manual Chiamare assistenza tecnica Call Technical Support Configurare il setup macchina Configure the machine setup Collegare Punzonatrice Connect the Embosser Controllare punzoni e riprovare se il difetto rimane chiamare assistenza tecnica Check the punches and retry If the f...

Страница 44: ...ommand has an invalid BCC E 72 Errore di protocollo Il comando ha un Redundancy Code non valido Protocol error The command has an invalid Redundancy Code ERRORE TROUBLE MOTIVO CAUSE RIMEDIO SOLUTION Verificare la stringa di comando inviata alla macchina Verifythecommandstringsenttothemachine Verificare la stringa di comando inviata alla macchina Verifythecommandstringsenttothemachine Verificare la...

Страница 45: ...Una volta all anno oliare la guida della pinza a destra e a sinistra B e muovere poi la pinza avanti e indietro per assicurare la corretta lubrificazione su tutta la superficie di contatto Se durante tale operazione si verificano degli attriti occorre chiamare l assistenza tecnica 7 MAINTENANCE GENERAL MAINTENANCE BY THE OPERATOR The operator should make a habit of doing general maintenance on the...

Страница 46: ... che aprendo il portello frontale la macchina blocchi qualsiasi operazione se così non fosse chiamare il servizio di assistenza poichè qualche dispositivo di sicurezza potrebbe essersi danneggiato Repeat this operation every 20 days or every 1500 produced plates Every 6 months the internal mechanical parts should receiveageneralgreasing Thiscanbedonehowever only by a specialised person When the ge...

Страница 47: ...YPE C S VER Y UNLOAD TYPE C S VER Emb Punch TYPE C S VER OCR Punch TYPE C S VER Large Tag Punch TYPE C S VER Large Tag OCR Punch TYPE C S VER TYPE C S VER MECHANICAL EPROM X Tot TYPE C S VER X Emb TYPE C S VER Y Emb TYPE C S VER Y Unl TYPE C S VER Emb Punch TYPE C S VER OCR Punch TYPE C S VER TYPE C S VER PROTOCOL CIM ASX MUL XON SERIAL INTERFACE BAUD RATE PARITY BITS x C STOP BITS Release 2 10 ...

Страница 48: ... 48 Metal Dog Tag 500 Metal Dog Tag 500 Plus Manuale Operatore rev 04 2008 Operator Manual QUESTA PAGINA E BIANCA PER ESIGENZA DI IMPAGINAZIONE THIS PAGE HAS BEEN LEFT BLANK FOR REASONS OF CLARITY ...

Страница 49: ... 49 Metal Dog Tag 500 Metal Dog Tag 500 Plus Manuale Operatore rev 04 2008 Operator Manual LCD EDIT ALLEGATO A LCD EDIT ANNEX A ...

Страница 50: ...tto LCD1 I dati di punzonatura possono essere immessi dal primo campo sul formato n 01 Permaggioriinformazionifarriferimentoalparagrafo Immissione dei dati di Punzonatura A 1 LCD EDIT AVAILABILITY Embossersequippedwithanexternalkeyboardhave an off line embossing capaiblity LCD Edit i e the embossing data is entered from that keyboard and does not come from a connected computer The operator may cre...

Страница 51: ...dente Premendo F 2 si esce dalla lista dei formati A 4 CAMBIO DEL FORMATO Premere F 4 digitare il numero poi ENTER Esempio per selezionare il formato 1 premere 01 poi ENTER Il cursore si trova nella funzione di selezione SELECT Premere ENTER per selezionare il formato Premere ENTER visualizzerà A 3 FORMAT MENU The twenty formats stored in the embosser are assignedatwodigitnumber 00 19 Eachformatca...

Страница 52: ...successivo Premere ENTER o TAB per il campo successivo Premere SHIFT TAB per tornare al campo precedente F 10 può essere premuto in qualsiasi momento per punzonare Premendo Enter o Tab dopo aver programmato l ultimo campo LCD visualizzerà il seguente A 5 EMBOSS DATA ENTRY Datacanbeenteredforthefirstfield Whencompleted press ENTER Example 123456 7 ENTER Data can be entered for the second field for ...

Страница 53: ...re gli altri formati F10 per attivare la punzonatura muove il cursore a sinistra muove il cursore a destra Non usare i tasti Fine Pag su Pag giù Home Ins Premere F 10 per punzonare La carta verrà punzonata Function Key Summary KEY PRESSED CONSEQUENT ACTION ENTER go to next field Tab go to next field F7 exits the lcd edit function SHIFT TAB returns to the last field f5 F1 recalls the last embossed ...

Страница 54: ...e degli errori durante la fase di produzione targhette vedere il ref 6 di questo manuale A 6 EDIT EMBOSSED PLATES The data of the last card embossed can be recalled by pressing F 1 New data can overwrite the previousdata Thisincludesallfieldsevenifthefields have protected data The data of the last card of all the formats is saved The data of the last card embossed of any format can be recalled by ...

Страница 55: ...petere la targhetta con gli stessi campi L Selezione del numero delle targhette da punzonare da 1 a 999 copie A 7 FORMATS GENERAL Embossers can store in resident memory up to 20 formats with up to 26 fields of information in each format Data is entered to these formats using a keyboard for off line embossing and or through the RS232 line using the Stored Format Format Variables Formats can be desi...

Страница 56: ...overelatarghettatra2caratteriadiacenti Ipassimotoresonomostraticomecostante Una costante di 07 produce una spaziatura tra carattere di 10 cpi Una costante di 10 produce una spaziatura per caratteri OCR 7 cpi Ognipassomotore costantedi01 equivale a una distanza di 0 36 mm 0 0142 Plate Embossing Area The card can be laid out in inches or metric measurements The operator can select the measurements t...

Страница 57: ...racter Recognition Identificativo di carattere speciale Campo Linea in cui l operatore può inserire i dati da punzonare in un area dedicata della carta e con un numero di caratteri massimo The following table can be used to determine the cost requirement of the specific character spacing COST SPACING TABLE COST CHAR INCH CHAR DECIMETER 05 14 40 5 56 06 11 70 4 61 07 10 00 3 96 08 8 80 3 47 09 7 82...

Страница 58: ...formato la tabella delle specifiche devono essere compilate per ogni formato Le coordinate X e Y vengono prese considerando lo 0 in basso a sinistra Nella seguente tabella vengono descritte le specifiche dei formati della targhetta della figura sopra FORMATO No 14 FORMAT NAME TEST SPECIFICHE DEI FORMATI DELLA TARGHETTA Plate Layout Preformatting It is recommended to make a layout of the plate to b...

Страница 59: ...numero 0 al numero 9 Passo 3 Selezione del Formato Un esempio di testo si ha nelle pagine precedenti vedi formato n 14 Vedi pagina 56 Tutti i formati vengono nominati OPEN Un formato open contiene di default 26 campi PROTECTED DATA FIELDS FLD A 8 SETTING UP A FORMAT Note While in the formatting mode pressing the F 7 key will exit the LCD Edit Function Step 1 Switching On Step 2 Format 01 is the fi...

Страница 60: ...programmato Iltestodelformatoverràprogrammato come il n 14 visto sopra Premere ENTER Numero delle carte da duplicare NO OF DUPS 000 Il valore inserito in questo luogo programmerà il numero delle carte da duplicare 000 1 originale 002 1 originale più 2 copie 999 1 originale più 999 copie Select Format 14 by pressing F 4 14 ENTER As shown in Figure there is a new format in location 14 named OPEN The...

Страница 61: ...2 Manda 2 messaggi con NO OF DUPS settato a 001 e INC CTRS WITH DUP settato a Y Targhetta 1 contatore 001 Primo messaggio Targhetta 2 contatore 002 Targhetta 3 contatore 003 Secondo messaggio Targhetta 4 contatore 004 Premere ENTER Premere ENTER Press ENTER Increment counter when duplicating INC CTRS WITH DUP N There is an option when plates are being duplicated that allow the incremental counters...

Страница 62: ... Passi di 2 2 4 6 8 10 12 14 16 Passi di 3 3 6 9 12 15 18 21 24 Passi di 4 4 8 12 16 20 24 28 32 Passi di 9 9 18 27 36 45 54 63 72 81 Il valore di passo di verrà usato in questo semplice testo Premere 1 e ENTER Set Incremental Counters CHANGE COUNTER VALUE N Y N There are four counters which can be programmed intoeachformat An N willadvancetheprogramming to screen LCD 14 All counters remain as pre...

Страница 63: ...nare il numero dei campi che devono essere programmati FIELD NUMBER 26 Immettere il numero dei campi da programmare nel formato Possono essere immessi al massimo 26 campi Premere 14 e ENTER Counter Setting INCR Y The counters can be set to count upward increment or downward decrement INCR Y INCR N 99 99 100 98 101 97 102 96 Incrementing will be selected for the test example Press Y and ENTER The L...

Страница 64: ...ha una costante di 07 10caratteriperpollice NelOCRlaspaziaturaha una costante di 10 7 caratteri per pollice Immettere il valore di costante poi ENTER A 9 DESIGNING INDIVIDUAL FIELDS LCD 15 will be displayed independently of any Y selected options in the top line of LCD 14 Step 1 Naming a Field NAME AA Type in the name HOSP and Enter Eight digits maximum and overwrite any existing letters of the pr...

Страница 65: ...mpi opzioni di campo B La destinazione che è terminata per questo campo Step 5 Enter Maximum Field Length No OF CHAR 31 The programmer can limit the number of characters thatwillbeacceptedbytheembosser Themaximum limit is determined by the value displayed at the end of the second line of the LCD Type in the desired value and press ENTER Step 6 Font Type There are two selectable types of font The s...

Страница 66: ...sser calcolerà il check digit e lo inserirà automaticamente alla fine del set di numeri Una N disabilita il Mod check automatico Step 1 Selecting The Variable Data Field Selecting this field as a variable will permit the operator to enter data to this field when embossing with the LCD Edit or on line when in a stored format protcol Press V or ENTER The following options are now available A Branch ...

Страница 67: ... del formato se questo era l ultimo campo Passo 4 Contatori In questa sezione vengono designati i campi in cui si devono inserire dei contatori Premere C Selection of Mod Check Type TYPE 00 0 MOD 11 Non Consecutive Algorithm 1 MOD 11 Consecutive Algorithm 2 MOD 10 LUHN Algorithm Details on the types of algorithms are given in the Manual of the platic embosser machines Pres Return The following opt...

Страница 68: ...ata la prossima targhetta il contatore sarà relativo al contatore del campo duplicato A questo punto sono possibili due linee di programmazione A Designazione del prossimo campo ref LCD 15 B Memorizzazione del formato se questo era l ultimo campo ref LCD 22 Enter the counter number that was programmed for this field when the format was set up Press counternumber and Enter The following options are...

Страница 69: ...Operatore rev 04 2008 Operator Manual THE LAST FIELD IS COMPLETED PRESS F10 TO SAVE THE FORMAT OR SHIFT TAB TO COME BACK A 10 MEMORIZZAZIONE DEL FORMATO Premere F 10 Il formato sarà memorizzato A 10 STORING THE FORMAT Press F 10 The format will be stored ...

Страница 70: ...ers Via O Serra 2 40012 Calderara di Reno Bologna ITALY Tel 39 051 6465011 Fax 39 051 6465012 E mail cimtech cimitaly it www cimitaly it CIM USA Inc Americas 10813 N W 30th Street Suite 108 Miami FL 33172 USA Tel 1 305 639 30 40 Fax 1 305 639 30 60 E mail techsupport usa cim usa com www cim usa com Timbro rivenditore Sales Mark ...

Отзывы: