


7
Operation
Your LCD monitor has been adjusted to its optimal settings before shipment. You can also
adjust the image using the following illustrations and steps.
Notes
The OSD turns off several seconds after you stop pressing the buttons while
performing an adjustment.
Any changes are automatically saved in memory when the OSD turns off. Turning off
the power should be avoided while using the menu.
Adjustments for clock, phase and positions are saved for each individual signal
timing. Except for these adjustments, all other adjustments have only one setting,
which applies to all signal timings.
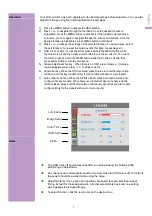
To select function, click the red cursor on the desired one.
English
Luminance
Image Setup
Color Temp.
OSD Setup
Extra
1) Press the MENU-button to activate the OSD window.
2) Press + or - to navigate through the functions. Once the desired function is
highlighted, press the MENU-button to activate it. If the function selected has a
sub-menu, press or again to navigate through the sub-menu functions. Once the
desired function is highlighted, press MENU-button to activate it.
3) Press + or - to change the settings of the selected function. To exit and save, select
the exit function. If you want to adjust any other function, repeat steps 2-3.
4) OSD Lock Function: To lock the OSD, press and hold the MENU button while
the monitor is off and then press power button to turn the monitor on. To un-lock
the OSD - press and hold the MENU button while the monitor is off and then
press power button to turn the monitor on.
5) Volume adjustment hot key When there is no OSD, press Volume (+) to active
volume adjustment bar, press - or + to adjust volume.
6) Source hot key: When the OSD is closed, press Source (or Auto/Source) button
will be Source hot key function (Only for the models with dual or more inputs).
7) Auto configure hot key: When the OSD is closed, press Auto button will be auto
configure hot key function. When there is no individual Source hot key and the
OSD is closed, press Auto/Source button continuously about 3 second to do auto
configure (Only for the models with dual or more inputs).
:
Содержание cmv946d
Страница 1: ...60cm 23 6...