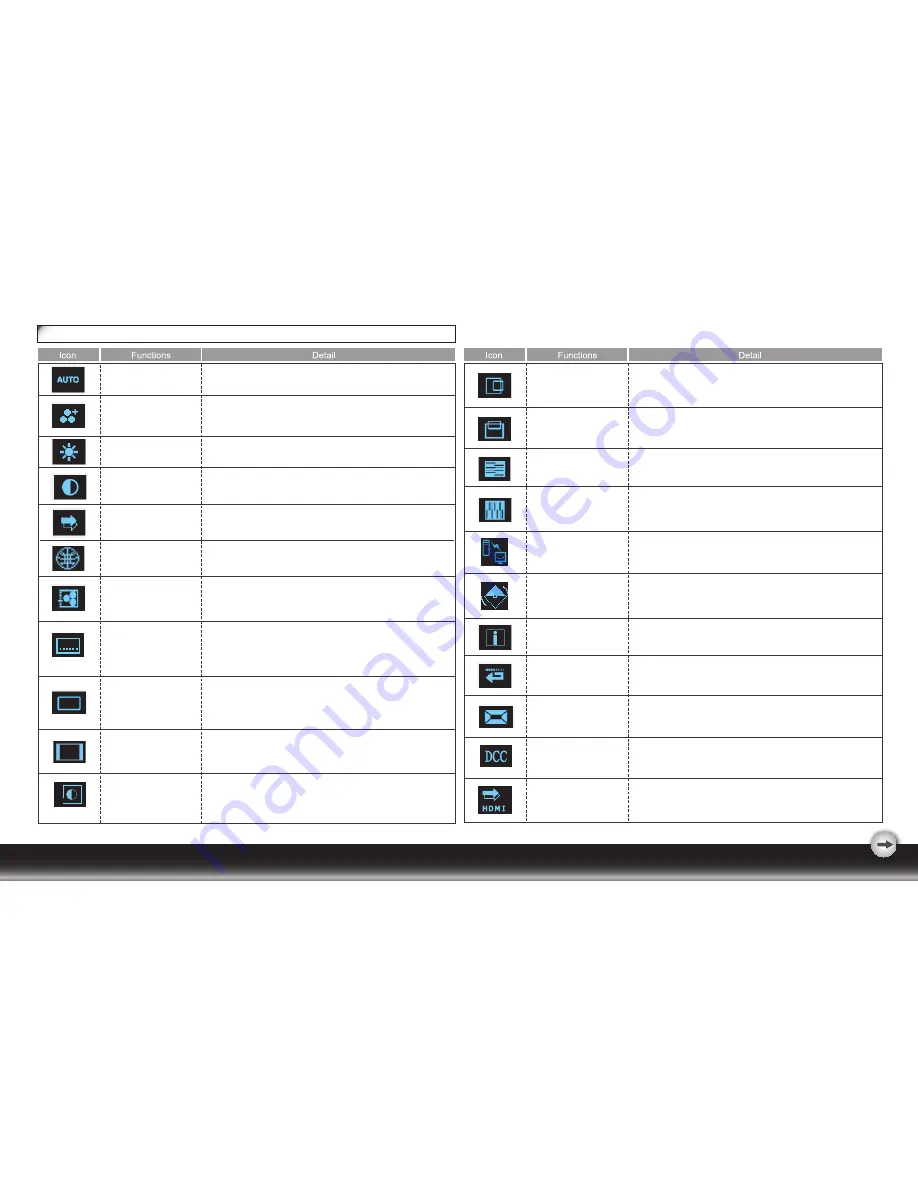
Chimei 23 58cm Скачать руководство пользователя страница 7

- 5 -

OSD Icon List

AUTO

ADJUSTMENT

INPUT SIGNAL

SELECT

BRIGHTNESS

  * Optimize the picture performance automatically.

* Adjust the luminance level of the screen.

* Select the input signal from Analog, or Digital Inputs (Optional).

HORIZONTAL

POSITION

VERTICAL

POSITION

PHASE

CLOCK

* Shift the screen left or right

*

Adjust the monitor internal sampling clock rate

*

 Shift the screen up or down

*

Adjust the monitor internal signal phase

CONTRAST

*

Adjust the contrast level of the screen.

  * Activate the built-in color engine to enhance the graphic 

effects according to the different situations of the display.

contents

THEME MODE 

OSD MENU 

LANGUAGE

* Select your own preference of language of OSD menu.

       COLOR 

TEMPERATURE

*

Adjust the mechanical specifications regarding the 

display.(Power Saving Mode, White Balance, Clock, Phase, 

Horizontal Position, Vertical Position, Information)

SYSTEM

* 6500K: Select the setting of screen color to be reddish white.

* 7500K: Select the setting of screen color to be 7500K.

* 9300K: Select the setting of screen color to be bluish white.

*

Adjust the balance of the input signal.

WHITE BALANCE

* Show the frequency, resolution, input interface and other 

  operating details about this display.

INFORMATION

DEMO

RECALL

* Reset monitor parameters back to factory preset values.

* 2 seconds after activation of this function, some of the

menus will stimulate feature-grading effects 2 times over.

DDC/CI

* Select turn on or turn off DDC/CI function

SYSTEM

FULLSCREEN

DISPLAY RATIO

*

*

 Select the display ratio from Native, and Full Screen

* Full Screen: adjust and enlarge the display screen to full 

NATIVE SCREEN

DYNAMIC CONTRAST 

CONTROL(OPTIONAL)

 Display high dynamic contrast control, and present more 

 colorful screen.

* Display equality screen according to the original ratio.

screen size.

AUDIO INPUT SELECT

* Select input audio via HDMI cable or audio cable. this 

  function is available in HDMI source only.

Содержание 23 58cm

Страница 1: ...Wide LCD Monitor User Manual ...

Страница 2: ...ion 1 Maintenance 1 Transporting the monitor 1 GETTING STARTED Package contents 2 Monitor installation 2 Identifying parts and controls 3 Customizing your Monitor 3 3 Introduction to Hotkeys 4 OSD icon list 5 Troubleshooting 6 Technical Features and Specifications Interface Frequency 7 Addendum 8 FCC compliance The operation of Function menu 4 Working with OSD Group ...

Страница 3: ...ion exposed to direct sunlight excessive dust mechanical vibration or shock 3 The apparatus shall only be used between 5 tilted forward and 15 tilted backward as normal operation position If the tilt angle exceeds 15 it shall be used for wall mounting or packaging only Information for users applicable in European Union countries The symbol on the product or its packaging signifies that this produc...

Страница 4: ... rear of the monitor 3 2 Plug the other end of the audio cable into the audio port of your computer or other audio source Monitor installation Package contents Before beginning ensure that the carton contains the following items 1 LCD Monitor 2 Monitor Base and Neck the shape of base may vary according to the monitor model 3 Power Cord plug may vary according to the electrical standards for your a...

Страница 5: ...show that a button represents different functions in different levels of the architecture Customizing your Monitor Important Important The On Screen Display OSD system provides a full range of customizable tools to optimize your display Although you could perform comprehensive customization we strongly recommend that you use the AUTO ADJUSTMENT function It can utilize the default values to thoroug...

Страница 6: ...ee like directory can help you to become aware of the whole system During the whole process you need to know the following actions 1 Activate the OSD main menu Under the energized condition press any function key to execute the function 2 Confirm the selection Press the button 3 Browse the previous or next option Press and 4 Adjust the option value Press and to adjust the value E 5 Return to the h...

Страница 7: ...n Information SYSTEM 6500K Select the setting of screen color to be reddish white 7500K Select the setting of screen color to be 7500K 9300K Select the setting of screen color to be bluish white Adjust the balance of the input signal WHITE BALANCE Show the frequency resolution input interface and other operating details about this display INFORMATION DEMO RECALL Reset monitor parameters back to fa...

Страница 8: ...press a key on the keyboard to wake up the computer 3 Check if the video signal cable is properly connected to the monitor and computer Symptom Check Items 1 Check if your computer is turned on 2 Check if the video signal cable is properly connected to the monitor and computer 1 Ensure that the resolution and or refresh rate is set correctly 1 No picture 2 LED indicator is not lit 1 No picture 2 L...

Страница 9: ...ed frequency of the supported timing is not requested exactly 4 Normalization of VGA card s deviation will be acceptable 5 Horizontal Frequency 31 82KHz 6 Vertical Frequency 56 76Hz 7 Technical Features and Specifications Interface Frequency Net Net Tilt Angle Analog Digital Operating Condition Storage Condition D sub DVI D Optional HDMI Optional 5 15 About 3 9kg AC Consumption AC 100 240V 50Hz 60...

Страница 10: ...uctions may cause harmful interference to radio communications However there is no guarantee that interference will not occur in a particular installation If this equipment does cause harmful interference to radio or television reception which can be determined by turning the equipment off and on the user is encouraged to try to correct the interference by one or more of the following measures 3 R...

Отзывы: