background image

PACLR2

Installation Instructions

8

2.

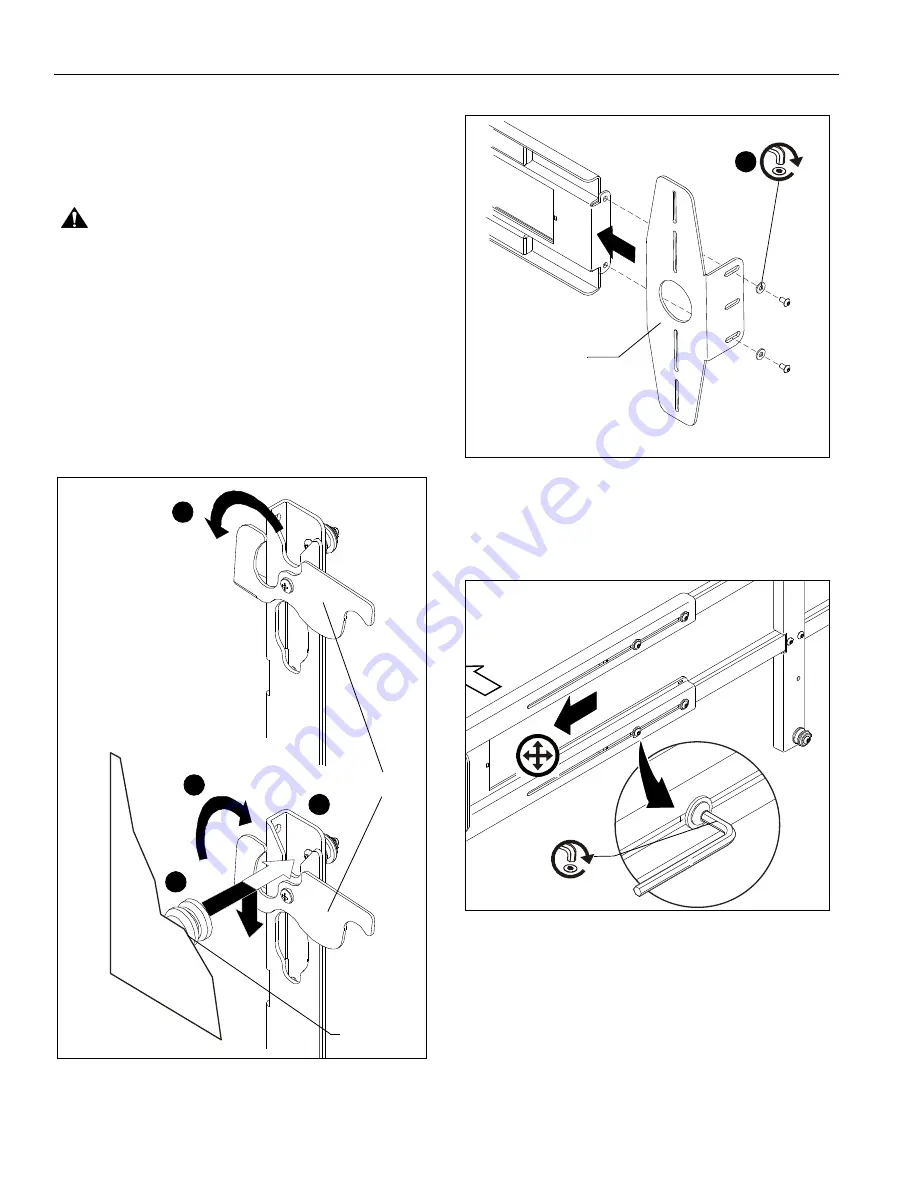
Verify latching flag is in the OPEN position. (See Figure 10)

3.

Align four mounting buttons on display with four teardrop
mounting holes in accessory.

4.

Slide mounting buttons into teardrop mounting holes and
lower display until recessed area of mounting buttons is
seated in lower area of teardrop mounting holes.

WARNING:

IMPROPER INSTALLATION CAN LEAD TO

DISPLAY FALLING CAUSING SEVERE PERSONAL
INJURY OR DAMAGE TO EQUIPMENT. Make sure ALL
mounting buttons are properly seated in lower area of four
teardrop mounting holes.

5.

Move latching flag to CLOSED position to secure display on
accessory. (See Figure 10)

NOTE:

A padlock or similar device can be used to provide

additional security.

6.

Install speaker mounting brackets with speakers to speaker
mounting rails by using four button head cap screws and
four washers set aside earlier. (See Figure 11)

Figure 10

Figure 11

7.

Adjust speaker horizontal location.  (See Figure 12)

8.

Tighten eight button head cap screws to hold speaker
mounting rail in place. (See Figure 12)

Figure 12

9.

Route all signal and power cables and wires to display and
speakers.

2

3

4

5

Display

CLOSE

Latching Flag

OPEN

X4

Speaker Mounting
Bracket
(1each end)

Speaker not shown for clarity

2

Front

X8

Содержание PACLR2

Страница 1: ...ng Instruções de Instalação Istruzioni di installazione Installatie instructies Instructions d installation Speaker Accessory Spanish Product Description German Product Description Portuguese Product Description Italian Product Description Dutch Product Description French Product Description PACLR2 ...

Страница 2: ...s you to the possibility of damage or destruction of equipment if you do not follow the corresponding instructions WARNING Failure to read thoroughly understand and follow all instructions can result in serious personal injury damage to equipment or voiding of factory warranty It is the installer s responsibility to make sure all components are properly assembled and installed using the instructio...

Страница 3: ...Installation Instructions PACLR2 3 TOOLS REQUIRED FOR INSTALLATION PARTS 1 8 A 1 5 1 2 B 6 C 1 1 8 PACLR2 accessory ...

Страница 4: ... Instructions 4 DIMENSIONS Figure 1 14 00 200X200 VESA PATTERN CONFIGURABLE TO 7 87 200MM 14 00 20 25 58 35 SHIPPED 73 85 FULL EXTENSION 54 55 SHIPPED 70 FULL EXTENSION THREADED HOLES FOR 200X200 VESA 10 TILT PER SPEAKER ...

Страница 5: ...splay mounting pattern WARNING IMPROPER INSTALLATION CAN LEAD TO ACCESSORY AND OR DISPLAY FALLING CAUSING SEVERE PERSONAL INJURY OR DAMAGE TO EQUIPMENT If the display being installed does not have a VESA 200 x 200 or 14 x 14 mounting pattern an interface bracket will be required to install this accessory To reconfigure to the 200 x 200 VESA pattern 1 Remove eight button head cap screws securing up...

Страница 6: ...e aside for reuse Figure 6 IMPORTANT If orientation of speaker mounting bracket has changed as a result of speaker rail adjustment verify proper orientation of bracket with speaker before continuing 3 Install left and right speaker mounting brackets to speakers using the installation instructions provided with the speakers and the dimensional drawing below See Figure 7 and Figure 8 WARNING IMPROPE...

Страница 7: ...llation Instructions PACLR2 7 Figure 8 Install Accessory to Mount and Display to Accessory 1 Install accessory to mount following the installation instructions provided with the mount See Figure 9 Figure 9 1 ...

Страница 8: ...rea of four teardrop mounting holes 5 Move latching flag to CLOSED position to secure display on accessory See Figure 10 NOTE A padlock or similar device can be used to provide additional security 6 Install speaker mounting brackets with speakers to speaker mounting rails by using four button head cap screws and four washers set aside earlier See Figure 11 Figure 10 Figure 11 7 Adjust speaker hori...

Страница 9: ...Installation Instructions PACLR2 9 Figure 13 Display Speakers ...

Страница 10: ...PACLR2 Installation Instructions 10 ...

Страница 11: ...Installation Instructions PACLR2 11 ...

Страница 12: ... Company www chiefmfg com 06 10 USA International A 8401 Eagle Creek Parkway Savage MN 55378 P 800 582 6480 952 894 6280 F 877 894 6918 952 894 6918 Europe A Fellenoord 130 5611 ZB EINDHOVEN The Netherlands P 31 0 40 2668620 F 31 0 40 2668615 Asia Pacific A Office No 1 on 12 F Shatin Galleria 18 24 Shan Mei Street Fotan Shatin Hong Kong P 852 2145 4099 F 852 2145 4477 ...

Отзывы: