background image

MFAUBSP

Installation Instructions

4

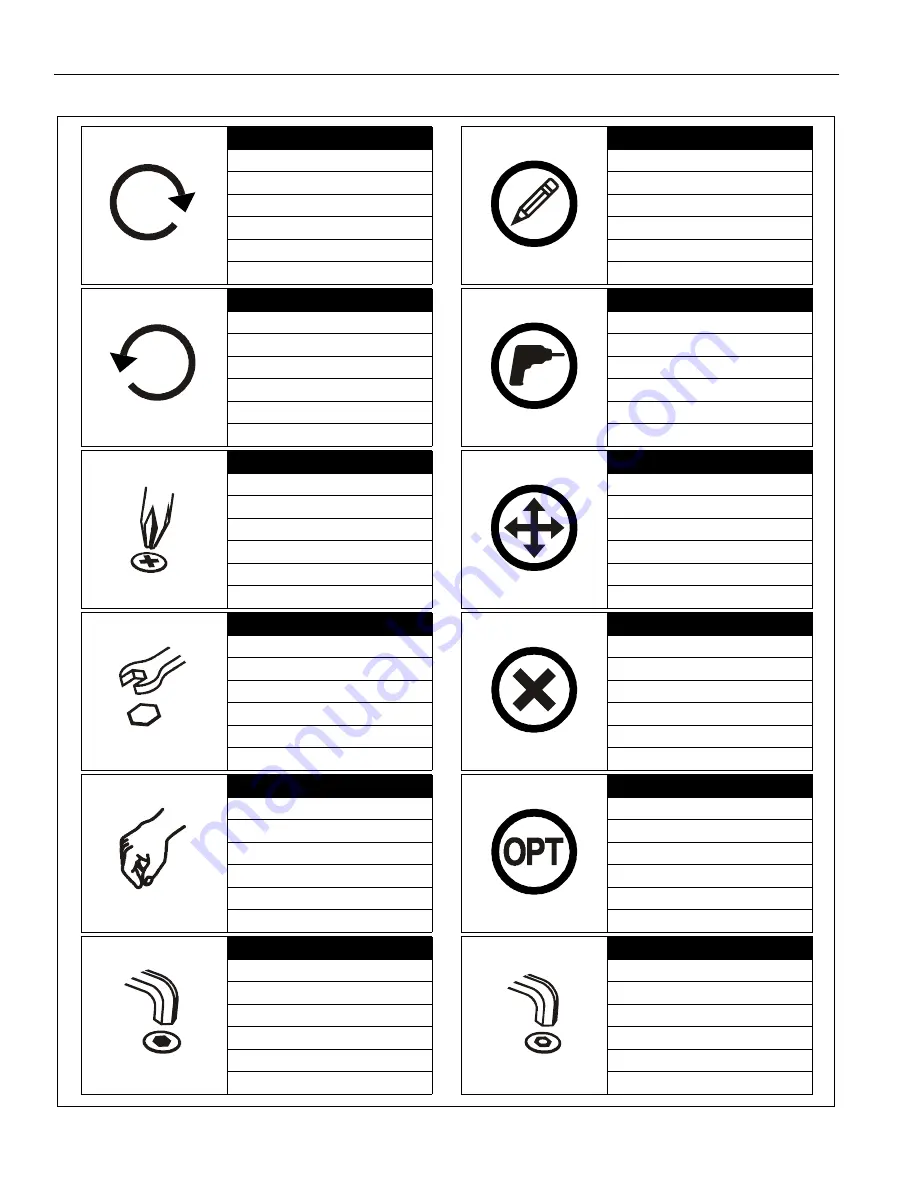
LEGEND

Tighten Fastener

Apretar elemento de fijación

Befestigungsteil festziehen

Apertar fixador

Serrare il fissaggio

Bevestiging vastdraaien

Serrez les fixations

Loosen Fastener

Aflojar elemento de fijación

Befestigungsteil lösen

Desapertar fixador

Allentare il fissaggio

Bevestiging losdraaien

Desserrez les fixations

Phillips Screwdriver

Destornillador Phillips

Kreuzschlitzschraubendreher

Chave de fendas Phillips

Cacciavite a stella

Kruiskopschroevendraaier

Tournevis à pointe cruciforme

Open-Ended Wrench

Llave de boca

Gabelschlüssel

Chave de bocas

Chiave a punte aperte

Steeksleutel

Clé à fourche

By Hand

A mano

Von Hand

Com a mão

A mano

Met de hand

À la main

Hex-Head Wrench

Llave de cabeza hexagonal

Sechskantschlüssel

Chave de cabeça sextavada

Chiave esagonale

Zeskantsleutel

Clé à tête hexagonale

Pencil Mark

Marcar con lápiz

Stiftmarkierung

Marcar com lápis

Segno a matita

Potloodmerkteken

Marquage au crayon

Drill Hole

Perforar

Bohrloch

Fazer furo

Praticare un foro

Gat boren

Percez un trou

Adjust

Ajustar

Einstellen

Ajustar

Regolare

Afstellen

Ajuster

Remove

Quitar

Entfernen

Remover

Rimuovere

Verwijderen

Retirez

Optional

Opcional

Optional

Opcional

Opzionale

Optie

En option

Security Wrench

Llave de seguridad

Sicherheitsschlüssel

Chave de segurança

Chiave di sicurezza

Veiligheidssleutel

Clé de sécurité

Содержание MFAUBSP

Страница 1: ...truções de Instalação Istruzioni di installazione Installatie instructies Instructions d installation Portrait Stretch Mount Stand Spanish Product Description German Product Description Portuguese Product Description Italian Product Description Dutch Product Description French Product Description MFAUBSP ...

Страница 2: ...instructions can result in serious personal injury damage to equipment or voiding of factory warranty It is the installer s responsibility to make sure all components are properly assembled and installed using the instructions provided WARNING Failure to provide adequate structural strength for this component can result in serious personal injury or damage to equipment It is the installer s respon...

Страница 3: ...Installation Instructions MFAUBSP 3 DIMENSIONS ...

Страница 4: ...Chave de bocas Chiave a punte aperte Steeksleutel Clé à fourche By Hand A mano Von Hand Com a mão A mano Met de hand À la main Hex Head Wrench Llave de cabeza hexagonal Sechskantschlüssel Chave de cabeça sextavada Chiave esagonale Zeskantsleutel Clé à tête hexagonale Pencil Mark Marcar con lápiz Stiftmarkierung Marcar com lápis Segno a matita Potloodmerkteken Marquage au crayon Drill Hole Perforar...

Страница 5: ...E 1 interface head assembly F 1 column assembly K 5 5 16 18 x 3 4 Left upright D 1 column inner cover cover G 1 back cover L 1 3 16 MA 4 MB 4 MC 4 MD 4 ME 4 MF 4 MG 4 M 1 hardware bag MH 4 MI 2 H 2 base plate J 8 5 16 18 x 1 2 N 10 FCA clip P 10 cable tie Q 1 3 16 M6x12mm M6x16mm M6x30mm M8x12mm M8x16mm M8x25mm 1 4 20 x 1 1 4 1 4 1 2 A 1 ...

Страница 6: ...5 16 18 x 1 2 flat head cap screws J to secure two base plates H to column assembly F See Figure 1 Figure 1 2 Slide interface head assembly E into column assembly F See Figure 2 3 Use four 5 16 18 x 3 4 button head cap screws K to secure interface head assembly E to column assembly F See Figure 2 Figure 2 4 Use remaining 5 16 18 x 3 4 button head cap screw K to secure column upper cover C to inter...

Страница 7: ...pacers are required If mounting holes are recessed or if protrusions prevent brackets A and B from laying flat then spacers ME must be used CAUTION Using screws of improper length may damage your display Proper screws will have adequate thread engagement without contacting bottom of display mounting holes 4 Select screw length See Figure 4 Using your hand insert SHORTEST length screw of selected d...

Страница 8: ...an even mount install uprights to be centered over column assembly Do NOT install both uprights to the same side of column assembly See Figure 6 Figure 6 Cable Management NOTE The following cable management options may vary based on type of display being mounted and user preference 1 Place FCA clip N into groove on back of Fusion mount with clip handle in a vertical position See Figure 7 2 Rotate ...

Страница 9: ...ver G to expose height adjustment knob 2 Turn height adjustment knob clockwise to raise display See Figure 11 3 Turn height adjustment knob counterclockwise to lower display See Figure 11 WARNING Do not attempt to raise or lower the adjustment carriage beyond its upper or lower limit High and low points are shown in Figures 11 and 12 NOTE A 1 2 socket wrench may also be used to adjust height by tu...

Страница 10: ...s located between the MFAUBSP up to and including the display does not exceed 125 lbs 56 7 kg WARNING RISK OF SERIOUS INJURY OR DEATH Placing a remote control or toy on the stand may encourage a child to climb onto the stand causing the stand to tip over onto the child DO NOT place remote controls or toys on the stand WARNING RISK OF SERIOUS INJURY OR DEATH Relocating audio and or video equipment ...

Страница 11: ...Installation Instructions MFAUBSP 11 ...

Страница 12: ...6918 Europe A Franklinstraat 14 6003 DK Weert Netherlands P 31 0 495 580 852 F 31 0 495 580 845 Asia Pacific A Office No 918 on 9 F Shatin Galleria 18 24 Shan Mei Street Fotan Shatin Hong Kong P 852 2145 4099 F 852 2145 4477 Chief a products division of Milestone AV Technologies 8800 002995 Rev01 2017 Milestone AV Technologies www milestone com 10 17 ...

Отзывы: