background image

Page 10

For technical questions, please call 1-800-444-3353.

SKU 45689 


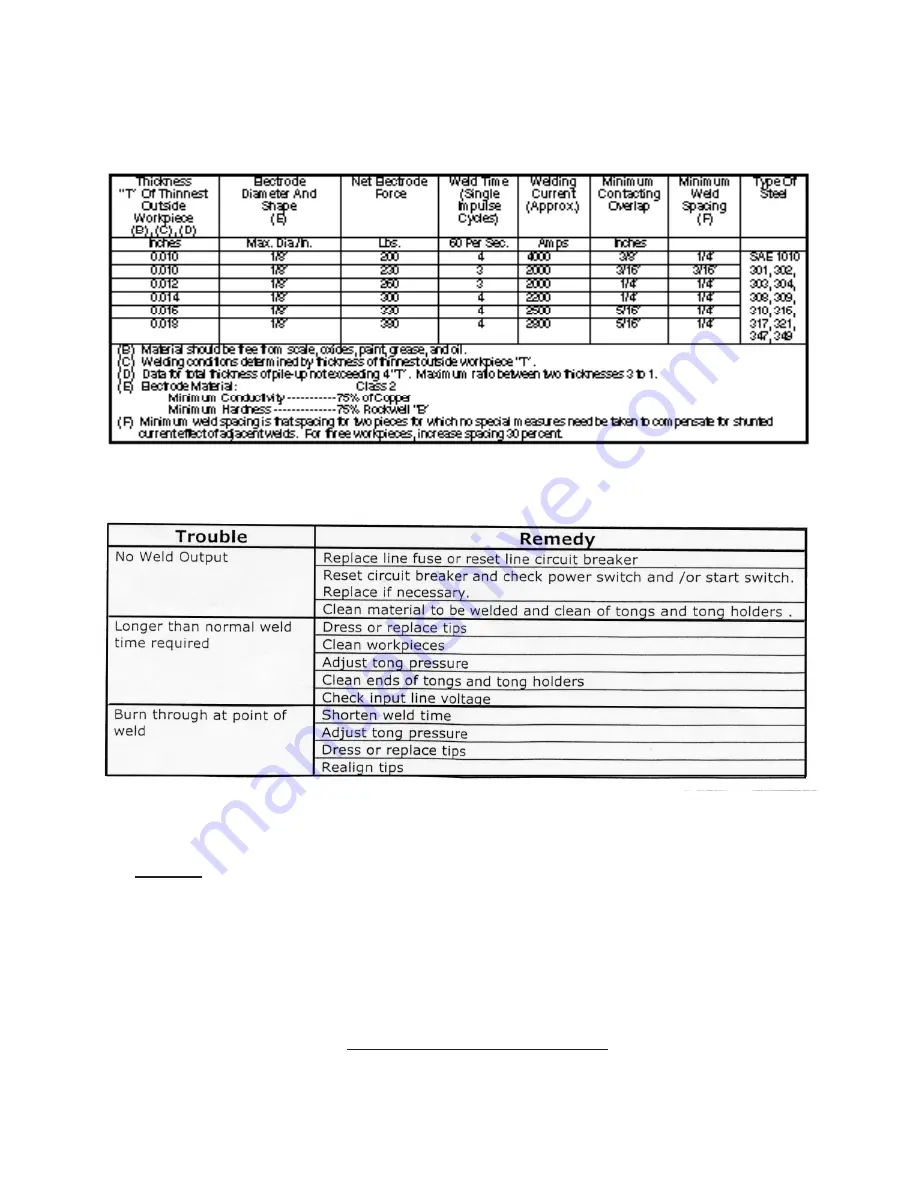
recoMMended practiceS

For Spot Welding loW-carBon Steel

trouBle Shooting guide

inSpection, Maintenance, and cleaning

1. 

Caution:

  Always disconnect the Spot Welder from its electrical power supply source 

before performing any inspection, maintenance, or cleaning.

2. 

Before each use, inspect the general condition of the Spot Welder.  Inspect switch, 

power plug and cord assembly, and extension cord (if used) for damage.  Check for 

loose screws, misalignment, binding of moving parts, broken parts and any other condi-

tion that may affect its safe operation.  If abnormal noise or vibration occurs, disconnect 

the Spot Welder from its electrical supply source immediately and have the problem cor-

rected before further use.  Do not use damaged equipment.

Содержание Welding 45689

Страница 1: ...ed No portion of this manual or any artwork contained herein may be reproduced in any shape or form without the express written consent of Harbor Freight Tools Diagrams within this manual may not be d...

Страница 2: ...s are impaired while taking drugs If there is any doubt do not attempt to use this product 5 USE EYE HEARING BREATHING AND HAND PROTECTION Wear an ANSI approved welding helmet goggles with shaded lens...

Страница 3: ...s to do the work of larger industrial equipment tools or attachments Do not use this product for a purpose for which it was not intended SPECIFIC PRODUCT WARNINGS AND PRECAUTIONS 1 GROUND THIS PRODUCT...

Страница 4: ...AT ALL TIMES DURING OPERATION Use a vise clamps etcetera not provided 9 OVERUSE CAN CAUSE OVERHEATING After continuous use allow the Spot Welder adequate time to cool before the next use 10 BEFORE TRY...

Страница 5: ...l 3 To attach the Lower Tong part 47 to the Spot Welder loosen the four Cap Screws part 3 located at the bottom front of the tool See Figure A and Assy Diagram 4 Slide the Lower Tong part 47 between t...

Страница 6: ...AP SCREW 3 FIGURE A TONG ALIGNMENT UPPER TONG 46 TONG TIPS 48 LOWER TONG 47 UPPER TONG 46 LOWER TONG 47 TONG TIPS 48 FIGURE B To Attach The Handle To The Spot Welder 1 To attach the Wooden Handle part...

Страница 7: ...WASHER HANDLE 17 BOLT 19 HEX NUT 20 HANDLE BRACKET 18 FIGURE C POWER SWITCH 25 25 HEX SCREW 16 FIGURE D To Attach Tong Tips To The Spot Welder 1 Caution Prior to attaching the Tong Tips parts 48 make...

Страница 8: ...between the workpieces and no weld can be made To increase the Tong pressure loosen the front Hex Jam Nut part 10 The more the front Hex Jam Nut is loosened the greater the pressure on the Tong Tips...

Страница 9: ...the Power Switch to stop the electrical current To Use The Operating Lever 1 Caution Never touch the Upper and Lower Tongs parts 46 47 when weld ing a workpiece Allow the Tong Tips part 48 and the wo...

Страница 10: ...n maintenance or cleaning 2 Before each use inspect the general condition of the Spot Welder Inspect switch power plug and cord assembly and extension cord if used for damage Check for loose screws mi...

Страница 11: ...S MANUAL AS A REFERENCE TOOL ONLY NEITHER THE MANUFACTURER NOR DISTRIBUTOR MAKES ANY REPRESENTATION OR WARRANTY OF ANY KIND TO THE BUYER THAT HE OR SHE IS QUALIFIED TO MAKE ANY REPAIRS TO THE PRODUCT...

Страница 12: ...a l u s n I 4 2 1 w o l e b D C B A f o g n i t s i s n o c h c t i w S r e w o P 5 2 1 h c t i w S y l b m e s s A t c a t n o C A 5 2 1 h c t i w S t c a t n o C B 5 2 1 h c t i w S e l g g o T C 5...

Страница 13: ...13 For technical questions please call 1 800 444 3353 SKU 45689 ASSEMBLY DIAGRAM NOTE Some parts are listed and shown for illustration purposes only and are not available individually as replacement p...

Страница 14: ...enance We shall in no event be liable for death injuries to persons or property or for incidental contingent special or conse quential damages arising from the use of our product Some states do not al...

Отзывы: