background image

Page 9

For technical questions, please call 1-800-444-3353.

Item 69582 


SAFET

y

Op

ERA

TION

M

AINTENAN

c

E

SETU

p

Fence Installation

1.  Loosen the Fence Lock Knobs and insert the Fence 

into the holders in the Base Plate. See Figure E.

2.  Tighten the Fence Lock Knobs.

Figure E 

Fence Lock Knobs

Fence

Base Plate 

Cover

cutting Function Adjustment

Move the Mode Lever to the desired cutting mode.

cutting mode 0:

 Blade moves up and down only.   

Use this setting for hardwood or metals.

cutting modes I, II, & III:

  Blade moves back and forth 

during each stroke, cutting faster in softer materials.   

The cut will not be as clean as mode 0.   

This action is greatest at mode III.

Figure F

Mode Lever

Workpiece and Work Area Set Up

1.  Designate a work area that is clean and well-lit.  

The work area must not allow access by children 

or pets to prevent distraction and injury.

2.  Route the power cord along a safe route to reach 

the work area without creating a tripping hazard or 

exposing the power cord to possible damage. The 

power cord must reach the work area with enough 

extra length to allow free movement while working.

3.  Secure loose workpieces using a vise or clamps 

(not included) to prevent movement while working.

4.  There must not be objects, such as utility lines, 

nearby that will present a hazard while working.


General Operating Instructions

1.  Plug the Power Cord into the nearest 

120 volt, grounded, electrical outlet.

2.  Position the Saw Blade of the Jigsaw about 1/2" from 

the beginning cut line on the workpiece. Do not allow 

the Saw Blade to come in contact with the workpiece.

3.  Squeeze the Trigger to turn on the Jigsaw. 

4.  If operating the Jigsaw for an extended period 

of time, you may wish to depress the Trigger 

Lock to lock the Trigger in its “ON” position. 

To unlock the trigger lock de press the Trigger Lock 

in the opposite direction to its “OFF” position.

5.  Allow the Saw Blade to stroke at full speed 

before slowly feeding it into the workpiece.

6.  Make sure to hold the Jigsaw firmly with both hands 

to avoid kickback. Then, finish making the cut.

7.  When finished, release the Trigger to stop the 

Jigsaw. Wait until the Saw Blade stops completely. 

Then, remove the Jigsaw from the workpiece.

8.  To prevent accidents disconnect the power 

cord after use. Clean, then store the tool 

indoors out of children’s reach.

Содержание 69582

Страница 1: ......

Страница 2: ...ation which if not avoided could result in minor or moderate injury Addresses practices not related to personal injury IMPORTANT SAFETY INFORMATION General Power Tool Safety Warnings Read all safety warnings and instructions Failure to follow the warnings and instructions may result in electric shock fire and or serious injury Save all warnings and instructions for future reference The term power ...

Страница 3: ...times This enables better control of the power tool in unexpected situations 5 Dress properly Do not wear loose clothing or jewelry Keep your hair clothing and gloves away from moving parts Loose clothes jewelry or long hair can be caught in moving parts 6 If devices are provided for the connection of dust extraction and collection facilities ensure these are connected and properly used Use of the...

Страница 4: ...omagnetic fields in close proximity to heart pacemaker could cause pacemaker interference or pacemaker failure In addition people with pacemakers should Avoid operating alone Do not use with power Trigger Locked on Properly maintain and inspect to avoid electrical shock Any power cord must be properly grounded A Ground Fault Circuit Interrupter GFCI should also be implemented it prevents sustained...

Страница 5: ...hoice between different processes 5 Include vibration free periods each day of work 6 Grip tool as lightly as possible while still keeping safe control of it Let the tool do the work 7 To reduce vibration maintain the tool as explained in this manual If any abnormal vibration occurs stop use immediately SAVE THESE INSTRUCTIONS Grounding Instructions TO PREVENT ELECTRIC SHOCK AND DEATH FROM INCORRE...

Страница 6: ...ptable for outdoor use 7 Make sure the extension cord is properly wired and in good electrical condition Always replace a damaged extension cord or have it repaired by a qualified electrician before using it 8 Protect the extension cords from sharp objects excessive heat and damp or wet areas Table A RECOMMENDED MINIMUM WIRE GAUGE FOR EXTENSION CORDS 120 240 VOLT NAMEPLATE AMPERES at full load EXT...

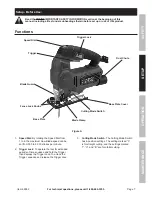
Страница 7: ...e Cover Cutting Mode Switch Blade Clamp Fence Lock Knobs Blade Guard Figure A 1 Speed Dial By rotating the Speed Dial from 1 to 6 the maximum Saw Blade speed can be set from 500 to 3 000 strokes per minute 2 Trigger Lock To operate the tool for extended periods of time squeeze and hold the Trigger then depress the Trigger Lock To unlock the Trigger squeeze and release the Trigger once 3 Cutting Mo...

Страница 8: ... close instantly Saw Blade Installation Note Blade sold separately 1 Lift the Blade Guard up and hold it See Figure A on page 7 2 Twist the Blade Clamp and insert the Saw Blade with teeth pointing forward See Figure B Insert the Blade completely then release the Blade Clamp 3 Return the Blade Guard back into place Figure B Saw Blade Blade Clamp Adjusting the Cutting Speed 1 Speed Dial Adjust the s...

Страница 9: ...extra length to allow free movement while working 3 Secure loose workpieces using a vise or clamps not included to prevent movement while working 4 There must not be objects such as utility lines nearby that will present a hazard while working General Operating Instructions 1 Plug the Power Cord into the nearest 120 volt grounded electrical outlet 2 Position the Saw Blade of the Jigsaw about 1 2 f...

Страница 10: ...ernal damage or wear Carbon brushes or switch for example 1 Check that cord is plugged in 2 Check power at outlet If outlet is unpowered turn off tool and check circuit breaker If breaker is tripped make sure circuit is right capacity for tool and circuit has no other loads 3 Turn off tool and allow to cool Press reset button on tool 4 Have technician service tool Tool operates slowly 1 Forcing to...

Страница 11: ...8 Trigger 1 29 Carbon brush holder 2 30 Copper holder for brush 2 31 Carbon brush 2 32 Bearing 607 1 33 Stator 1 34 Inlay for carbon brush 2 35 Cord shield 1 36 Power cord 1 37 Cord clamp 1 38 Tapping screw 2 Part Description Qty 39 Right housing 1 40 Tapping screw 9 41 Cover for inlet air 1 42 Tapping screw 2 43 Split washer Ø4 1 44 Guide wheel 1 45 Support pin 1 46 Support 1 47 Pin for guide whe...

Страница 12: ...tly or indirectly to misuse abuse negligence or accidents repairs or alterations outside our facilities criminal activity improper installation normal wear and tear or to lack of maintenance We shall in no event be liable for death injuries to persons or property or for incidental contingent special or consequential damages arising from the use of our product Some states do not allow the exclusion...

Отзывы: