Chicago Electric 66910 Скачать руководство пользователя страница 11

Page 11

For technical questions, please call 1-800-444-3353.

SKU 66910 
        

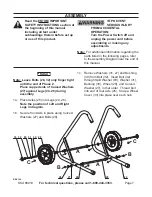
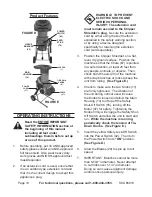
Do not force the Chipper Shredder.  Let 

8. 

the natural suction process take in the 
material to be cut.  Always stand clear 
and to the side of the Chute (67).   

(See Figure E.)

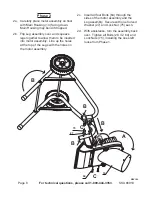
Without putting your hands into the 

9. 

Hopper (1), slowly drop the material in 
(one branch at a time).  The machine will 
pull it in automatically.  

(See Figure E.)

WaRnIng!  never put your hands  

10. 

into the Hopper (1).  always use the 
Feed Stick (76).  (See Figure D.)

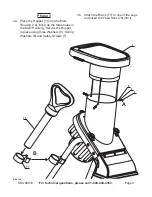
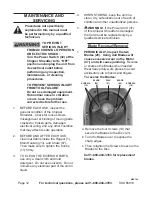
Should the Chipper Shredder jam while 

11. 

in use, immediately turn the Power 
Switch (42) to its 

“OFF”

 position.  

Unplug the Power Cord (37) from its 
extension cord.  Unscrew and remove 
the two Knobs (11).  Open the Main 

Housing (14) to expose the two Blades 

(20).  Clear the jam.  Close the Housing, 
and retighten the two Tie-Down Knobs.  
Then plug the Power Cord into its 
extension cord, and turn the Power 
Switch to its 

“On”

 position to resume 

cutting.  

(See Figures D and E.)

NOTE:  In extreme working conditions 

12. 

sensors in the Chipper Shredder will 
automatically switch off the Motor (47) 
to prevent overheating.  In this event, 
turn the Power Switch (42) to its 

“OFF”


position and unplug the machine from 

its extension cord.  Wait five minutes 

or until the Motor has cooled.  Clear 
the machine of all debris.  Depress the 

Circuit Breaker (39).  Then plug the 

machine into its extension cord and turn 
the Power Switch to its

 “On”

 position to 

resume cutting.  

(See Figure D.)

When finished using the Chipper 

13. 

Shredder, turn the Power Switch (42) to 
its 

“OFF”

 position.  Remove the Safety 

Lock-Off Switch from the Power Switch.  
Then unplug the Power Cord (37) from 

its extension cord.   

(See Figures D and E.)

Wait until all moving parts of the Chipper 

14. 

Shredder have stopped moving.  Then 
open the machine and clean out the 
Hopper (1), Main Housing (14), and 
Chute (67).  

(See Figure E.)

Clean, then store the Chipper Shredder 

15. 

indoors out of reach of children and other 
unauthorized persons.

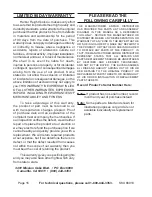
nOtE: Performance will decrease as 

the blades wear.   
the blades can be reversed to 
expose a fresh cutting edge, 
see Blade Reversal/Removal
 on 
page 12.

REV 10h

Содержание 66910

Страница 1: ... reserved No portion of this manual or any artwork contained herein may be reproduced in any shape or form without the express written consent of Harbor Freight Tools Diagrams within this manual may not be drawn proportionally Due to continuing improvements actual product may differ slightly from the product described herein Tools required for assembly and service may not be included For technical...

Страница 2: ...azardous situation which if not avoided could result in minor or moderate injury NOTICE is used to address practices not related to personal injury CAUTION without the safety alert symbol is used to address practices not related to personal injury When using electric gardening equipment basic safety precautions should always be followed to reduce the risk of fire electric shock and personal injury...

Страница 3: ...edder should be 7 grounded while in use to reduce the risk of electric shock to the operator The unit is equipped with a 3 conductor cord and 3 prong grounding plug to fit the proper grounding receptacle The green or green and yellow conductor in the cord is the grounding wire Do not connect the green or green and yellow wire to a live terminal Your unit has a plug as illustrated above The outlet ...

Страница 4: ...e tired 6 Do not grasp the exposed cutting blades or cutting edges when picking up or holding the equipment 7 Keep hands and feet away from the cutting area 8 Keephandsawayfromtheblades 9 Wear thick jeans and steel toed work boots to help prevent injury caused by flying debris Equipment Use and Care Avoid a dangerous environment Do not 1 use equipment in damp or wet locations Do not use in rain 2 ...

Страница 5: ...he Chipper Shredder comes to a complete stop Disconnect the Power Cord and take the following steps Remove any foreign or clogged a material Check for any loose parts and tighten b Replace or repair damaged parts c Periodically stop the Chipper Shredder 6 and check the discharge area to ensure the processed material does not build up and clog the Chute Do not move the Chipper Shredder when 7 the M...

Страница 6: ... Motor Speed 3460 RPM Cutting Capacity 1 1 4 Diameter Maximum Safety Features Internal Safety Cut Off Switch When Knobs 11 are loose or Main Housing 14 is open Motor will cease to run Accessories Feed Stick 5mm Allen Wrench 6mm Allen Wrench 14mm 17mm Wrench Unpacking When unpacking make sure the item is intact and undamaged If any parts are missing or broken please call Harbor Freight Tools at 1 8...

Страница 7: ...er 83 Washer 31 Bushing 30 Wheel 29 and Curved Washer 27 in that order Thread bolt into end of rear Axle 25 Snap a Wheel Cover 33 into place over each hub Assembly Read the entire Important Safety Instructions section at the beginning of this manual including all text under subheadings therein before set up or use of this product To prevent serious injury from accidental operation Turn the Power S...

Страница 8: ...to allow them to be inserted into motor assembly Line up the holes at the top of the Legs with the holes on the motor assembly Insert all four Bolts 64 through the 2c sides of the motor assembly and the Leg assembly Secure with one Curved Washer 27 and Lock Nut 75 each With assistance turn the assembly back 2d over Tighten all Bolts 28 32 64 and Lock Nuts 75 including the ones left loose from Phas...

Страница 9: ...ce the Hopper 1 onto the Main 3a Housing 14 lining up the three holes in the Main Housing Secure the Hopper in place using three Washers 8 Spring Washers 6 and Safety Screws 7 Attach the Brace 77 to one of the Legs 3b and insert the Feed Stick 78 into it 7 6 8 1 77 78 B A REV 10h ...

Страница 10: ...evice designed specifically for retaining the extension cord sold separately Position the Chipper Shredder on a flat 3 level dry ground surface Position the machine so that the Chute 67 is pointed in a safe direction at least 25 feet from any people animals or objects Then chock both Wheels 29 of the machine with scrap branches or rocks to keep the unit from rolling See Figure E Check to make sure...

Страница 11: ... NOTE In extreme working conditions 12 sensors in the Chipper Shredder will automatically switch off the Motor 47 to prevent overheating In this event turn the Power Switch 42 to its OFF position and unplug the machine from its extension cord Wait five minutes or until the Motor has cooled Clear the machine of all debris Depress the Circuit Breaker 39 Then plug the machine into its extension cord ...

Страница 12: ...CH Use 2 clean out debris inside the Hopper 1 Main Housing 14 and Chute 67 Then make sure to tighten the Knobs 11 firmly TO CLEAN THE EXTERIOR PARTS 3 use only a clean cloth and mild detergent Do not use solvents Do not immerse any electrical part of the unit in liquid WHEN STORING keep the unit in a 4 clean dry safe location out of reach of children and other unauthorized persons 5 WARNING If the...

Страница 13: ...nd Chute 67 Tighten Knobs 11 firmly Then reset circuit breakers and restart Check that Knobs 11 are 4 firmly tightened No cutting action Unit is clogged with debris 1 Blades dull or damaged 2 Clean out all debris from unit 1 Replace damaged blades 2 Motor sounds as if it is not running properly Circuit Breaker 39 trips Unit is clogged with debris Clean out all debris from unit Chipper Shredder shu...

Страница 14: ... Washer 3 35 Spring Washer 3 36 Screw 3 37 Power Cord Plug 1 38 Protection Tube 1 39 Circuit Breaker 1 40 Nut 1 41 Wire A 1 Part Description Qty 42 Power Switch 1 43 Motor Housing 1 44 Cable Fix 1 45 Capacitor 1 46 Covering 1 47 Motor Assembly 1 48 Washer 1 49 Screw 2 50 Spring Washer 2 51 Washer 2 52 Switch Shelf 1 53 Wire B 1 54 Wire C 1 55 Safety Shut Off Switch 1 57 Cover 1 58 Motor Support 1 ...

Страница 15: ...Page 15 For technical questions please call 1 800 444 3353 SKU 66910 REV 10g ASSEMBLY DIAGRAM NOTE 5mm Allen Wrench 79 not shown 6mm Allen Wrench 80 not shown 14mm 17mm Wrench 82 not shown ...

Страница 16: ...product at our election or we may elect to refund the purchase price if we cannot readily and quickly provide you with a replacement We will return repaired products at our expense but if we determine there is no defect or that the defect resulted from causes not within the scope of our warranty then you must bear the cost of returning the product This warranty gives you specific legal rights and ...

Отзывы: