


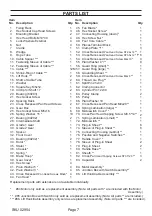


SKU 02954
Page 5
mOunTIng THE HOIST
This tool requires no assembly besides mounting it to a jib boom capable of sup-
porting the weight of the tool and any project pieces you will be lifting.
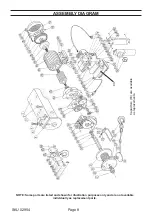
All parts named and listed refer to those in the Assembly Diagrams and Parts List
on Pages 7 and 8.
Place the two Mounting Brackets [2] over the jib boom in the location you intend to
1.
mount the Hoist.
Have an assistant hold the Hoist in place and attach the Brackets to the Fixing Rack
2.
[1] using the Hex Head Bolts [4], Lock Washers [5] and Nuts [6] supplied.
Once the Hoist is in the final position, tighten Nuts firmly.
3.
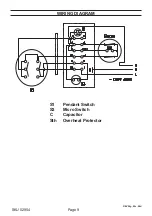
OpERATIOn
You must turn the Hoist on in order to pull out or wind up the Cable.
1.
To operate the Power Switch, [76], press the upper part of the button on the Switch to
2.
reel in the Cable. Press the lower part to release Cable.
Position the item you wish to lift, underneath the Hoist. Check to be sure conditions
3.
are safe to lift the item.
Grasp the Lift Hook [15] and pull it away from the Hoist while pressing on the lower
4.
part of the button on the Power Switch. Pull the Hook away from the Hoist as you do
so. Always leave at least three turns of Cable on the spool to insure that the Cable is
able to lift to the stated weight capacity.
Attach the Hook to the item. Never wrap the Cable around an item and hook the Cable
5.
onto itself. This can cause damage to the item you are lifting, as well as the Cable.
Stand clear. When it is safe to do so, use the Power Switch to retract the Cable into
6.
the machine, and lift the item.
As you lift the item, be sure the Cable winds properly onto the spool. Cable should not
7.
cross over itself when it is on the spool.
If you are unable to lift a load, do not continue to operate the Power Switch. This can
8.
result in damage to the motor and possibly break the Cable.


