1 0 -6 WHEELS A N D TIRES
WHEEL REMOVAL A N D
INSTALLATION
Jacking Instructions
Place vehicle jack supplied or recommended as follows:
to raise a rear wheel
place jack under axle housing;
to
raise front wheel of C, G, P models
place jack under
lower control arm pivot;
to raise front wheel of K
models,
place jack under front axle near spring seat.
Dual and Single Wheels
When installing the tire and wheel on the vehicle, the
following procedure should be followed:
After wheel nuts are put on loosely, turn the wheel until
one nut is at the top of the bolt circle; tighten the nut
just snug. Snug up the remaining nuts criss-cross to
minimize runout, then tighten the nuts to the
recommended torque alternately and evenly to avoid
excessive runout.
Lateral runout should not exceed 1/8" on front wheel or
3/16" on rear wheel.
Matching Side and Lock Rings
Side and lock rings of different rim types are
not
interchangeable
Some may appear to be, but they do
not fit properly on the rim base. Serious accidents have
resulted from the use of mismatched rings. Rim base
and rings must be matched according to manufacturer,
size and type. This information is stamped on each part.
Installing Synthetic Tubes
CAUTION:
When tube and flap are not
properly lubricated and mounted, they will
stretch thin in the tire bead and rim region.
This will cause premature failure.
1. Before installing tube in tire, clean inside of casing
thoroughly.
2. Insert tube in tire and inflate until it is nearly
rounded out.
3. Inspect rim for rust scale and bent flanges—clean
rust scale and straighten flanges where necessary.
4. Using a brush or cloth swab, apply a solution of
neutral vegetable oil soap to the inside and outside
of tire beads and also to the rim side of the tube.
Do not allow soap solution to run down into tire.
5. When mounting tire and tube on a drop center rim,
follow the standard procedure. Be sure tire is
centered on rim so that beads are out of rim well
before inflating. Do not allow tire to hang loosely
on wheel while inflating.
6. Center valve and pull it firmly against the rim.
Hold in this position and inflate until tire beads are
firmly seated on rim against flanges.
7. Completely deflate tire by removing valve core.
8. Reinflate tire to recommended pressure.
TUBELESS TIRES
Tubeless tires mounted on one piece full drop center
rims are standard on some trucks. These tires have a
safety inner liner which if punctured, tends to cling to
the penetrating object forming a partial seal until the
object is removed from the tire.
The mounting and demounting of tubeless truck tires
will present no problem when a rubber lubricant, such as
Ru-Glyde or equivalent is applied to tire beads and rim
flanges. Ru-Glyde or equivalent in addition to materially
assisting in mounting and demounting also prevents
rusting at the tire sealing area and thus prevents tires
from adhering to the wheel.
CAUTION:
A hammer, or tools with sharp
edges, should never be used to demount or
mount tubeless tires as damage to rim flange or
tire sealing bead may result.
Inspection for Leaks
1. With wheel assembly removed from vehicle, inflate
the tire to recommended operating pressure.
2. Check for leaks at rim bead by placing wheel and
tire horizontal and allowing water to stand in
groove between rim and tire. Check for large leaks
by lowering assembly into water tank or running
water over tire.
Demounting (6.50-16 tires)
The 6.50-16 size may be demounted using present tire
machines or standard tire irons following the same
procedure employed in servicing tube type tires.
Demounting (all except 6.50-16 tires)
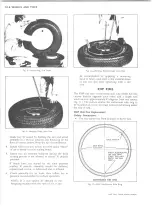
1. Remove valve core to completely deflate tire. With
tire lying flat on floor, loosen beads from rim seats
by walking around on tire with heels at points close
to rim. With wide side of rim down, apply tire
lubricant to top bead. With stops toward rim, insert
spoon ends of two tire irons about 10" apart. While
standing on tire to hold bead in gutter, pull one tool
toward center of rim (fig. 4).
2. Hold one iron in position with foot and pull second
iron toward center of rim. Progressively work bead
off rim, taking additional bites if necessary (fig. 5).
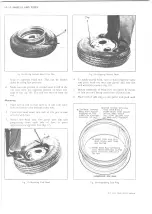
3. Stand assembly in vertical poisition. Lubricate
second bead. At top of assembly insert straight end
of tire iron between bead and back flange of rim at
about a 45 degree angle (fig. 6).
4. Turn iron so that is is perpendicular to rim. Pry
second bead off (fig. 7).
Mounting (all except 6.50-16 tires)
All tubeless tires except the 6.50-16 size will be mounted
as follows:
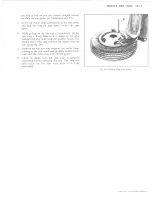
1. Inspect rim to insure bead seats are clean and
smooth. Then place rim on floor with wide side
LIGHT DUTY TRUCK SERVICE MANUAL
Содержание Light Duty Truck 1973
Страница 1: ......
Страница 4: ......
Страница 6: ......
Страница 39: ...HEATER AND AIR CONDITIONING 1A 13 Fig 14 Heater Wiring Diagrams LIGHT DUTY TRUCK SERVICE MANUAL...
Страница 53: ...HEATER AND AIR CONDITIONING 1A 27 LIGHT DUTY TRUCK SERVICE MANUAL...
Страница 115: ...LIGHT DUTY TRUCK SERVICE M A N U A L HEATER AND AIR CONDITIONING 1A 89...
Страница 123: ...BODY 1B 3 Fig 6 Typical 06 Van LIGHT DUTY TRUCK SERVICE MANUAL...
Страница 149: ...BODY 1B 29 Fig 84 Body Mounting 06 Fig 85 Body Mounting 14 LIGHT DUTY TRUCK SERVICE MANUAL...
Страница 171: ...LIGHT DUTY TRUCK SERVICE M A N U A L Fig 2 Frame Horizontal Checking Typical FRAME 2 3...
Страница 173: ...LIGHT DUTY TRUCK SERVICE M A N U A L Fig 4 10 30 Series Truck Frame FRAME 2 5...
Страница 174: ...2 6 FRAME LIGHT DUTY TRUCK SERVICE MANUAL Fig 5 Underbody Reference Points G Van...
Страница 177: ...LIGHT DUTY TRUCK SERVICE MANUAL G 10 20 C 10 P 10 30 Fig 2 Front Suspension C P K Typical FRONT SUSPENSION 3 3...
Страница 185: ...FRONT SUSPENSION 3 11 Fig 16 Toe out on Turns LIGHT DUTY TRUCK SERVICE MANUAL...
Страница 224: ......
Страница 229: ...REAR SUSPENSION AND DRIVELINE 4 5 Fig 13 Rear Spring Installation C K Models LIGHT DUTY TRUCK SERVICE MANUAL...
Страница 266: ......
Страница 310: ...5 44 BRAKES C MODELS G MODELS P MODELS Fig 77 Parking Brake System LIGHT DUTY TRUCK SERVICE MANUAL...
Страница 351: ...ENGINE 6 15 Fig ID Sectional View of Eight Cylinder Engine LIGHT DUTY TRUCK SERVICE MANUAL...
Страница 375: ...EN G IN E 6 39 LIGHT DUTY TRUCK SERVICE MANUAL...
Страница 376: ...6 4 0 ENGINE LIGHT DUTY TRUCK SERVICE MANUAL...
Страница 377: ...ENG IN E 6 41 LIGHT DUTY TRUCK SERVICE MANUAL...
Страница 378: ...LIGHT DUTY TRUCK SERVICE MANUAL Fig 37L K Series Engine Front Mount 6 42 ENG INE...
Страница 379: ...E N G IN E 6 43 FRONT MOUNT REAR MOUNT Fig 38L G Series Engine Mounts LIGHT DUTY TRUCK SERVICE MANUAL...
Страница 400: ...6 6 4 ENG INE LIGHT DUTY TRUCK SERVICE MANUAL...
Страница 401: ...ENG IN E 6 65 LIGHT DUTY TRUCK SERVICE MANUAL...
Страница 402: ...6 6 6 ENGINE LIGHT DUTY TRUCK SERVICE MANUAL...
Страница 403: ...E NG IN E 6 67 Fig 36V C Series Engine Mounts LIGHT DUTY TRUCK SERVICE MANUAL...
Страница 410: ......
Страница 423: ...EN G IN E C OOLING 6K 13 Fig 16 Overheating Chart LIGHT DUTY TRUCK SERVICE MANUAL...
Страница 424: ...6 K 1 4 ENG INE COOLING Fig 17 Coolant Loss Chart LIGHT DUTY TRUCK SERVICE MANUAL...
Страница 455: ...ENGINE FUEL 6M 31 Fig K13 Accelerator Controls P30 42 454 Engine LIGHT DUTY TRUCK SERVICE MANUAL...
Страница 456: ...6M 32 ENGINE FUEL Fig K15 Accelerator Controls G Van L 6 LIGHT DUTY TRUCK SERVICE MANUAL...
Страница 492: ......
Страница 506: ...CEC PLUNGER IS EXTENDED Fig lid Vacuum Advance Diagram Six Cylinder Engine 6T 14 EMISSION CONTROL SYSTEMS...
Страница 512: ...Fig 18e Vacuum Advance Diagram V8 Engine...
Страница 515: ...EMISSION CONTROL SYSTEMS 6T 23 Fig If Six Cylinder A I R System LIGHT DUTY TRUCK SERVICE MANUAL...
Страница 516: ...6 T 2 4 E M IS S IO N CONTROL SYSTEMS LIGHT DUTY TRUCK SERVICE MANUAL...
Страница 517: ...E M IS S IO N C O N TR O L SYSTEM S 6T 25 Fig 4f Diverter Valve Vent Valve LIGHT DUTY TRUCK SERVICE MANUAL...
Страница 528: ......
Страница 540: ...6 Y 1 2 ENGINE ELECTRICAL Fig 16b Battery Installation C K Series LIGHT DUTY TRUCK SERVICE MANUAL...
Страница 572: ...6Y 44 ENGINE ELECTRICAL Fig 25i V 8 Spark Plug Wire Installation LIGHT DUTY TRUCK SERVICE MANUAL...
Страница 590: ......
Страница 592: ...7M 2 CLUTCHES MANUAL TRANSMISSIONS VIEW B Fig la Clutch Linkage Assy C K Models LIGHT DUTY TRUCK SERVICE MANUAL...
Страница 593: ...CLUTCHES MANUAL TRANSMISSIONS 7M 3 LIGHT DUTY TRUCK SERVICE MANUAL...
Страница 594: ...7M 4 CLUTCHES MANUAL TRANSMISSIONS Fig lc Clutch Linkage Assy P Models LIGHT DUTY TRUCK SERVICE MANUAL...
Страница 598: ...7M 8 CLUTCHES MANUAL TRANSMISSIONS LIGHT DUTY TRUCK SERVICE MANUAL...
Страница 642: ......
Страница 654: ......
Страница 656: ...LIGHT DUTY TRUCK SERVICE MANUAL Fig 19M Drive Range Low First Gear Typical 7A 14 AUTOMATIC T R A N S M IS S IO N...
Страница 662: ...LIGHT DUTY TRUCK SERVICE M A N U A L Fig 22M LI Range Manual First Gear Typical 7A 20 AUTOMATIC TRANSMISSION...
Страница 668: ...LIGHT DUTY TRUCK SERVICE M A N U A L Fig 25M Reverse Range Typical 7A 26 AUTOMATIC T R A N S M IS S IO N...
Страница 739: ...FUEL TANKS AND EXHAUST 8 9 Fig 15 Filler Neck and Vent Hose Van LIGHT DUTY TRUCK SERVICE MANUAL...
Страница 740: ...8 10 FUEL TANKS AND EXHAUST Fig 16 Fuel Feed and Return Pipes Front C K LIGHT DUTY TRUCK SERVICE MANUAL...
Страница 743: ...FUEL TANKS AND EXHAUST 8 13 LIGHT DUTY TRUCK SERVICE MANUAL...
Страница 744: ...8 14 FUEL TANKS AND EXHAUST LIGHT DUTY TRUCK SERVICE MANUAL...
Страница 746: ...8 16 FUEL TANKS AND EXHAUST Fig 2 5 Fuel Feed Pipe Front P 105 4 2 LIGHT DUTY TRUCK SERVICE MANUAL...
Страница 760: ...8 30 FUEL TANKS AND EXHAUST Fig 40 Exhaust Pipe P Models LIGHT DUTY TRUCK SERVICE MANUAL...
Страница 761: ...FUEL TANKS AND EXHAUST 8 31 LIGHT DUTY TRUCK SERVICE MANUAL...
Страница 763: ...FUEL TANKS AND EXHAUST 8 33 LIGHT DUTY TRUCK SERVICE MANUAL...
Страница 766: ......
Страница 781: ...STEERING 9 15 OIL PRESSURE OIL RETURN PORT VALVE BODY Fig 21 Left Turn Position LIGHT DUTY TRUCK SERVICE MANUAL...
Страница 832: ...LIGHT DUTY TRUCK SERVICE MANUAL Fig 106 Power Steering Pump Mounting Typical 9 66 STEERING...
Страница 833: ...PUMP ASSEMBLY STEERING GEAR TYPICAL SMALL V8 TYPICAL LARGE V8 STEERING 9 67...
Страница 860: ...9 94 STEERING LEAKAGE AREAS Fig 133 Power Steering Gear Leakage LIGHT DUTY TRUCK SERVICE MANUAL...
Страница 861: ...STEERING 9 95 Fig 134 Power Steering Pump Leakage LIGHT DUTY TRUCK SERVICE MANUAL...
Страница 864: ......
Страница 876: ......
Страница 886: ...11 10 CHASSIS SHEET METAL LIGHT DUTY TRUCK SERVICE MANUAL...
Страница 891: ...ELECTRICAL BODY AND CHASSIS 12 5 LIGHT DUTY TRUCK SERVICE MANUAL...
Страница 897: ...ELECTRICAL BODY AND CHASSIS 12 11 Fig 14 Instrum ent Cluster Assembly C K Models LIGHT DUTY TRUCK SERVICE MANUAL...
Страница 934: ......
Страница 942: ......
Страница 970: ......
Страница 972: ......
Страница 974: ......
Страница 976: ...V...
Страница 978: ......
Страница 979: ......


