background image

6

MODEL: RJ02-180-4

MODEL: RJ02-180-4

OPERATING INSTRUCTIONS

Using as a panini press in the closed position:

1.   Always preheat the panini maker closed.

2.   Before using the panini maker, use a pastry brush to lightly coat the top and 

bottom grilling plates with vegetable oil. This will help enhance the non-stick 
quality of the grill plates.

IMPORTANT:

 We recommend not to use non-stick sprays as they can cause 

build-up on the cooking plate.

3.   Make sure that the removable drip tray is in the correct position before you 

use the panini maker.

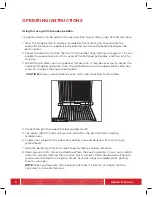
4.   The front two feet of the panini maker can be raised or lowered. Raising the 

feet will allow the grease to drain to the back of the appliance when grilling.

5.   Adjust the feet by pressing the center tab of each foot. This will cause the foot 

to tilt into the upright position and it is now ready for use.

6.    Preheat the panini maker for about 3 minutes. Keep the panini maker closed 

when preheating.

7.   Check to make sure that the cord is fully unwrapped and ready to plug in an 

electrical outlet. The (POWER) light will illuminate and remain lit during use.

8.  While preheating, prepare your food to be grilled.

9.    After approximately 2 minutes, the green (READY) light will light up, 

indicating the appliance is preheated and ready for use.

NOTE:

 When the panini maker is heated for the first time, it may emit a slight 

smoke or odor; this is normal and should disappear after 2 or 3 uses. That 
does not affect the safety of the appliance.

NOTE:

 When cooking more than one panini side by side, try to make sure 

that each sandwich is similar in thickness. This will allow both to cook quickly, 
evenly, and grill well on both the top and bottom.

10. Place the panini sandwich centered on the bottom grill plate.

11.  Close the handle and gently lower the top grill plate.

12.  To ensure a perfectly grilled panini, make sure that the top grill plate lies 

evenly on the top of the bread and the sandwich is centered on the grill plate. 
If desired, press the handle down several times while cooking to press the 
sandwich and make it flatter.

13.  During cooking, the green (READY) indicator light will cycle on/off during 

cooking. This indicates that the thermostat is maintaining the proper cooking 
temperature.

14. Continue grilling until the bread is toasted, and food is cooked to your liking.

15.  To remove your grilled panini sandwiches, always use a heat safe plastic or  

wooden spatula as the grill becomes hot during cooking.

WARNING: 

never use a sharp edge or metal utensil as this can scratch the  

non-stick finish on the grill plates. 

Содержание RJ02-180-4

Страница 1: ...180 GRILL PANINI PRESS CUSTOMER SERVICE 888 315 6553 customerservice chefman com RJ02 180 4 MULTI FUNCTIONAL...

Страница 2: ...2 MODEL RJ02 180 4 READ ALL INSTRUCTIONS BEFORE USE For your safety and continued enjoyment of this product always read the instruction manual before using...

Страница 3: ...1 Introduction 2 Safety Instructions 5 Features 7 Operating Instructions 15 Cleaning and Maintenance 17 Notes 19 Terms and Conditions 20 Warranty Card Contents...

Страница 4: ...each product is backed by a comprehensive manufacturer s 1 year warranty as well as outstanding after sales service support through our dedicated customer service team In the unlikely event that your...

Страница 5: ...ervice representative During initial use you may notice some smoke and or a slight odor This is normal and should quickly dissipate It should not reoccur after the appliance has been used a few more t...

Страница 6: ...y such as a fire call 911 SAVE THESE INSTRUCTIONS THIS APPLIANCE IS FOR HOUSEHOLD USE ONLY SHORT CORD INSTRUCTIONS A short power supply cord is provided to reduce the hazards resulting from entangleme...

Страница 7: ...e appliance and cause it to fray and break DO NOT OPERATE APPLIANCE IF THE LINE CORD SHOWS ANY DAMAGE OR IF APPLIANCE WORKS INTERMITTENTLY OR STOPS WORKING ENTIRELY CAUTION To ensure continued protect...

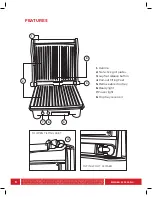
Страница 8: ...ATURES 1 Handle 2 Non stick grill plates 3 Lay flat release button 4 Pull out tilting Feet 5 Removeable drip tray 6 Ready light 7 Power light 8 Drip tray reservoir 4 1 2 6 5 3 8 7 TO OPEN TILTING FEET...

Страница 9: ...green READY light will light up indicating the appliance is preheated and ready for use NOTE When the panini maker is heated for the first time it may emit a slight smoke or odor this is normal and sh...

Страница 10: ...ll plate down on the upper plate s drip tray reservoir to adjust the angle See figure 1 CAUTION Always wear protective oven mitts when touching a hot surface 4 Preheat the grill to produce the best gr...

Страница 11: ...oden cooking utensil to remove cooked on food residue Never use steel wool or abrasive cleaning pads to remove food residue Use a damp cloth or non abrasive sponge with a small amount of non abrasive...

Страница 12: ...s rye sourdough multigrain pita etc 3 Add some crunch Make the most of your sandwich by using olive oil butter or cooking sprays on the outside of your panini to create a more crispy and flavorful san...

Страница 13: ...10 MODEL RJ02 180 4 NOTES...

Страница 14: ...ranty does not cover normal wear of parts or damage resulting from any of the following negligent use or misuse of the product improper voltage or current use contrary to the operation instructions de...

Страница 15: ...a Suite 207 Mahwah NJ 07495 All data fields are required in order for us to process your request Model Number Full Name Address Phone Date of Purchase Retail Store of Purchase We recommend you keep th...

Страница 16: ...ser 2 Click on Sign Up Now 3 Fill in the required information as prompted NOTE Place of Purchase refers to the store at which you purchased your product 4 Sign in using your User Name and Password CLU...

Отзывы: