

For more detailed information, refer to the
CheckVideo HD Indoor Micro
Dome Camera Installation Guide
available at
www.checkvideo.com
.
Step Three
Install Camera
Step Four
Configuration
Fig. 7a -
A zone, defined by eight end points
(first point is green; other points are blue)
Fig. 7b -
A completed zone
1.
O
n the CheckVideo Dashboard, click on Devices >
Configure Device.
2.
Select Device: Select the device and video resolutions
for event clips and DVR. CheckVideo will default both
resolutions to 720p. You may wish to start with these
settings. Your chosen resolution settings will depend
upon the upload capacity of your Internet provider.
3.
Configure Events: Click the Edit button to create a
zone for a particular object type. Then use your mouse
to draw the zone by clicking the left mouse button
wherever you want to define a point of the zone. The
zone should cover the entire area where you want to
detect an event. Enter a time span, event type, zone,
and duration and click Add Event button.
4. Select Notification Method - Central Stations:
Select a
Central Station type that should receive alert metadata.
5. Select Notification Method - Users: Click the checkbox
next to
any user(s) who should receive notifications for
this camera and their method of notification.
6.
Click Save.
© 20
20
CheckVideo, LLC
CheckVideo is a registered trademark of CheckVideo, LLC. All rights reserved.
7CVCHQC000E-0
2
.00
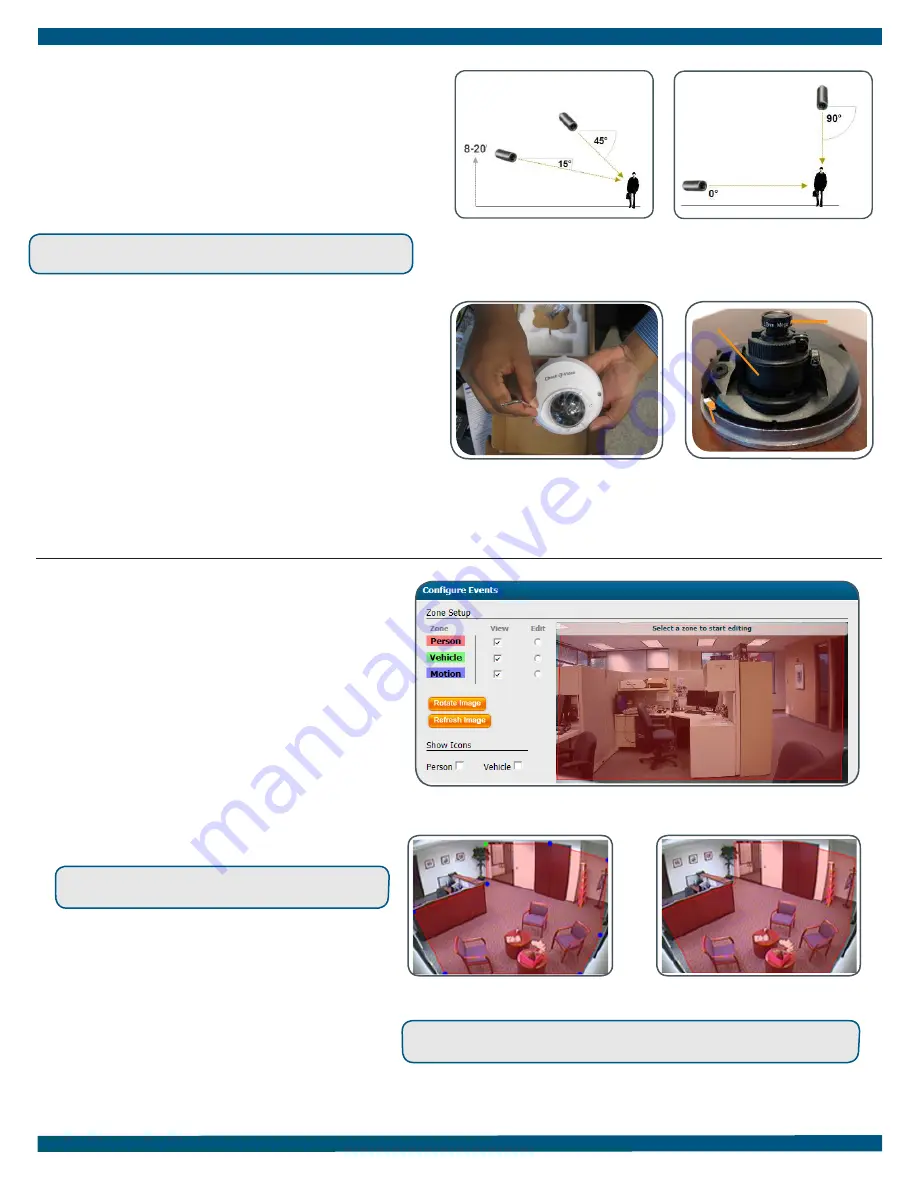
Fig. 2 -
MORE EFFECTIVE:
Cameras
are at a 15 to 45 degree downward
tilt and are mounted 8 to 20 feet high
Fig. 3 -
LESS EFFECTIVE:
Cameras are
directly overhead (90 degrees) or parallel
to (0 degrees) the target
To optimize event detection, place your CheckVideo HD Camera
as follows:
•
HEIGHT: Each camera must be installed 8 to 20 feet off the
ground.
•
DISTANCE: If you are mainly detecting people, the distance
between the camera and the people you wish to detect
should be 10 to 100 feet. If you are primarily concerned with
detecting vehicles, the range is 30 to 160 feet.
The
CheckVideo Camera Placement Guide
includes a summary
checklist on improving your camera placement.
Once you’ve determined where to place the Camera, run Cat-5
network cable from the router to the desired location. The
Camera can be placed on a ceiling or wall.
To adjust the camera to the proper angle, remove the cover using
the included hex wrench. This will expose the ball and lens. The
ball rotates in 3 directions. Gripping the ball, adjust the angle for
your location, seeking to maintain a 15 to 45 degree downward
tilt. Be careful not to touch the lens as rotating it will change the
focus and may result in fingerprints on your video images.
Using the mounting screws, attach the camera to the wall or
ceiling and reattach the cover using the previously removed hex
screws.
Remember to pay attention to the microSD card, being
careful to avoid pressing on it with the camera's cover.
Power up the camera (refer to Step 1 for additional information).
Fig. 6-
Rotate Image button
Fig. 4 -
Remove the cover using the
supplied hex wrench
Fig. 5 -
Rotate the
Ball
to achieve the
proper viewing angle.
Make sure
your browser is set to 100% when drawing
your zone.
,
Ball
Lens
MicroSD
Card


