background image

Operation

Stand-Alone Mode (Sound-Active, Auto Mode): 

This mode allows a single unit to run to the beat of the music, or the unit will auto change in Auto 
Mode. 

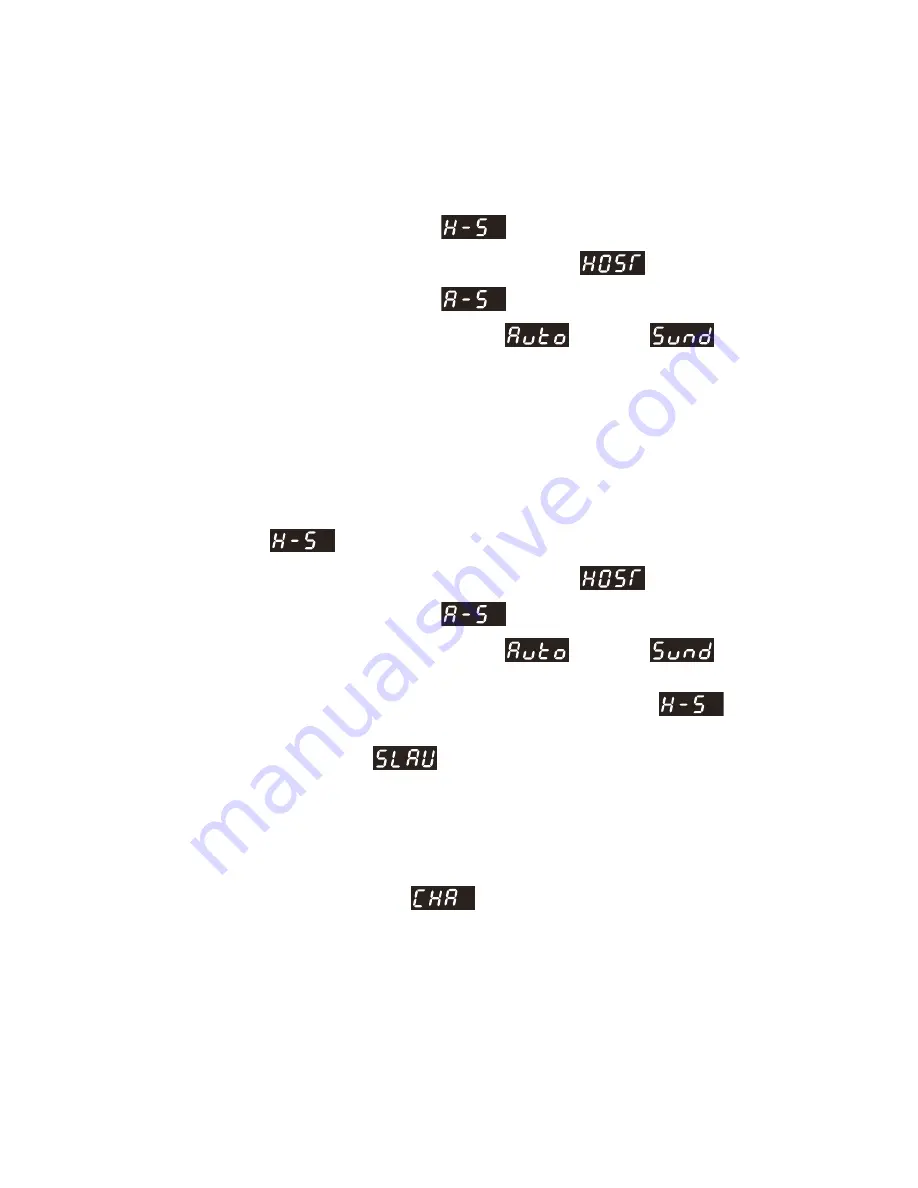
1) Press 

<MENU>

 repeatedly until 

 is displayed and select it by pressing 

<ENTER>

2)  Scroll through using the 

<UP>

 and 

<DOWN>

 buttons until 

 is displayed and select it. 

3) Press 

<MENU>

 repeatedly until 

  is displayed and select it by pressing 

<ENTER>

3)  Scroll through and select the desired mode. 

 is Auto mode, 

 is Sound-

Active mode. 

Master/Slave Mode (Master Sound, Master Auto): 

This mode will allow you to link up to 32 units together without a controller. 

1)  Use standard DMX cables to daisy chain your units together via the DMX connector on the rear 

of the units. For longer cable runs we suggest a terminator at the last fixture. For more 
information about terminators, see page 9. 

2)  Choose a unit to function as the Master. Press 

<MENU>

 repeatedly on the Master unit until 

 is displayed and select it by pressing 

<ENTER>

2)  Scroll through using the 

<UP>

 and 

<DOWN>

 buttons until 

 is displayed and select it. 

3) Press 

<MENU>

 repeatedly until 

  is displayed and select it by pressing 

<ENTER>

4)  Scroll through and select the desired mode. 

 is Auto mode, 

 is Sound-

Active mode. 

5)  On the Slave fixtures, Press 

<MENU>

 repeatedly on the Master unit until 

 is 

displayed and select it by pressing 

<ENTER>

6)  Scroll through until 

 is displayed and select it. 

DMX Mode 

This mode allows the unit to be controlled by any universal DMX controller. If you are unfamiliar with 
DMX, please read the DMX Primer on page 18.  

1) Press 

<MODE/ESC>

 until 

 is displayed.  

2) Use 

the 

<UP>

 and 

<DOWN>

 buttons to select the desired address and press the 

<ENTER>


button. 

LG-80 User Manual 

14 

2007-07-16/11:07


Содержание Scorpion GrafX LG-80

Страница 1: ... Activated DMX512 Master Slave 115V 230V Switch Replaceable Fuse User Serviceable Duty Cycle Scorpion GrafX LG 80 USER MANUAL Chauvet 3000 N 29th Ct Hollywood FL 33020 U S A 800 762 1084 954 929 1115 FAX 954 929 5560 www chauvetlighting com ...

Страница 2: ... 5 Pin Conversion Chart 10 SETTING UP A DMX SERIAL DATA LINK 10 MASTER SLAVE FIXTURE LINKING 10 MOUNTING 11 Orientation 11 Rigging 11 5 OPERATING INSTRUCTIONS 11 NAVIGATING THE CONTROL PANEL 11 MENU MAP 12 Menu Functions 13 NOTE ABOUT FRAME RATE 13 OPERATION 14 Stand Alone Mode Sound Active Auto Mode 14 Master Slave Mode Master Sound Master Auto 14 DMX Mode 14 DMX CHANNEL VALUES EXAMPLE 15 GENERAL...

Страница 3: ...s chart A fixture s listed current rating is its average current draw under normal conditions All fixtures must be powered directly off a switched circuit and cannot be run off a rheostat variable resistor or dimmer circuit even if the rheostat or dimmer channel is used solely for a 0 to 100 switch Before applying power to a fixture check that the source voltage matches the fixture s requirement C...

Страница 4: ...er source before servicing or replacing lamp or fuse and be sure to replace with same lamp source Secure fixture to fastening device using a safety chain Never carry the fixture solely by its head Use its carrying handles Maximum ambient temperature Ta is 95 F 35 C Do not operate fixture at temperatures higher than this In the event of a serious operating problem stop using the unit immediately Ne...

Страница 5: ...d and zoom Laser on off via DMX Custom text patterns and animated graphics via GrafXpress A ditional Features Powered by Pangolin Cont High speed precision Galvo Dual hanging brackets with turn faste Sound sensitivity control Rugged construction Fan cooled el Summar CHANNEL FUNCTION 1 Pan 2 Tilt 3 Vector speed 4 Laser enable 5 Page select 6 Cue select 7 Animation speed 8 Dimmer 9 Zoom 10 t the Y A...

Страница 6: ...ontroller sold separately IEC Power Connector and Fuse Holder DMX Out DMX In ILDA DB25 Connector for Optional Controller sold separately Factory Upload Input Voltage Switch Power Switch Sound Sensitivity Knob Rear of Base LG 80 User Manual 6 2007 07 16 11 07 ...

Страница 7: ...ng Label Identification Laser Classification Class IIIa There is only one laser aperture on this product CAUTION AVOID EXPOSURE TO BEAM Avoid direct eye contact with laser light Never intentionally expose your eyes or others to direct laser radiation Non Interlocked Housing Warning Labels This unit contains an embedded laser device that exceeds the output of the intended class internally Exposure ...

Страница 8: ...e 4 SETUP Fuse Replacement Disconnect the power cord before replacing a fuse and always replace with the same type fuse The fuse is located inside this compartment Remove using a flat head screwdriver With a flat head screwdriver wedge the fuse holder out of its housing Remove the damaged fuse from its holder and replace with exact same type fuse Insert the fuse holder back in its place and reconn...

Страница 9: ...5 applications Standard microphone cables cannot transmit DMX data reliably over long distances The cable will have the following characteristics 2 conductor twisted pair plus a shield Maximum capacitance between conductors 30 pF ft Maximum capacitance between conductor and shield 55 pF ft Maximum resistance of 20 ohms 1000 ft Nominal impedance 100 140 ohms CABLE CONNECTORS Cabling must have a mal...

Страница 10: ...eed to connect from the output as stated above to the input of the following fixture and so on CHAUVET Certified DMX Data Cables Order Code Description DMX1 5 DMX Cable 1 5m 4 9ft DMX4 5 DMX Cable 4 5m 14 8ft DMX10 DMX Cable 10m 32 8ft Master Slave Fixture Linking 1 Connect the male 3 pin connector side of the DMX cable to the output female 3 pin connector of the first fixture 2 Connect the end of...

Страница 11: ...ons located directly underneath the LCD Display DOWN UP ENTER MENU Power LED DMX LED Button Function DOWN Scrolls through menu options in descending order UP Scrolls through menu options in ascending order ENTER Used to select and store the current menu or option within a menu MENU Used to access the menu or to return to a previous menu option The Control Panel LED Display shows the menu items you...

Страница 12: ...Menu Map Use the MENU button to scroll through these menu items Use the UP DOWN and ENTER buttons to scroll through these menu items LG 80 User Manual 12 2007 07 16 11 07 ...

Страница 13: ...r status for Master Slave operation and the built in programs will be triggered by the sound No data link is required all fixtures can be set to this mode for Stand alone operation Automatic Master Unit Sets the fixture to Master status for Master Slave operation and the built in programs will be triggered automatically No data link is required all fixtures can be set to this mode for Stand alone ...

Страница 14: ... terminator at the last fixture For more information about terminators see page 9 2 Choose a unit to function as the Master Press MENU repeatedly on the Master unit until is displayed and select it by pressing ENTER 2 Scroll through using the UP and DOWN buttons until is displayed and select it 3 Press MENU repeatedly until is displayed and select it by pressing ENTER 4 Scroll through and select t...

Страница 15: ... Ù 064 065 Ù 069 070 Ù 074 075 Ù 079 080 Ù 084 085 Ù 089 090 Ù 094 095 Ù 099 100 Ù 104 105 Ù 109 110 Ù 114 115 Ù 119 120 Ù 124 125 Ù 129 130 Ù 134 135 Ù 139 140 Ù 144 145 Ù 149 150 Ù 154 155 Ù 159 160 Ù 164 165 Ù 169 170 Ù 174 175 Ù 179 180 Ù 184 185 Ù 189 190 Ù 194 195 Ù 199 200 Ù 204 205 Ù 209 210 Ù 214 215 Ù 219 Cue Image Select Cue 1 Cue 2 Cue 3 Cue 4 Cue 5 Cue 6 Cue 7 Cue 8 Cue 9 Cue 10 Cue 1...

Страница 16: ... 0 100 9 000 Ù 255 Zoom Zero Size Full Size 10 000 Ù 255 X Size Flipped Zero Size Normal 11 000 Ù 255 Y Size Flipped Zero Size Normal 12 000 Ù 255 Image Rotate 0 360 Degrees 13 000 Ù 255 X Position Left Center Right 14 000 Ù 255 Y Position Left Center Right Note Zoom channel 9 must be at least DMX value 008 to see an image LG 80 User Manual 16 2007 07 16 11 07 ...

Страница 17: ... of its life 9 Light will not come on after power failure Some discharge lamps require a cooling off period before the electronics in the fixture can kick start it again wait 5 to 10 minutes before powering up 9 Loss of signal Use only DMX cables Install terminator Note Keep DMX cables separated from power cables or black lights 9 9 9 9 Moves slow Check 220 110v switch for proper setting 9 No flas...

Страница 18: ...the fixtures whose starting address is set incorrectly You can however control multiple fixtures of the same type using the same starting address as long as the intended result is that of unison movement or operation In other words the fixtures will be slaved together and all respond exactly the same DMX fixtures are designed to receive data through a serial Daisy Chain A Daisy Chain connection is...

Страница 19: ...ean the external optics at least every 20 days Clean the internal optics at least every 30 60 days Returns Procedure Returned merchandise must be sent prepaid and in the original packing call tags will not be issued Package must be clearly labeled with a Return Merchandise Authorization Number RA Products returned without an RA will be refused Call CHAUVET and request RA prior to shipping the fixt...

Страница 20: ...ype DPSS Laser Output 5mW Cooling Fan Cooled PHOTO OPTIC Pan 510 Tilt 260 THERMAL Maximum ambient temperature 104 F 40 C FUSE Main 20mm Glass 2A 250V Fast Blow CONTROL PROGRAMMING Data input locking 3 pin XLR male socket Data output locking 3 pin XLR female socket Data pin configuration pin 1 shield pin 2 pin 3 Protocols DMX 512 USITT DMX Channels 14 ORDERING INFORMATION Scorpion GrafX LG 80 Contr...

Отзывы: