Introduction
-4-
COLORdash S-Par 1 User Manual Rev. 2
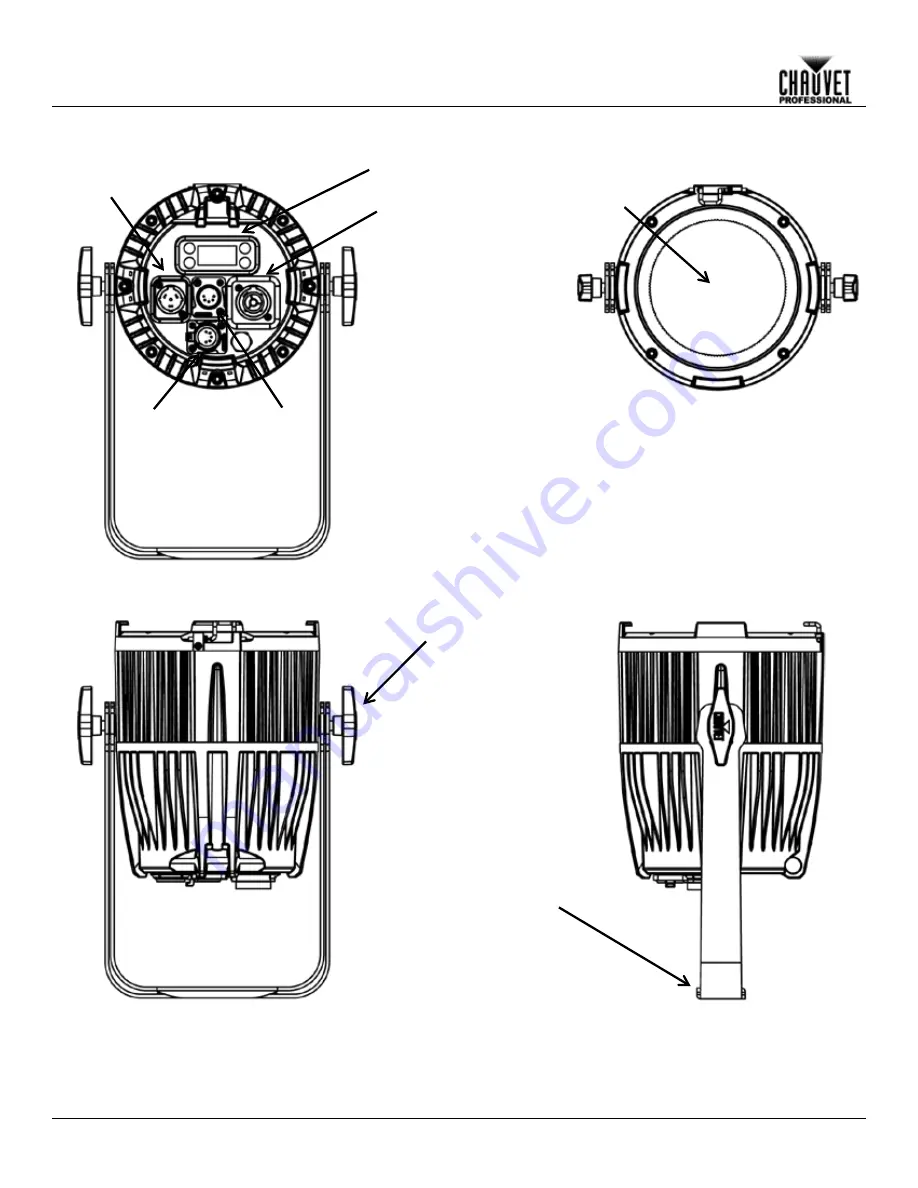
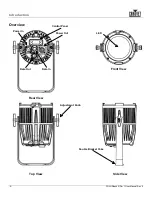
Overview
Front View
Rear View
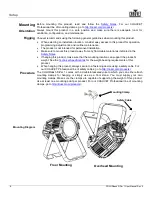
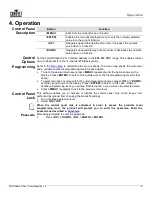
Side View
Control Panel
LED
Power In
Data Out
Power Out
Adjustment Knob
Double Bracket Yoke
Top View
Data In
Страница 1: ...User Manual...
Страница 2: ...ual or its content for any other purpose without written consent from Chauvet Document Printing For better results print this document in color on letter size paper 8 5 x 11 in double sided If using A...
Страница 3: ...inking 7 DMX Personalities 7 Master Slave Connectivity 7 Mounting 8 Orientation 8 Rigging 8 Procedure 8 4 Operation 9 Control Panel Description 9 Control Options 9 Programming 9 Control Panel Lock 9 P...
Страница 4: ...Table of Contents ii COLORdash S Par 1 User Manual Rev 2 Product Maintenance 16 6 Technical Specifications 17 Returns 18 Contact Us 19...
Страница 5: ...entions Convention Meaning 1 512 A range of values in the text 50 60 A set of mutually exclusive values in the text SET A button on the product s control panel Settings A product function or a menu op...
Страница 6: ...now Other areas where the product will be subject to extreme radiation or caustic substances Mount this product in a location with adequate ventilation at least 20 in 50 cm from adjacent surfaces Make...
Страница 7: ...mount or hanging support bracket Features 4 6 or 11 channel quad color LED wash product Operating modes 4 channel RGBA 6 channel RGBA dimmer strobe 11 channel RGBA dimmer strobe color macro white bala...
Страница 8: ...Introduction 4 COLORdash S Par 1 User Manual Rev 2 Overview Front View Rear View Side View Control Panel LED Power In Data Out Power Out Adjustment Knob Double Bracket Yoke Top View Data In...
Страница 9: ...Introduction COLORdash S Par 1 User Manual Rev 2 5 Dimensions 9 09 in 231 mm 6 68 in 169 mm 8 39 in 213 mm 12 32 in 313 mm 7 32 in 186 mm...
Страница 10: ...nect this product to a rheostat variable resistor or dimmer circuit even if the rheostat or dimmer channel serves only as a 0 to 100 switch AC Plug The COLORdash S Par 1 comes comes with a power input...
Страница 11: ...essional com Master Slave Connectivity The Master Slave mode allows a COLORdash S Par 1 the master to control one or more COLORdash S Par 1s the slaves without a DMX controller One COLORdash S Par 1 b...
Страница 12: ...lammable material as indicated in the Safety Notes If hanging this product make sure that the mounting location can support the product s weight See the Technical Specifications for the weight bearing...
Страница 13: ...he desired main level press MENU repeatedly until the option shows on the display Press ENTER to select This will take you to the first programming level for that option To select an option or value w...
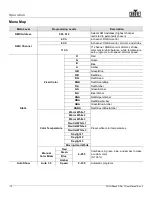
Страница 14: ...mer speed Static Fixed Color R Red G Green B Blue A Amber GB Green Blue RB Red Blue RG Red Green RGB Red Green Blue RA Red Amber GA Green Amber BA Blue Amber RGA Red Green Amber RBA Red Blue Amber GBA...
Страница 15: ...red LED maximum value G Sets green LED maximum value B Sets blue LED maximum value LED Frequency 600Hz Selects the PWM output frequency 1200Hz 2000Hz 4000Hz 25KHz Key Lock On Turns the passcode on or...
Страница 16: ...shown by the COLORdash S Par 1 when the color setting is RGBA and the DMX controller s red green and blue faders are set to 255 1 Go to the White Balance main level 2 Select Manual to continue to adju...
Страница 17: ...trol panel 1 Go to the Back Light main level 2 Select On remains on 10S 10 seconds 20S 20 seconds or 30S seconds Fixture Hours Software Version This option displays the total number of hours the fixtu...
Страница 18: ...00 B 100 A 100 White 1 White 2 White 3 White 4 White 5 White 6 White 7 White 8 White 9 White 10 White 11 8 Color Temperature 000 005 006 025 026 050 051 075 076 100 101 125 126 150 151 175 176 200 201...
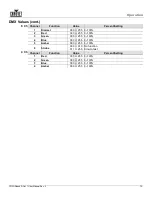
Страница 19: ...nt Setting 1 Dimmer 000 255 0 100 2 Red 000 255 0 100 3 Green 000 255 0 100 4 Blue 000 255 0 100 5 Amber 000 255 0 100 6 Strobe 000 010 011 255 No function Slow to fast 4 Ch Channel Function Value Per...
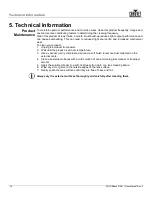
Страница 20: ...ncreased mechanical wear To clean your product 1 Unplug the product from power 2 Wait until the product is at room temperature 3 Use a vacuum or dry compressed air and a soft brush to remove dust coll...
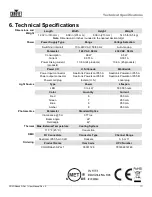
Страница 21: ...45 products Power I O U S Canada Worldwide Power input connector Seetronic Powerkon IP65 A Seetronic Powerkon IP65 A Power output connector Seetronic Powerkon IP65 B Seetronic Powerkon IP65 B Power c...
Страница 22: ...th an RMA number Chauvet will refuse any product returned without an RMA number DO NOT write the RMA number directly on the box Instead write it on a properly affixed label Once you have received the...
Страница 23: ...ting eu Website www chauvetlighting eu General Information Chauvet Europe Ltd Address Unit 1C Brookhill Road Industrial Estate Pinxton Nottingham UK NG16 6NT Voice 44 0 1773 511115 Fax 44 0 1773 51111...