background image

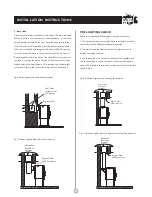
that the hearth must extend in front of the stove by at least 300mm

(12 inches) and to the sides of the stove by at least 150mm (6

inches). When the fire door is open, it extends beyond the front of

the stove by:

390mm (15.3in)          414mm (16.3in)          491mm (19.3in)

If in doubt as to the positioning of the stove expert advice should be

sought either from the supplier or the local building inspector.

If the vertical rear flue connector (shown in Fig. 9) is used then the

chimney may be swept through the appliance.

Horizontal lengths of flue must be kept to a minimum and should not

be more than 150mm (6 inches) long. The sealing face of the flue

collar should be coated with fire cement before fixing to the body of

the stove using the two screws provided. The blanking plate must be

removed, sealed with fire cement and refitted, care being taken to

ensure that the fold on the clamping plate is in line with the lugs on

the firebox as shown on the label on the clamping plate. Ensure that

the clamping plate does not prevent the throat plate from seating

correctly. All flue connections must be well sealed.

COVE 1                      COVE 2                       COVE 3

The fireplace must allow good circulation of air around the appliance

to ensure that maximum heat is transferred to the room and also to

prevent the fireplace from overheating. A gap of 150mm (6 inches)

each side and 300mm (12 inches) above the appliance should give

sufficient air circulation. If a wooden mantelpiece or beam is used in

the fireplace it should be a minimum of 460mm (18 inches), and

preferably 600mm (24 inches) from the appliance. In some situations

it may be necessary to shield the beam or mantelpiece to protect it.

In order for the fire to operate correctly there must be an air gap

behind the appliance of at least 40mm, but be aware that this

distance will need to be greater in some cases to meet Building

Regulation requirements.

There are several ways of connecting the stove to the flue. These are

illustrated in figures 6 to 9.

It is possible to pass a 16 inch diameter sweeps brush through the

appliance but in most back outlet installations it will be necessary to

have a soot door to enable the chimney to be swept. This may either

be in the actual brickwork of the chimney or in the register plate.

Various types and positions of soot doors are shown in figures 6 to 9.

CONNECTIONS TO FLUES

SOOT DOORS

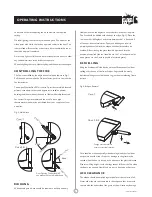
UNPACKING THE STOVE

The stove arrives bolted and shrink-wrapped to its pallet. The

wrapping is first removed, then the stove released from the pallet by

removing the 4 pallet bolts using a 10mm spanner. The pallet brackets

can now be removed from the stove by tilting it and using a 13mm

spanner to remove the bolts. These 4 bolts are required for levelling

on the Low Stand or fixing on the Centre Stand, but are not used on

the Store Stand. The Stove comes with the Low Stand fitted and if

this is to be used, the Stove may now be moved to its final position.

The pallet is intended to be cut up and used for kindling fuel.

FITTING THE STOVE TO ITS STAND

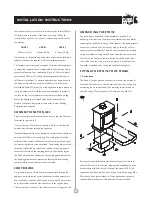
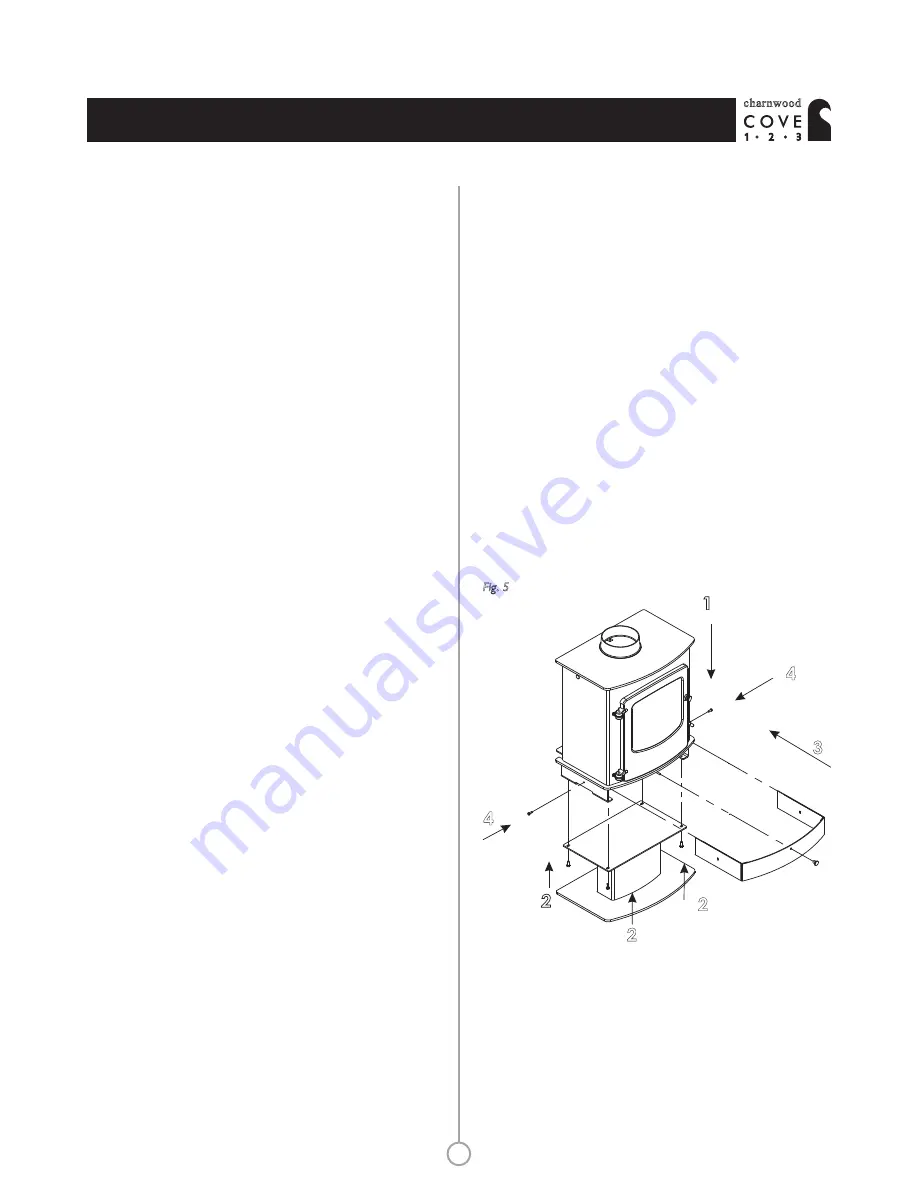
1. Centre stand

The Stand is first positioned on the hearth in the desired position of

the stove. The lower cover must be removed from the stove by first

unscrewing the air control knob, then removing the 6mm bolt on

each side using a 10mm spanner. The Cover may now slide off.

Ensure that the pallet brackets have been removed from the stove,

then lift the stove on to the stand, aligning the 4 tapped holes in the

base brackets with the 4 slots in the top of the stand. NOTE: This

requires at least 2 people. The stove is fixed to its stand using 4 M8 x

20mm bolts and 4 plain washers. A 13mm open ended spanner is

required. Replace the cover, side bolts and Air Control Knob.

1

2

Fig. 5

2

2

3

4

4

®

charnwood

INSTALLATION  INSTRUCTIONS

10

Содержание Cove 1

Страница 1: ...Operating Installation Instructions charnwood 1 2 3 ...

Страница 2: ......

Страница 3: ...re Surround Connection to Flues Soot Doors Unpacking The Stove Pre Lighting Check Commissioning Dimensions Parts Lists Certification 4 4 4 5 5 5 5 6 6 9 9 9 9 10 10 10 11 11 13 15 16 18 19 INSTALLATION INSTRUCTIONS Lighting Controlling The Fire 4 10 Throat Plate Flueway Clearing Chimney Sweeping Trouble Shooting If You Need Further Help Fitting The Stove To Its Stand 7 7 8 ...

Страница 4: ...n a shared flue system When using the stove in situations where children aged and or infirm persons are present a fireguard must be used to prevent accidental contact with the stove The fireguard should be manufactured in accordance with BS 8423 2002 FUEL DOOR OPERATION Only dry well seasoned wood should be burnt on this appliance as burning wet unseasoned wood will give rise to heavy tar deposits...

Страница 5: ...otate between the 1 o clock and 3 o clock positions several times Too much riddling can result in emptying unburnt fuel into the ashpan and should therefore be avoided After riddling the grate should be put back into the position as required the tool should be in the 1 o clock position for open grate or in the 5 o clock position for closed grate Keep the firebox well filled but do not overfill to ...

Страница 6: ...uld not be used near the appliance whilst it is under fire If the fire is going to be out of use for a long period for instance in the summer then to prevent condensation and hence corrosion the air control should be left fully open and the fire door left ajar It is also advisable to sweep the chimney and clean out the fire Spraying the inside of the door and firebox with a light oil such as WD40 ...

Страница 7: ...TING Fire Will Not Burn Blackening of Door Glass therefore when lighting the stove allow the fire bed to become well established before closing the air control This also applies when re fuelling the stove b When re fuelling keep the fuel as far back from the front firebar as possible do not try to fit too much fuel into the firebox c Wet wood or logs overhanging the front firebars will cause the g...

Страница 8: ...rigade should be called immediately After a chimney fire the chimney should be carefully examined for any damage Expert advice should be sought if necessary If you need further help with your Charnwood Cove then your Installer will be able to provide the answers to most questions Your Local Charnwood Premier Dealer has a great deal of experience and will also be able to provide helpful advice Furt...

Страница 9: ...e should be sought regarding the necessity of having the chimney lined If it is found necessary to line the chimney then a lining suitable for Solid Fuel must be used If there is no existing chimney then a prefabricated block chimney or a twin walled insulated stainless steel flue to BS EN15287 1 2007 can be used either internally or externally These chimneys must be fitted in accordance with the ...

Страница 10: ... that this distance will need to be greater in some cases to meet Building Regulation requirements There are several ways of connecting the stove to the flue These are illustrated in figures 6 to 9 It is possible to pass a 16 inch diameter sweeps brush through the appliance but in most back outlet installations it will be necessary to have a soot door to enable the chimney to be swept This may eit...

Страница 11: ...ots in the side of the stand with the 6mm tapped holes in the base brackets Fix in position with the bolts that were used to secure the cover and replace the Air Control Knob PRE LIGHTING CHECK Before initial lighting the following points should be checked 1 The bottom grate bars must all be fitted and should move freely and easily when the riddling mechanism is operated 2 The plates round the sid...

Страница 12: ... should be lit and checked to ensure that smoke and fumes are taken from the appliance up the chimney and emitted safely Also check all joints and seals On completion of the installation and commissioning please leave the operating instructions with the customer and advise them on the use of the appliance charnwood INSTALLATION INSTRUCTIONS 12 ...

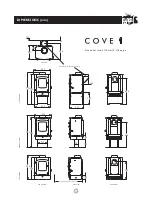
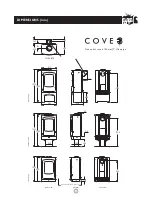
Страница 13: ...VIEW BACK VIEW CENTRE LOW STAND STAND STORE STAND 399 352 82 129 129 636 TOP VIEW 795 745 423 383 302 347 136 636 223 795 745 423 98 199 103 437 596 546 103 Max dimension with door open 673 13 charnwood DIMENSIONS mm Flue outlet to suit 125mm 5 flue pipe ...

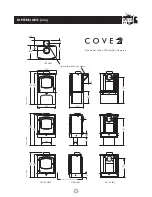
Страница 14: ... STORE STAND TOP VIEW Optional Vertical Rear Flue Adapter 408 4 159 139 459 88 554 949 894 520 408 350 150 779 949 894 300 124 247 103 27 779 712 657 113 542 Max dimension with door open 808 14 charnwood DIMENSIONS mm Flue outlet to suit 150mm 6 flue pipe ...

Страница 15: ... BACK VIEW CENTRE LOW STAND STAND STORE STAND TOP VIEW 167 458 191 523 105 1325 1280 585 615 180 410 458 1143 1325 1280 250 160 300 110 35 1143 1025 980 110 843 Max dimension with door open 902 15 charnwood DIMENSIONS mm Flue outlet to suit 180mm 7 flue pipe ...

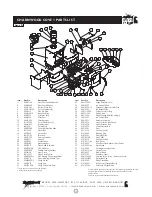
Страница 16: ...nc Fixings 39 004 SY27 Air Control Rod 40 004 SY23 Actuator Assembly 41 008 SY13 Upper Quattro Box Gasket 42 010 SY20 Upper Quattro Box 43 010 SY19 Lower Quattro Box 44 002 SY01 Door 45 001 SY10 Firebox Cove1 46 012 PV09 Blanking Plate 47 010 EY51 Clamping Plate 48 002 PV12B Flue Collar 49 010 EY19 Flue Spacer Ring 50 010 SY11 Base Cover 51 010 PV33 Vert Rear Flue Adapter Opt l Extra 52 010 SY02 S...

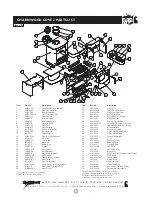
Страница 17: ...et Flap Pads 15 012 AY33 Mover Bar 16 002 AY30 Carrier Bar 17 012 AY13 Idler Rod 18 012 AY15 Riddler Rod 19 004 PY17 Ashpan 20 002 AY07B Front Firebar 21 002 AY08 Deepening Bar 22 002 RY15 Door Knob Spindle 23 008 FFN001 M12 Half Nut 24 004 ST008 Tabbed Locking Washer 25 002 AY14 Door Catch 26 010 ST031 Door Catch Spacer 27 008 FFW015 M12 Double Coil Spring Washer 28 008 PY13 Door Riddling Ashpan ...

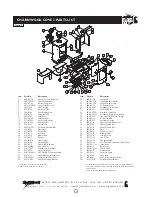
Страница 18: ... 012 BY33 Mover Bar 16 002 BY30 Carrier Bar 17 012 AY13 Idler Rod 18 012 AY15 Riddler Rod 19 004 RY17 Ashpan 20 002 BY07B Front Firebar 21 002 BY08 Deepening Bar 22 002 RY15 Door Knob Spindle 23 008 FFN001 M12 Half Nut 24 004 ST008 Tabbed Locking Washer 25 002 AY14 Door Catch Cam 26 008 FFW015 M12 Double Coil Spring Washer 27 008 PY13 Door Riddling Ashpan Tool 28 008 PV28 S Hinge Pin Set 2 Per Set...

Страница 19: ...e heating thermal output Energy efficiency A Division of A J Wells Sons Limited Registered in England No 03809371 10 Cove I SY44 CPD 2006 550mm 550mm 0 47 275 C 4 1kW 76 5 Wood Logs Cove 2 PY44 CPD 2006 450mm 600mm 0 33 338 C 8 0kW 74 7 Wood Logs Cove 3 RY44 CPD 2006 500mm 500mm 0 23 310 C 12 0kW 78 4 Wood Logs Bishops Way Newport Isle of Wight PO30 5WS United Kingdom A J WELLS SONS LTD A J WELLS ...

Страница 20: ... r e d i n E n g l a n d N o 0 3 8 0 9 3 71 charnwood BISHOPS WAY NEWPORT ISLE OF WIGHT PO30 5WS UNITED KINGDOM T 4 4 0 19 8 3 5 3 7 7 7 7 F 4 4 0 19 8 3 5 3 7 7 8 8 C O N TA C T U S AT W W W C H A R N W O O D C O M y o u r p re m i e r d e a l e r REV COVE v2 1 2 3 06 13 ...

Отзывы: