3
2
Assembly Instructions
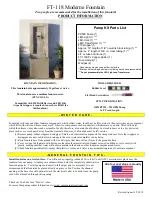
Parts List
For Easiest Assembly:
• To avoid losing any small components or hardware,
assemble your product on a hard level surface that
does not have cracks or openings. You may wish to lay
down a blanket or similar, to avoid possible damage to
the finish during assembly.
• Clear an area large enough to layout all components
and hardware.
• Great care has been taken during production to remove
sharp edges but you should handle all components
with care to avoid injury.
• Check you have all components before beginning.
• When applicable, tighten all hardware connections by
hand first. Once the step is completed go back and fully
tighten all hardware.
• Follow all steps in order to properly assemble your
product.
Typical assembly: approximately ½ hour.
Tools Needed:
• Adjustable Spanner or Socket Wrench
• Phillips Screwdriver
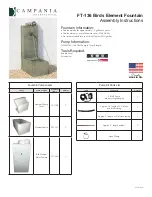
Step 1
Assemble Fire Pit Bowl (1) with Legs (2) by inserting bolt
(A) through the holes in bowl and attach to bowl and
fasten hand tight with nut (B).
Step 2
Fasten all 3 Legs in the same manner, once all the Legs are
attached place unit on a level surface and tighten with a
Phillips screwdriver and an adjustable wrench.
No.
Description
Qty
1.
Fire Pit Plough 90cm
1
2.
Fire Pit Legs
3
A.
M6x15cm Bolt
6
B.
M6 Nuts
6
Exploded View