Charder MS4910 Скачать руководство пользователя страница 9


Electrical fast 

transient/burst 

IEC 61000-4-4   

±  2kV for 
power supply 
lines   
+ 1kV for 
input/output 
lines   

+ 2kV for power 
supply lines 
+ 1kV for 
input/output 
lines 

Mains power quality should be 
that of a typical commercial or 
hospital environment.   

Surge IEC 

61000-4-5   

±  1kV line(s) to 
line(s)   
±  2kV line(s) to 
earth   

+ 1kV line(s) to 
line(s) 
+ 2kV line(s) to 
earth 

Mains power quality should be 
that of a typical commercial or 
hospital environment.   

Voltage Dips, 
short interruptions 
and voltage 
variations on 
power supply 
input lines IEC 
61000-4-11   

0% UT for 0,5 
cycle 
0% UT for 1 
cycle 
 
70% UT(30% 
dip in UT) for 
25 cycles 
 
0% UT for 5 s 

0% UT for 0,5 
cycle 
0% UT for 1 
cycle 
 
70% UT(30% 
dip in UT) for 25 
cycles 
 
0% UT for 5 s 

Mains power quality should be 
that of a typical commercial or 
hospital environment. If the 
user of the device requires 
continued operation during 
power mains interruptions, it is 
recommended that the device 
be powered from an 
uninterruptible power supply or 
a battery. 

Power 
frequency(50/60 
Hz) magnetic field 
IEC 61000-4-8   

30 A/m   

30 A/m   

The device power frequency 
magnetic fields should be at 
levels characteristic of a typical 
location in a typical commercial 
or hospital environment. 

NOTE UT is the a.c. mains voltage prior to application of the test level. 


Guidance and manufacturer’s declaration-electromagnetic immunity


The MS4910 Stand-on Floor Scale is intended for use in the electromagnetic environment 
specified below. The customer or the user of the device should assure that is used in such an 
environment.   

Immunity test 


IEC 60601 test 
level 


Compliance 
level 


Electromagnetic 
environment-guidance 


Conducted RF   

IEC 61000-4-6   


Radiated RF IEC 

61000-4-3   

3 Vrms 

150 KHz to 80 MHz 


6 V in ISM bands 

between  0,15  MHz 

and 80 MHz   

80 % AM at 1 kHz 


3 V/m 

3 Vrms 

150 KHz to 80 

MHz 


6 V in ISM 

bands between 

0,15 MHz and 

80 MHz   

80 % AM at 1 

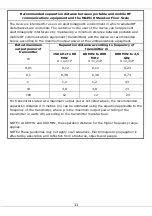
Portable and mobile RF 
communications equipment 
should be used no closer to any 
part of the device including 
cables, than the recommended 
separation distance calculated 
from the equation applicable to 

Содержание MS4910

Страница 1: ...1 USER MANUAL MS4910 Stand on Floor Scale Please keep the instruction manual at hand all the time for future reference...

Страница 2: ...esentative in the European Community Manufacturer s batch or lot number Device is a medical device Serial number Unique Device Identifier Device conforms to 93 42 EEC as amended by 2007 47 EC Medical...

Страница 3: ...national copyright law All content is licensed and usage is subject to written authorization from Charder Electronic Co Ltd hereinafter Charder Charder is not liable for any damage caused by a failure...

Страница 4: ...lumn 18 E Attaching Thermal Printer 21 III Indicator 24 A Indicator and Key Functions 24 B Display layout 25 IV Using Device 26 A Basic Operation 26 B Hold 26 C BMI 26 D Tare 27 E Pre Tare 28 F Print...

Страница 5: ...on soft surfaces ex carpet may result in inaccurate results Ensure all parts are properly locked and tightened before operating the device Device is intended to measure one subject at a time Safety In...

Страница 6: ...dling chemical electrochemical or electrical interference All maintenance technical inspections and repairs should be conducted by an authorized Charder service partner using original Charder accessor...

Страница 7: ...ce the device in direct sunlight or in close proximity to an intense heat source Excessively high temperatures may damage the internal electronics Incident Reporting Any serious incident that has occu...

Страница 8: ...ing domestic establishments and those directly connected to the public low voltage power supply network that supplies buildings used for domestic purposes Harmonic emissions IEC 61000 3 2 Class A Volt...

Страница 9: ...m an uninterruptible power supply or a battery Power frequency 50 60 Hz magnetic field IEC 61000 4 8 30 A m 30 A m The device power frequency magnetic fields should be at levels characteristic of a ty...

Страница 10: ...y not apply in all situations Electromagnetic propagation is affected by absorption and reflection from structures objects and people a Field strengths from fixed transmitters such as base stations fo...

Страница 11: ...paration distance according to frequency of transmitter m 150 kHz to 80 MHz d 1 2 P 80 MHz to 800 MHz d 1 2 P 800 MHz to 2 5 GHz d 2 3 P 0 01 0 12 0 12 0 23 0 1 0 38 0 38 0 73 1 1 2 1 2 2 3 10 3 8 3 8...

Страница 12: ...olumn 1 Fasten and tighten four screws at the bottom of the base Ensure four adjustable feet and stability foot are at same level before using device Castor wheel column 1 Fasten and tighten four scre...

Страница 13: ...13 2 Ensure four adjustable feet and stability foot are at the same level before using the device Rotate counter clockwise to extend clockwise to retract Stability foot Adjustable feet...

Страница 14: ...14 3 Retract stability foot before moving device using castor wheels Note rotate counter clockwise to extend clockwise to retract Ensure stability foot is retracted before using castor wheels...

Страница 15: ...ting Batteries 1 Open battery housing cover 2 Accessing batteries 3 Use either rechargeable battery pack or AA batteries 4 Ensure batteries are installed into the housing correctly Take out the batter...

Страница 16: ...6 5 Install the battery housing into the compartment and make sure the right side of housing pin is facing towards inside of the connecting position Rechargeable Battery Housing AA size Battery Housin...

Страница 17: ...dapter into AC Connector Port After a long period in storage e g 3 months the battery should run a full cycle charge discharge to allow it to restore full capacity Ensure rechargeable battery housing...

Страница 18: ...Narrow Column Step 1 Attach two fixing blocks to column using four flat head screws Step 2 Attach height rod to blocks using two flat head screws Item Name Quantity 1 Fixing block screws 4 2 Fixing bl...

Страница 19: ...h height rod to brackets using flat head screws Item Name Quantity 1 M5x0 8x11 round head screw 4 2 Relief Bushing 2 3 Bracket for HM200D HM201D HM201M 2 4 Height Rod Compatible with HM200D HM201D HM2...

Страница 20: ...20 Connecting height rod to indicator HM200D HM201D Digital height rod data transmission port on indicator Secure excess cable to column...

Страница 21: ...21 E Attaching Thermal Printer Standard Narrow Column Washer head screw M5 0 8 15mm Cross head screw M4 0 7 6mm...

Страница 22: ...mn Item Parts Qty 1 M5 15L head screw 1 2 Screws for printer bracket 2 3 Printer bracket 1 4 TP2100 TP2110 Thermal Printer 1 purchased separately Print Button Printer Bracket Screws for Printer Bracke...

Страница 23: ...23 1 Install the side bracket 2 Install the thermal printer on the bracket...

Страница 24: ...values up to 5 4 PRE TARE Pre tare the known weight of an object ex chair before beginning measurement 5 TARE Allows user to deduct weight from reading after measurement 6 PRINT When printer or PC is...

Страница 25: ...t data input 11 ENTER Confirm input B Display layout Definitions Stable symbol Indicate that weight is stable Zero symbol Weight is at zero Negative weight Weight under zero Low battery Battery needs...

Страница 26: ...ctive child Note if fluctuation is too severe average weight determination will be difficult and hold may not function correctly 1 Switch on the device normally 2 Press the key HOLD will be displayed...

Страница 27: ...as usual Indicator will display weight height and BMI 4 Lower stopper on HM200D HM201D until it touches top of subject s head Device will automatically calculate BMI based on change in height and wei...

Страница 28: ...sed to subtract the known weight of a substance prior to weighing The device can store 5 sets of pre tare values Pre tare values can be stored using two different methods Load Weight or Input Manually...

Страница 29: ...ing If no further action is taken within 6 seconds indicator will return to normal mode While digit is blinking Enter pre tare weight using 0 9 keys Ex to pre tare 5 0 kg of weight press 0 0 5 0 Ex to...

Страница 30: ...to assign this number with the current pre tare weight Press key to store pre tare weight the indicator will make a beep sound C Recall Pre Tare Weight DESCRIPTION EXAMPLE Press and hold key for 3 sec...

Страница 31: ...al Mode NOTE Pre tare weight must be under max capacity otherwise screen will show 0 00 after key is pressed and the operator will have to re input pre tare settings F Print If thermal printer is conn...

Страница 32: ...month followed by day using numeral keys 0 9 Ex December 25th is 12 25 Input 1 2 2 5 Press key once completed to proceed to time setting Time Setting Enter time 24hr format using numeral keys 0 9 Ex...

Страница 33: ...uct device to shut off automatically after a certain period of time Press to toggle between options 120 sec 180 sec 240 sec 300 sec off and to confirm selection Buzzer Beep When function is turned on...

Страница 34: ...on or off Press to toggle between on off and to confirm selection Wi Fi optional If device has Wi Fi module installed Wi Fi function can be turned on or off Press to toggle between on off and to conf...

Страница 35: ...ata Manager can be used to connect the device to a PC The software program can be downloaded from the Charder website LINK URL https www chardermedical com download htm 2 Connect USB cable to device i...

Страница 36: ...BMI calculation into software if needed Press Clear to clear all input NOTE information can also be input after weight measurement 2 Conduct measurement If Auto is selected results will be transmitte...

Страница 37: ...hanges and multiple measurements for the same subject we recommend not changing the default file name 2 Result example If previous results were saved in 20190201 csv new results also need to be saved...

Страница 38: ...ut result using a printer connected to the PC VII Wireless Connection If the device has the wireless module installed the indicator can transmit measurement results wirelessly Please see Charder wirel...

Страница 39: ...lockwise to extend and try again External objects interfering with measurement platform Clear platform of objects and try again Device may not function properly on soft surfaces such as carpets or law...

Страница 40: ...apacity Reduce weight on measurement platform and try again Counting Error too high Signal from loadcells too high Error normally caused by faulty loadcell or wiring Please contact distributor Countin...

Страница 41: ...latform 360 W x 310 D x 70 H mm Column 850 mm Device Weight 7 8 kg Key Functions On Off Zero Print BMI Hold Pre Tare Tare Clear Enter 0 9 M1 5 Data Transmission USB Wireless Module optional NOTE Devic...

Страница 42: ...ower adapters specified below AMP VOLTAGE DRAWING NO CE APPROVED TYPE NO MODEL NO TYPE Adapter plug 12V 2A AD 8058 AD 0521 UE24WU 120200SPA US AD 8057 AD 0520 UE24WV 120200SPA EU AD 8056 AD 0519 UE24W...

Страница 43: ...________________________________________________ _______________________________________________________ _______________________________________________________ _______________________________________...

Страница 44: ...directives 93 42 EEC as amended by 2007 47 EC Medical Device Directive 2014 31 EU Non automatic Weighing Instruments Directive Please see separate document showing on sticker of device for above CE ma...

Отзывы: