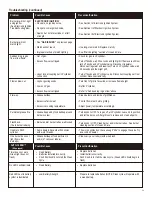
Char-Broil 463322613 Скачать руководство пользователя страница 29

Troubleshooting (

continued

)

Problem

Burner(s) will not  light 
using ignitor.
(See Electronic Ignition 
Troubleshooting also)

Burner(s) will not
match light.

Sudden drop in gas
flow or low flame.

Flames blow out.

Flare-up.

Persistent grease fire.

Flashback...
(fire in burner tube(s)).

Unable to fill LP 
cylinder.

One burner does not 
light from other 
burner(s).

Possible Cause

ELECTRONIC IGNITION:

• No spark, no ignition noise.

• No spark, some ignition noise.

• Sparks, but not at electrode or at full 

strength.

• See 

“GAS ISSUES:”

 on previous page.

• Match will not reach.

• Improper method of match-lighting.

• Out of gas.

• Excess flow valve tripped.

• Vapor lock at coupling nut/LP cylinder 

connection.

• High or gusting winds.

• Low on LP gas.

• Excess flow valve tripped.

• Grease buildup.

• Excessive fat in meat.

• Excessive cooking temperature.

• Grease trapped by food buildup around 

burner system.

• Burner and/or burner tubes are blocked.

• Some dealers have older fill nozzles 

with worn threads.

• Grease buildup or food particles in 

end(s) of carryover tube(s).

Prevention/Solution

• See Section I of Electronic Ignition System.

• See Section II of Electronic Ignition System.

• See Section III of Electronic Ignition System.

• Use long-stem match (fireplace match).

• See “Match-Lighting” section of Use and Care.

• Check for gas in LP cylinder.

• Turn off knobs, wait 30 seconds and light grill. If flames are still low, 

turn off knobs and LP cylinder valve. Disconnect regulator. 
Reconnect regulator and leak-test. Turn on LP cylinder valve, wait 
30 seconds and then light grill.

• Turn off knobs and LP cylinder valve. Disconnect coupling nut from 

cylinder. Reconnect and retry.

• Turn front of grill to face wind or increase flame height.

• Refill LP cylinder.

• Refer to “Sudden drop in gas flow” above.

• Clean burners and inside of grill/firebox.

• Trim fat from meat before grilling.

• Adjust (lower) temperature accordingly.

• Turn knobs to OFF. Turn gas off at LP cylinder. Leave lid in position 

and let fire burn out. After grill cools, remove and clean all parts.

• Turn knobs to OFF. Clean burner and/or burner tubes. See burner 

cleaning section of Use and Care.

• The worn nozzles don’t have enough “bite” to engage the valve. Try 

a second LP dealer.

• Clean carry-over tube(s) with wire brush.
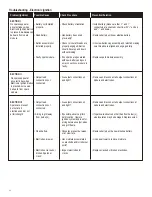
AUTO-CLEAN™

Possible Cause

Prevention/Solution

(If Equipped)

Replace batteries

Install batteries correctly.

Push Knob in to start the clean cycle. (Green LED should begin to 
flash)

Timer does not work 
(Green light does not 
flash)

Dead Battery

Batteries installed incorrectly.

Knob Position did not start the Clean 

Cycle

Replace batteries

No LED’s will illuminate

Dead Battery

Prepare to replace batteries (NOTE: Clean cycle will operate with 

a weak battery.

Red LED next to battery 
symbol is illuminated

Low Battery Strength 

29  

Содержание 463322613

Страница 1: ...ber Date Purchased IMPORTANT Fill out the product record information below See rating label on grill for serial number For support and to register your grill please visit us at www charbroil com If yo...

Страница 2: ...uation or unsafe practice which if not avoided may result in minor or moderate injury Safety Symbols The symbols and boxes shown below explain what each heading means Read and follow all of the messag...

Страница 3: ...ger than 6 quarts in capacity could exceed weight limit of the side burner shelf resulting in failure of grill cart components or side shelf CALIFORNIA PROPOSITION 65 1 Combustible by products produce...

Страница 4: ...gas leak You can inadvertently activate this safety feature without having a gas leak This typically occurs when you turn on the gas using the grill control knob before you turn on the LP tank valve...

Страница 5: ...neath the meat to catch grease and food drippings and helps minimize clean up Rotisserie Cooking Rotisserie cooking is best for round meat such as large roasts whole poultry and pork It generally requ...

Страница 6: ...rilling Dry rubs can be applied directly to the meat immediately before grilling GRILLING GUIDE Tips Tricks Wood Chips For extra smoke flavor when grilling try adding wood chips Soak the chips in wate...

Страница 7: ...per cleaning tools such as wire or steel wool It can also discolor due to heat chemicals or grease build up To maintain your grill s high quality appearance wash with mild detergent and warm water or...

Страница 8: ...er Filling Use only licensed and experienced dealers LP dealer must purge new cylinder before filling Dealer should NEVER fill LP cylinder more than 80 of LP cylinder volume Volume of propane in cylin...

Страница 9: ...as described in the LP Cylinder section of this manual Always keep new and exchanged LP cylinders in upright position during use transit or storage Leak test new and exchanged LP cylinders BEFORE conn...

Страница 10: ...LP cylinder valve by turning hand wheel counterclockwise If you hear a rushing sound turn gas off immediately There is a major leak at the connection Correct before proceeding 4 Brush soapy solution...

Страница 11: ...rners turn knob to the HIGH position starting with the burners closest to IGNITION BURNERS first If ignitor does not work follow match lighting instructions Push and hold ELECTRONIC IGNITION button un...

Страница 12: ...risol abrasive cleaners degreasers or a concentrated grill cleaner on plastic parts Damage to and failure of parts can result Porcelain surfaces Because of glass like composition most residue can be w...

Страница 13: ...found replace burner VERY IMPORTANT Burner tubes must reengage valve openings See illustrations at right 9 Attach electrode to burner 10 Carefully replace burners 11 Attach burners to brackets on fire...

Страница 14: ...God improper care and maintenance grease fire accident alteration replacement of parts by anyone other than Manufacturer misuse transportation commercial use abuse hostile environments inclement weat...

Страница 15: ...CH HOLDER R 3 THERMOMETER S 1 WARMING RACK T 3 FLAME TAMER U 3 COOKING GRATE V 1 CART SIDE PANEL LEFT W 1 BOTTOM SHELF X 1 TANK SCREW Y 2 WHEEL Z 1 AXLE AA 2 LEG CAP BB 2 END CAP CC 1 RIGHT SIDE SHELF...

Страница 16: ...PARTS DIAGRAM Y T W S R R R B C D A O L N M Q P DD EE CC J V U F G H HH GG II MM QQ NN OO KK LL RR TT U U O P P P O O K K L T T I I I E FF SS JJ AA Z BB X PP AA LL UU 16...

Страница 17: ...1 4 20x2 3 8 machine screws and 1 4 20 flange nuts at front and 1 4 20x2 3 8 machine screws and 1 4 20 flange nuts at rear 1 4 20x2 3 8 Machine Screw Qty 4 1 4 20 Flange Nut Qty 4 2 Attach back brace...

Страница 18: ...h 8x3 8 sheet metal screws Then attach to bottom shelf with 8x3 8 sheet metal screws Attach upper front panel to left and right side panels with 8x3 8 sheet metal screws Then attach to lower front pan...

Страница 19: ...axle rod through wheel axle spacer legs and other axle spacer and wheel Attach with axle washer and hitch pin Push leg extenders into right legs Axle Spacer Wheel Axle Rod Leg Extender Stand cart upr...

Страница 20: ...two people to lift and position grill head onto cart Carefully lower the grill head onto the cart Make sure the regulator hose is hanging outside the cart Attach with 1 4 20x1 2 screws 1 4 20x1 2 Scre...

Страница 21: ...scia Right Side Shelf 21 7 Install side shelf assembly onto the pre installed screws located on the right side of firebox A Tighten the pre installed screws securely Attach with 1 4 20x1 2 screws as s...

Страница 22: ...sheet metal screws B Fascia Sideburner Shelf 22 Install side burner side shelf assembly onto the pre installed screws located on the left side of firebox A Tighten the pre installed screws securely At...

Страница 23: ...ach side burner with 8 wing nut B Hook venturi clip to side burner tube and around manifold Attach side burner ignitor wire to electrode C Press side burner control knob onto valve stem D Place grate...

Страница 24: ...the Electrode Ignition Module Total 2 connections shown A NOTE Switch terminals are larger than electrode terminals and should only be installed in location shown as A B Do not untie the wires while...

Страница 25: ...it will go then push the gauge downward until it clips into the panel shown B C Back of Firebox H e a t T e n t Place heat tents over burners by inserting tabs into slots in front of firebox Note Not...

Страница 26: ...ot and leg wires are on top Warming Rack is installed upside down CAUTION Failure to install grease cup clip and grease cup will cause hot grease to drip from bottom of grill with risk of fire or prop...

Страница 27: ...orage Regulator Cylinder screw at rear of cart Tank Retainer Screw LP tank is sold separately Use only with an OPD over fill protection device equipped LP tank Fill and leak check before attaching to...

Страница 28: ...eturn LP cylinder to gas supplier Turn off LP cylinder valve Remove regulator from cylinder and visually inspect rubber seal for damage See LP Cylinder Leak Test and Connecting Regulator to the LP Cyl...

Страница 29: ...in LP cylinder Turn off knobs wait 30 seconds and light grill If flames are still low turn off knobs and LP cylinder valve Disconnect regulator Reconnect regulator and leak test Turn on LP cylinder v...

Страница 30: ...tions on and tight Are output connections on and tight If possible observe grill in dark location Operate ignition system and look for arcing between output wires and grill frame All sparks present bu...

Страница 31: ...N TRANSFERABLE LLENEESTA TARJETAY DEVUELVALADENTRODE LOS 10 DIASDE LA COMPRA PARA EL SERVICIODE GARANTIAES NECESARIOQUE PRESENTESU COMPROBANTEDE COMPRA CONSERVELA FACTURA ESTAGARANTIAES INTRANSFERIBLE...

Страница 32: ...O RECEIVE A SPECIAL OFFER CHARBROIL COM REGISTER CHECK OUT THESE GREAT FEATURES ON OUR WEBSITE Valuable product information Inspiring grilling accessories Reliable customer support Delicious recipes a...

Отзывы: