background image

25

IMPOR

TANT: 

If the appliance is being converted from natural gas to propane (LPG), the following 

operations must be performed before calibrating the gas valve as instructed above.

•  Turn adjuster screw (V) on the gas valve clockwise through the number of complete revolutions 

specified in table 3.

To simplify calibration of the gas valve, the “calibration function” can be set directly on the boiler 

control panel by proceeding as follows:
1) Press the 


 keys (2-3) together until the display shows the pointer “ ” alongside the   

symbol (about 6 seconds). 

2) Press  the 


  keys  to  set  the  fan  speed  at  the  minimum  and  maximum  heat  output 

(%PWM);

  N.b - to set the 

minimum 

and

 maximum

 heat output quickly, press the 


 keys respecti-

vely;

3) press either of the two 


 keys to exit the function.

0307_2201

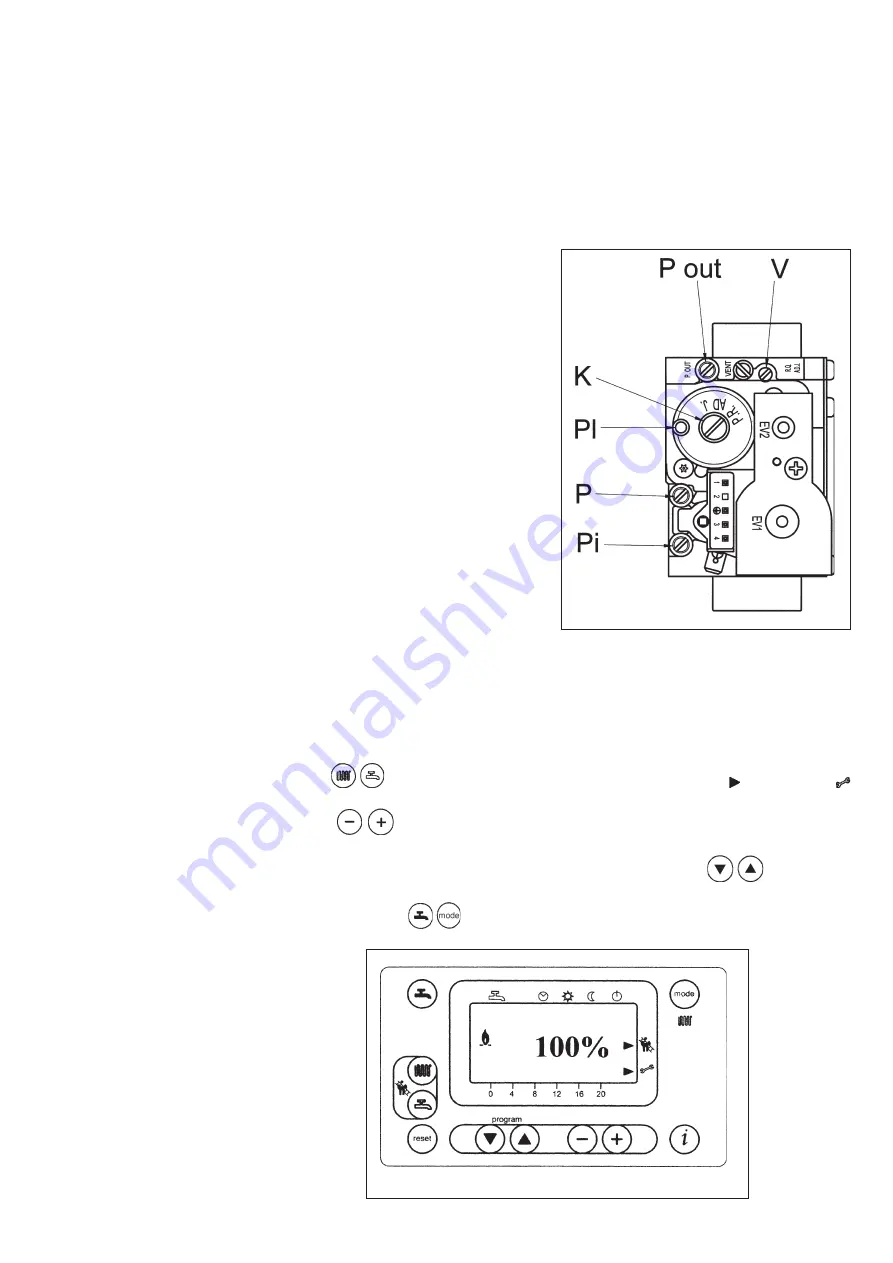
Figure 14

0310_01

14

Figure 13

Pi:


Gas supply pressure connection point

P out:

  Gas pressure to burner connection point

P:


Pressure connection point


for measurement of the OFFSET

Pl:


Air signal input from fan

V:


Gas flow adjuster screw

K:


OFFSET adjuster screw

Carry out the following operations in the given sequence:

1) 

 Calibration of the maximum heat output. Check that the CO

2

 measured on the flue, with the boiler 

operating at the maximum heat output, is the same as that shown in table 1. Otherwise, turn the 

regulation screw (V) on the gas valve. Turn the screw clockwise to reduce the concentration of 

CO

2

 and anticlockwise to increase it.

2)

 Calibration of reduced heat output. Check that the CO

2

 measured on the flue, with the boiler ope-

rating at the minimum heat output, is the same as that shown in table 1. Otherwise, turn the offset 

regulation screw (K) on the gas valve. Turn the screw clockwise to increase the concentration of 

CO

2

 and anticlockwise to reduce it.

14. Gas valve adjustment

Содержание 1.45 FF HTE

Страница 1: ... Instructions 1 1 1 1 1 45 FF HTE 45 FF HTE 45 FF HTE 45 FF HTE 45 FF HTE 1 1 1 1 1 55 FF HTE 55 FF HTE 55 FF HTE 55 FF HTE 55 FF HTE 1 1 1 1 1 65 FF HTE 65 FF HTE 65 FF HTE 65 FF HTE 65 FF HTE Wall mounted condensing boilers ...

Страница 2: ... CEE Low Voltage Directive 73 23 CEE Contents 1 Instructions prior to installation 34 2 Instructions prior to commissioning 34 3 Commissioning of the boiler 35 4 Filling the boiler 41 5 Turning off the boiler 41 6 Prolonged standstill of the system Frost protection 41 7 Servicing instructions 41 Instructions pertaining to the user 8 General information 42 9 Instructions prior to installation 42 10...

Страница 3: ... has been connected to pre existing flue ducts thorough cleaning has been carried out in that residual combustion products may come off during operation of the boiler and obstruct the flue duct d to ensure correct operation of the appliance and avoid invalidating the guarantee observe the following precautions 1 Hot water circuit If the water hardness is greater than 20 F 1 F 10 mg calcium carbonate...

Страница 4: ...imum temperature Operation in manual mode at the maxi mum temperature set Operation in automatic mode Operation in central heating mode Operation in domestic hot water mode 020503_1 Figure 1 SECONDARY display MAIN display IMPORTANT The instructions contained in this manual relating to the operation of the hot water circuit are relevant only if the appliance is actually connected to a domestic hot ...

Страница 5: ...tion which is identified by the appearance on the display of two black dashes under the symbol 4 Reset key In case of a fault referred to in point 3 7 Faults and resetting the boiler the boiler can be restarted by pressing this key for at least two seconds If this key is pressed with no fault present the display will show the message E153 and the same key has to be pressed again for at least two se...

Страница 6: ...n the premises to be heated Press the key 3 figure 1 to set the maximum domestic hot water temperature Press the keys to set the temperature required press either of the keys 1 or 10 figure 1 to save and return to the main menu Press either of the keys to access the programming function a press these keys until the display shows P11 referring to the program start time b press the keys to set the tim...

Страница 7: ...g Minimum central heating temperature setting C Start of first daily period of automatic central heating End of first daily period of automatic central heating Start of second daily period of automatic central heating End of second daily period of automatic central heating Start of third daily period of automatic heating End of third daily period of automatic central heating Start of first daily peri...

Страница 8: ...e reset button for at least two seconds 020503_0500 Figure 4 Fault warnings appear on the secondary display figure 1 b alternating with the time both of them flashing figure 4 1 It is not possible to reset malfunction warnings which appear on the secondary display as the cause of the alarm has first to be removed 3 8 Fault warnings and resetting the boiler 020503_0600 Figure 4 1 ...

Страница 9: ... E20 E50 E110 E128 E129 E132 E133 E151 E153 E154 E160 E164 action required call the authorised service centre call the authorised service centre call the authorised service centre press the reset key for about 2 seconds if this device is triggered repeatedly call the authorised service centre Call an authorised service centre Call an authorised service centre call the authorised service centre pre...

Страница 10: ...ower open the boiler filling tap We recommend you open the tap very slowly in order to let off the air In case pressure drops occur frequently have the boiler checked by a Qualified Service Engineer 4 Filling the boiler 6 Prolonged standstill of the system Frost protection We recommend you avoid draining the whole system as water replacements engender purposeless and harmful limestone deposits insid...

Страница 11: ...omparable treatment system responding to current regulations 2 Heating circuit 2 1 new system Before proceeding with installation of the boiler the system must be cleaned and flushed out thoroughly to eliminate residual thread cutting swarf solder and solvents if any using suitable proprietary products To avoid damaging metal plastic and rubber parts use only neutral cleaners i e non acid and non a...

Страница 12: ...he boiler unit is fitted for connection to an external boiler For this purpose unscrew the two plugs on the heating system delivery return fittings if a hydraulic separator is not used see fig 12 10 Boiler installation MR G 1 heating flow GAS G 3 4 gas inlet to the boiler RR G 1 heating return SC condensation drain 0310_0103 Figure 5 TEMPLATES FIXING POINTS DRILL HOLES WITH A Ø12 BIT BOILER TEMPLATE F...

Страница 13: ...f 100 Pa Warnings for the following types of installation C13 C33 The terminals for the split flue must be provided for within a square with 50 cm sides Detailed instructions are given together with each accessory C53 The terminals for combustion air intake and for the expulsion of combustion products must not be provided for on opposite walls of the building C63 The maximum pressure drop of the du...

Страница 14: ..._0106 This type of duct allows to disengage exhaust gases and to draw combustion air both outside the building and in case a LAS flue is fitted The 90 coaxial bend allows to connect the boiler to a flue air duct in any direction as it can rotate by 360 It can moreover be used as a supplementary bend and be coupled with a coaxial duct or a 45 bend If the flue outlet is placed outside the flue air ductin...

Страница 15: ...from where the flue terminal is located The splitting kit consists of a flue duct adaptor 125 80 and of an air duct adaptor For the air duct adaptor fit the screws and seals previously removed from the cap The 90 bend allows to connect the boiler to flue air ducting regardless of direction as it can be ro tated by 360 It can moreover be used as a supplementary bend to be coupled with the duct or with ...

Страница 16: ...2 max 60 m L max 15 m 0310_3002 The maximum length of the suction duct must be 15 metres Twin vertical flue terminals installation options IMPORTANT if fitting a single exhaust flue duct ensure it is adequately insulated e g with glass wool wherever the duct passes through building walls For detailed instructions concerning the installation of fittings refer to the technical data accompanying the fitti...

Страница 17: ...ength m 0 20 21 40 41 60 Parametres H536 H613 Max heat output rpm 5500 5700 5900 Parametres H612 Min heat output rpm 1900 2000 2100 1 45 FF HTE COAXIAL PIPE Ø 80 125 C13 C33 C43 Pipes length m 0 4 5 10 Parametres H536 H613 Max heat output rpm 5600 6000 Parametres H612 Min heat output rpm 1650 1800 TWIN PIPE Ø 80 C13 C33 C43 C53 C83 Pipes length m 0 20 21 40 41 60 Parametres H536 H613 Max heat outp...

Страница 18: ...e appliance is less than 2 A If the value is greater a relay must be wired between the boiler control circuit board and the accessories drawing the higher current 13 Connecting the mains supply Figure 9 Turn the control box downwards and access the terminal blocks M1 and M3 by taking off the main protective cover The pumps of the heating system P1 and P2 have to be connected to boiler terminal blo...

Страница 19: ...al board Terminal board Terminal board Cover Cover 0603_1701 CG_1789 Expansion vessel Safety valve available optional extra P1 Low loss header pump P2 Heating circuit pump SI Low loss header available optional extra UR Central heating unit ...

Страница 20: ...nnecting heating only boilers to an external water heater The SIEMENS model QAA73 room temperature regulator optional accessory must be connected to terminals 1 2 of terminal board M2 in figure 9 The jumper across terminals 3 4 provided for connection of a room temperature thermostat must be removed The settings of the domestic hot water temperature and domestic hot water production schedule must b...

Страница 21: ...um time the boiler is switched on ahead of the timed program to optimise the temperature in the premises Opt Stop Max Maximum time the boiler is switched off ahead of the timed program to optimise the temperature in the premises HC2 gradient DHW Red Setp Minimum temperature of the domestic domestic hot water DHW program Selection of the type of timed program for domestic hot water 24 h day always ...

Страница 22: ...g b with QAA73 room temperature control device The temperature curve kt must be selected by setting parameter 70 HC1 gradient of the QAA73 room temperature control device as described in section 13 3 QAA73 parameters which can be set by the installation engineer service See graph 4 for selecting the curve referred to a room temperature of 20 C The curve is shifted automatically on the basis of the...

Страница 23: ...ture control device must be supplied with electricity by means of terminals 11 12 of terminal board M3 in figure 11 The contact relating to the request for operation of the other zones must be parallel connected and connected to terminal 3 4 TA of terminal board M2 in figure 11 The jumper present must be removed The central heating temperature of the zone controlled by the QAA73 is set automatically...

Страница 24: ...e located in the recess provided on the storage tank figure 12 The temperature and on off programming of the domestic hot water supply are selected directly from the boiler control panel as described in this manual under the user instruction headings 13 6 Connecting the pump hot water circuit Figure 12 STORAGE TANK CONNECTION DIAGRAM KEY UB DOMESTIC HOT WATER HEATER UNIT UR CENTRAL HEATING UNIT M2 ...

Страница 25: ... 14 0310_0114 Figure 13 Pi Gas supply pressure connection point P out Gas pressure to burner connection point P Pressure connection point for measurement of the OFFSET Pl Air signal input from fan V Gas flow adjuster screw K OFFSET adjuster screw Carry out the following operations in the given sequence 1 Calibration of the maximum heat output Check that the CO2 measured on the flue with the boiler o...

Страница 26: ...Consumption at max heat output m3 h 4 91 6 00 7 08 Consumption at min heat output m3 h 1 58 1 69 2 11 Gas nozzle mm 8 5 15 Gas consumption at 15 C 1013 mbar 1 45 FF HTE 1 55 FF HTE 1 65 FF HTE gas G31 3P 37 mbar PCI MJ Kg 46 34 46 34 46 34 Consumption at max heat output Kg h 3 60 4 40 5 20 Consumption at min heat output Kg h 1 16 1 24 1 55 Gas nozzle mm 8 5 15 G20 2H 20 mbar G31 3P 37 mbar CO2 max...

Страница 27: ...eed at maximum output in heating mode rpm maximum speed limitation Setting value of required speed rpm at low fire Setting value of required speed rpm at high fire Pump post circulation time in central heating mode min Burner operating pause time between two start ups s Hydraulic system setting see instructions provided with the SIEMENS AGU2 500 accessory H552 50 with AGU2 500 Configuration of heatin...

Страница 28: ...ng of the main burner Under such conditions the boiler is blocked You must press the reset button on the boiler to restore the normal operating conditions Supplementary running of the pump The electronically controlled supplementary running of the pump lasts 10 minutes when the boiler is in the central heating mode after the burner has switched off due to a room thermostat intervention Frost prote...

Страница 29: ...y and improve the cleanliness of the production products the flue sweeper function can be activated by proceeding as described below 1 press the 2 3 together until the pointer appears on the display alongside the symbol about 3 seconds but no more than 6 seconds In these conditions the boiler operates at the ma ximum heat output set for central heating 2 press either of the buttons to exit the func...

Страница 30: ...7 flue water exchanger 8 flame detector electrode 9 main burner 10 ignition electrode 11 air gas mixture header 12 mixer with venturi 13 gas diaphragm 14 fan 15 flue thermostat 16 coaxial fitting 17 automatic air vent 18 flue joint 19 hydraulic pressure sensor Figure 18 GAS HEATING INLET HEATING RETURN CONDENSATION DRAIN SEALED CHAMBER 0411_0501 ...

Страница 31: ...0 Hz FUSE MAIN INPUT TERMINAL BOARD HEATING SYSTEM PUMP HOT WATER PUMP PRESSURE SWITCH FLUE SAFETY THERMOSTAT SAFETY THERMOSTAT FLAME SENSING ELECTRODE GAS VALVE CENTRAL HEATING TEMPERATURE SENSOR ROOM THERMOSTAT QAA73 CONNECTION SAFETY SHUT DOWN OUTSIDE SENSOR D H W THANK SENSOR SPARK GENERATOR IGNITION ELECTRODE HYDRAULIC PRESSURE SENSOR 31 ...

Страница 32: ...5 80 25 80 Type C13 C33 C43 C53 C63 C83 B23 Concentric flue duct diameter mm 80 80 80 Concentric air duct diameter mm 125 125 125 2 pipe flue duct diameter mm 80 80 80 2 pipe air duct diameter mm 80 80 80 Max flue mass flow rate kg s 0 022 0 027 0 032 Min flue mass flow rate kg s 0 007 0 008 0 010 Max flue temperature C 74 78 75 NOx class 5 5 5 Type of gas used G20 G20 G20 G31 G31 G31 Natural gas feeding...

Страница 33: ...3 157 Avenue Charles Floquet 93158 Le Blanc Mesnil Cedex Téléphone 33 0 1 45 91 56 00 Télécopie 33 0 1 45 91 59 50 www chappee com BAXI S A au capital de 43 214 640 RCS Bobigny B 602 041 675 A P E 282 D ...

Отзывы: