background image

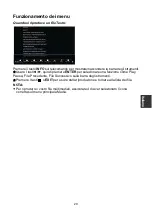
Funzionamento dei menu 

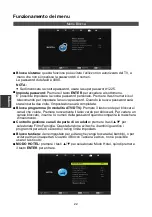
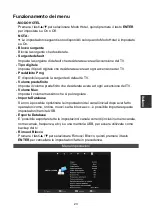
Volume automatico:

 Volume Automatico mantiene lo stesso livello del volume 

anche se cambiate programma. Siccome ogni emittente ha un segnale con le 

proprie caratteristiche, la regolazione del volume può essere necessaria ogni volta 

che si cambia canale. 

Questa opzione permette all’utente 

di godere di un volume 

stabile rendendo automatica la regolazione per ogni canale. 

SPDIF: 

è possibi

le selezionare la modalità d’uscita

 SPDIF desiderata. 

AD Switch:

 è possibile impostare AD


Switch

 su 

On o Off per attivare le 

impostazioni del volume della Audio Descrizione (AD).


Questa funzione, per ciechi, 


Bilanciamento:

 regola il livello del suono proveniente dallo speaker destro e da 

quello sinistro. 

consiste in una voce che descrive le immagini sullo schermo . 

E’ 

necessario che il 

canale supporti questa funzione. 


Orologio: 

visualizza l’ora corrente del

 segnale DTV.   

Fuso orario:

 premere I tasti

▲/▼/◄/► 

per selezionare il fuso orario. 

Timer di spegnimento:

 seleziona il tempo dopo il quale il TV va in standby 

automaticamente. 

Spegn. auto:

 seleziona il tempo (off, 3H, 4H, 5H) nel quale il TV rimane acceso 

senza fare alcuna operazione.   

Suggerimento: 

In questo tempo, il telecomando non deve fare alcuna operazione, 

altrimenti lo spegnimento automatico ripartirà da capo. 

Ora Legale: 

Premere I tasti

▲/▼

 per selezionare Ora Legale, quindi premere

◄/► 

per scegliere l’opzione

. (On, Off, Auto) 

NOTA: 


L’orologio cambierà

 quando cambierete il Fuso Orario. 

Menu Ora 


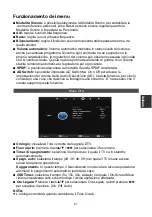
Modalità Sonoro:

 è possibile selezionare la Modalità Sonoro per soddisfare le 

vostre preferenze personali. Alti e Bassi possono essere regolati quando la 

Modalità Sonoro è impostata su Personale.   


Alti:

 regola i suoni di alta frequenza. 


Bassi:

 regola i suoni di bassa frequenza. 

Itali
ano

OSD Timer:

 seleziona il tempo (5s, 15s, 30s, Always) nel quale 

l’

 On-Screen Menu 

rimane visualizzat

o sullo schermo dopo l’ultima operazione effettuata

21

Содержание LED32E2200ST2

Страница 1: ...42 0 242408849 Fax 0042 0 220951190 Service E mail info changhongeurope cz CHANGHONG EUROPE ELECTRIC S R O Argentinsk 286 38 170 00 Praha 7 Czech Republic Http www changhong eu FR Z I EN SK T C DE CH...

Страница 2: ...Lock menu 21 Setup menu 23 Screen menu 24 Channel List 28 Teletext 29 Media Operation 24 7 Day TV GUIDE 28 Favorite List 28 Warning 1 Connection and Setup 7 Using the Remote Control 9 Installing Batte...

Страница 3: ...circuit different from that to which the receiver is connected d Consult the dealer or experienced radio TV technician for help CAUTION DO not attempt to modify this product in any way without written...

Страница 4: ...se sticks on top of the TV set 4 Ventilation When you install your TV maintain a distance of at least 4 inches between the TV and other objects walls cabinet sides etc to ensure proper ventilation Fai...

Страница 5: ...acement parts specified by the manufacturer or those with the same characteristics and performance as the original parts Use of unauthorized parts can result in fire electric shock and or other danger...

Страница 6: ...ators heat registers stoves or other apparatus including amplifiers that produce heat 6 Clean only with a dry cloth Unplug this product from the wall outlet before cleaning Do not use liquid cleaners...

Страница 7: ...from being walked on or pinched particularly at plugs convenience receptacles and the point where they exit from the apparatus 13 For added protection for this product during a lightning storm or whe...

Страница 8: ...nfrared sensor Adjust the volume level It turns on and off the TV Opens and closes the menu Change channels The navigation key It turns on the TV English 7 8 9 10 SCART PC PC AUDIO COMMON INTERFACE AV...

Страница 9: ...power input port with the power cable out of the above range other end of the VGA cable with the VGA port on the TV and tighten the bolts clockwise on the each end of VGA cable NOTE While connecting...

Страница 10: ...wer cable do not touch directly the metallic part of the cable English Computer SPDIF The equipment with HDMI output function Earphone RF Coaxial Wire 75 ohm USB Drive The equipment with HDMI output f...

Страница 11: ...type of batteries may cause chemical leakage and or explosion Please note the following Always ensure that the batteries are inserted with the and terminals in the correct direction as shown in the ba...

Страница 12: ...AL NICAM DUAL DUAL MONO and switch audio language in DTV mode 7 8 9 To select the direction 10 ENTER Select or confirm menu item 11 12 LIST Press to call up the channel list Press again to exit it 13...

Страница 13: ...y press again to release 20 Enter the Teletext press again for MIX mode press this button again to exit Play Pause in Media mode 21 RADIO Press to interchange Radio and 22 Change size of teletext scre...

Страница 14: ...0 minutes after there is no any signal such as the programs are stopped by TV station In PC mode the TV set will automatically turn off in 90 seconds if no signal When VGA cable is connected the TV tu...

Страница 15: ...uttons to select current satellite Scan Mode Press the buttons to select Scan Mode Default Blind Scan Network Channel Type Press the button to select channel type Scramble Free Scramble Free Service T...

Страница 16: ...button is pressed Example To select channel e g Channel 5 Press 5 To select channel e g Channel 20 Press 2 and 0 in a short time Press the VOL button to adjust the volume If you want to switch the so...

Страница 17: ...ayed gray it means that the item is not available or cannot be adjusted Some items in the menus may be hidden depending on modes or signal sources used Buttons on the TV have the same function as corr...

Страница 18: ...number Sound System Select the sound system Search Press the button to search down from the current frequency and press the button to search up Press buttons to select the DTV Manual Tuning then press...

Страница 19: ...nsponder from the list Delete Press the red button to delete the current satellite transponder Edit Press the green button to edit the current satellite transponder Add Press the yellow button to add...

Страница 20: ...tates the antenna to the stored satellite position Goto Reference Drive antenna to zero position When Motor is set to DiSEqC1 3 Set Location Press the green button to set Location Location Manual Abuz...

Страница 21: ...and the CI card During initialization of the CI card please don t operate the TV English Picture Mode You can select the type of picture which best corresponds to your viewing requirements Contrast B...

Страница 22: ...hann is changed This feature allows users to enjoy stable volume levels by making automatic adjustments for each program SPDIF Mode You can select a desired SPDIF Output mode AD Switch You can select...

Страница 23: ...your password the super password of 1225 still is valid Set Password Press the ENTER button to access the submenu You can set your private password Press the number buttons on the remote control to se...

Страница 24: ...he default source is TV Default Volume Set the Default volume for every time you open the TV Max Volume Set the max volume that you can adjust Import Database If you cannot restore the initial channel...

Страница 25: ...are Update USB Update the software using the USB memory device Please be careful not to disconnect the power or remove the USB drive until updates are complete HDMI CEC Press buttons to select HDMI CE...

Страница 26: ...t Adjust the Image Position if it does not fit the TV Auto Adjust To adjust the all PC setting automatically H Offset To adjust the horizontal placing of the image First insert a USB memory device int...

Страница 27: ...s Music mp3 MP3 Sample Rate 8K 48KHz Bit Rate 32K 320Kbps m4a aac AAC Sample Rate 16K 48KHz Channel Mono Stereo Photo jpg jpeg Progressive JPEG Max Resolution 1024 768 Baseline JPEG Max Resolution 153...

Страница 28: ...utton to play the selected files If no file is marked all the files in the folder will be played in sequence after you press button 4 Press the to stop the playing files 5 Press EXIT button to return...

Страница 29: ...a function such as play pause previous file next file from the on screen toolbar Press or EXIT buttons to exit playback go back to file list page When playing Text files Press the INFO button on the...

Страница 30: ...ton to display the Channel List Press button to select the All DTV Radio list HD etc Press the buttons to select the channel and press ENTER to watch it Press CH CH button to page up or down the Chann...

Страница 31: ...an double the size of the text to make it easier to read 1 Press the button to enlarge the top half of the page 2 Press the button again to enlarge the bottom half of the page 3 Press the button once...

Страница 32: ...und and indicator light is green blue Volume is in the minimum value or TV is in mute mode Adjust the value of volume The signal cable is not correctly connected Connect the signal cable correctly Blu...

Страница 33: ...lint free cloth Please be sure not to use a wet cloth Extended Absence If you expect to leave your TV dormant for a long time such as a vacation it s a good idea to unplug the power cord to protect a...

Страница 34: ...upu Upozorn n 1 Ovl d n hlavn jednotky 6 Bezpe nostn pokyny 4 14 14 Hlavn nab dka Operace 15 14 Nab dka Operace 15 Nab dka pro kan l 15 Nab dka pro as 22 Hotelov m PR VODCE KAN Odstra ov esky Nab dka...

Страница 35: ...ipojen p ij ma d Obra te se na prodejce nebo na zku en ho technika v oblasti r dio TV V STRAHA Nepokou ejte se sami jak mkoli zp sobem upravovat tento produkt bez p semn ho souhlasu dodavatele Nepovol...

Страница 36: ...nebo vonn ty inky 4 Ventilace P i instalaci televizoru zachovejte vzd lenost alespo 4 palc asi 11 cm mezi televizorem a dal mi p edm ty st ny bo n strany sk n atd aby byla umo n na p slu n ventilace...

Страница 37: ...nu n hradn ch d l u produktu ujist te se o tom e servisn technik pou v n hradn d ly specifikovan v robcem nebo p padn tak n hradn d ly se stejn mi vlastnostmi a stejn m v konem jako origin ln d ly Po...

Страница 38: ...di tory topn registry kamna nebo jin p stroje v etn zesilova kter produkuj teplo 6 Ot rejte pouze such m had kem 9 Neobch zejte bezpe nostn funkce polarizovan ch nebo zemn c ch typ z str ek Polarizova...

Страница 39: ...inu jasu a kontrastu p i zobrazov n statick ch sn mk 10 Chra te nap jec ru ne lapejte po n zabra te jej mu sm knut a to zejm na v bl zkosti z str ek obj mek a m st kde vystupuj z p stroje 13 P stroj v...

Страница 40: ...o n panel esky COMMON INTERFACE 6 AV YPbPr_R L HDMI1 ARC PC AUDIO Infra erven senzor Indik tor nap jen Zap n a vyp n TV Otev r a zav r menu P epnout program Nastavit hlasitost Naviga n tla tko Zap n T...

Страница 41: ...R Audio L Pokud KOMPONENT YPbPr a AV funguj jako mini termin l a sd lej stejn zvukov spot ebi vyberte si pros m audio a video kabel v pom ru jedna ku t em P ipojte USB port ke sluch tk m nebo k jin m...

Страница 42: ...str ky nedot kejte se p mo kovov sti kabelu P ipojen a nastaven esky SPDIF Video Audio L Audio R Pr Cr Pb Cb Y Audio L Audio R COMMON INTERFACE CI Dispositivo con esempio VCR Sluch tka USB jednotka Za...

Страница 43: ...tn ho typu bateri m e zp sobit unik n chemik li a nebo v buch Nikdy nezapome te na n sleduj c pokyny a informace V dy zkontrolujte zda jsou baterie vlo eny tak aby ozna en a na konc ch baterie odpov d...

Страница 44: ...t n nab dky OSD 16 LIST vyvol n seznamu kan l Dal nebo zad n hesla 4 TLA TKA S SLICEMI v b r kan l 5 SOURCE v b r zdroje sign lu Dual Dual 6 AUDIO I II p epnut zvuk Dual 8 9 MENU otev en obrazovky na...

Страница 45: ...n vzad v re imu MEDIA p ev jen vp ed v re imu MEDIA p edchoz v re imu MEDIA dal v re imu MEDIA STILL zmrazen obrazu pozastaven teletextov str nky dal m stiskem se obnovuje 19 otev en teletextu dal m s...

Страница 46: ...ostn ho re imu automaticky po 10 minut ch po stavu se ztr tou sign lu nap klad tehdy kdy do lo k zastaven programu prost ednictv m TV stanice V PC re imu se TV automaticky vypne po 90 sekund ch pokud...

Страница 47: ...DTV R dio Z kladn operace Pomoc tla tka ENTER spus te automatick vyhled v n Prvn lad n ATV pro p esko en ATV lad n stiskn te sou asn kl vesu Menu a kl vesu s ipkou sm uj c doleva Druh lad n DTV pro p...

Страница 48: ...c kan l po stisknut jak hokoli tla tka P klad Pro volbu kan lu nap kan lu 5 Stiskn te 5 Pro volbu kan lu nap kan lu 20 Stiskn te 2 a 0 kr tce po sob Nastaven hlasitosti Pomoc kl vesy VOL nastavte hla...

Страница 49: ...EXIT odejdete z Menu POZN MKA Pokud je polo ka v MENU zobrazen v ed barv znamen to e polo ka nen k dispozici a nem e b t tedy nastavena N kter polo ky v nab dk ch mohou b t skryty v z vislosti na re...

Страница 50: ...race Syst m volby barev Color system Zvolte syst m volby barev Syst m volby zvuku Sound System Zvolte syst m volby zvuku Typ sign lu je DVB C Automatick lad n Pomoc tla tka ENTER vstupte do sub menu Z...

Страница 51: ...moc jemn ho lad n nastavte frekvenci kan lu Vyhledat Pomoc tla tka m ete proch zet hodnoty aktu ln frekvence CADTV ru n lad n Manu ln ukl d n DTV kan l M d Skenov n Pomoc tla tka zvolte re im skenov n...

Страница 52: ...Limit Vymaz n nastaven limitu Tato funkce umo uje ot en ant ny v r mci pln ho oblouku Zru en v chodn ho a z padn ho limitu Nastav Pozici Pro nastaven polohy stiskn te lut tla tko Move Auto Automatick...

Страница 53: ...dostupn pouze v p pad sign lu v r mci DTV Pomoc tla tek zvolte Informace o sign lu pot stiskn te tla tko ENTER a zobrazte podrobn informace CI informace v re imu DTV Pomoc t to funkce m ete zobrazova...

Страница 54: ...ovn b l barvy na obrazu Jas Nastaven tmav barvy ern ch st na obrazu V ky Nastaven zvuku s vysokou frekvenc Basy Nastaven zvuku s n zkou frekvenc Vyv en Nastaven rovn zvuku poch zej c ho z lev ho a pra...

Страница 55: ...d n realizovat dnou operaci pot se televizor automaticky vypne Pokud v tomto obdob provedete n jakou operaci bude tato doba resetov na Auto re sp pot ebujete nku Zvolte dobu v hodin ch vypnuto 3H 4H 5...

Страница 56: ...to funkce zabr n te d tem v sledov n TV program pro dosp l podle nastaven ho ratingov ho limitu Z mek kl ves Ochrana proti pou it mal mi d tmi nebo proti jin mu neo ek van mu pou it Pokud je rozsv ce...

Страница 57: ...zvolte jazyk audio syst m Jazyky pro titulky Pomoc tla tek zvolte jazyk titulk Zhor en poslech Pomoc tla tek zvolte funkci Zhor en poslech pomoc tla tek zvolte Zapnuto nebo Vypnuto Pom r stran M ete s...

Страница 58: ...2 Pomoc tla tek m ete zvolit mo nost pro nastaven v menu OBRAZOVKA 3 Pomoc tla tka ENTER p ejdete k nastaven Aut nastaven Automatick nastaven se zen v ech po ta H Posuv Nastaven horizont ln pozice obr...

Страница 59: ...chlost bit 32K 320Kbps m4a aac AAC Hodnota vzork 16K 48KHz P enosov rychlost bit Kan l Mono Stereo Foto jpg jpeg Progresivn JPEG Maxim ln rozli en 1024 768 Z kladna JPEG Maxim ln rozli en 15360 8640 b...

Страница 60: ...en dn soubor budou v echny soubory ve slo ce p ehr v ny v dan m po ad po stisknut tla tka 4 Pomoc kl vesy ukon te p ehr v n soubor 5 Pomoc tla tka EXIT se vr t te k p edchoz nab dce a odejdete z nab...

Страница 61: ...e vra te zp t na str nku se seznamem soubor P ehr v n filmov ch soubor Pomoc tla tka INFO na d lkov m ovl da i skryjete zobraz te n strojovou li tu na obrazovce Pou ijte tla tka pot stiskn te ENTER a...

Страница 62: ...NTER a na n strojov li t obrazovky zvolte funkci jako nap klad P edchoz soubor Dal soubor Stiskn te tla tka nebo EXIT a opus te rozhran pro p ehr v n Pot se vra te zp t na str nku se seznamem soubor P...

Страница 63: ...m kl vesy LIST zobraz te seznam kan l Pomoc tla tek m ete zvolit kan l Po stisknut tla tka ENTER m ete tento kan l sledovat Pomoc tla tka CH CH m ete posunovat str nky v r mci dol Pomoc tla tka EXIT...

Страница 64: ...Dal m stisknut m tla tka m ete zv t it spodn polovinu str nky 3 Pomoc dal ho stisknut tla tka se vr t te zp t do norm ln ho zobrazen Re im odkryt Teletextov informace m ete snadno odkr t nap klad h d...

Страница 65: ...zeno AV Zvuk je na minimu nebo je TV cv re imu ztlumeno Nastavte hodnotu hlasitosti Zvuk je na minimu nebo je TV cv re imu ztlumeno Nastavte hodnotu hlasitosti Koaxi ln kabel je patn p ipojen P ipojte...

Страница 66: ...t ebi za zen ch WEEE po aduje aby se star elektrick spot ebi e pou van v dom cnosti nevyhazovaly do norm ln ho sm sn ho komun ln ho odpadu Star spot ebi e se mus sb rat odd len aby se optimalizovalo z...

Страница 67: ...ein und ausschalten 12 Erstmalige Einrichtung 12 Einen TV Sender w hlen 14 Die Eingangsquelle wechseln 15 Hauptmen Bedienung 15 Lautst rkeregelung 14 Men Bedienung 15 Men Kanal 16 Men Ton 21 Men sperr...

Страница 68: ...n den der Empf nger angeschlossen ist d Wenden Sie sich an Ihren Fachh ndler oder erfahrenen Radio und Fernsehtechniker f r Hilfe VORSICHT VERSUCHEN Sie nicht diese Produkt in irgendeiner Weise ohne v...

Страница 69: ...Fernseher 4 Bel ftung Wenn Sie Ihren Fernseher aufstellen halten Sie stets einen Abstand von mindestens 10 cm 4 Zoll zwischen dem Fernseher und anderen Gegenst nden W nden Schrankseiten usw ein um ord...

Страница 70: ...sicher dass das Servicepersonal Ersatzteile verwendet die durch den Hersteller angegeben sind oder solche die in Bezug auf Eigenschaften und Leistung den Originalteilen entsprechen Die Verwendung nich...

Страница 71: ...wie Heizk rpern fen oder anderen W rme erzeugenden Ger ten z B Verst rkern auf 6 Nur mit einem trockenen Tuch reinigen 9 Manipulieren Sie nicht den gepolten Stecker oder den Schutzkontaktstecker Ein...

Страница 72: ...Besch digungen des Stromkabels oder des Steckers wenn Wasser oder Gegenst nde in das Ger t eingedrungen sind das Ger t Regen oder Feuchtigkeit ausgesetzt war das Ger t nicht normal funktioniert oder...

Страница 73: ...Deutsch COMMON INTERFACE AV YPbPr_R L OUT DIGITAL AUDIO HDMI1 ARC PC AUDIO Schaltet den Fernseher ein und aus ffnet und schlie t dasMen Infrarotsensor Betriebsanzeige Kan le wechseln rke anpassen Navi...

Страница 74: ...ls COMPONENT YPbPr und AV als Mini Terminal arbeiten und dasselbe Audio teilen w hlen Sie bitte ein Eins auf Drei Audio Videokabel PCMCIA Schlitz ein anzuschlie en Mit Ihrem Kopfh rer oder einem ander...

Страница 75: ...isolierten Teil wenn Sie das Netzkabel ausziehen Ber hren Sie nicht direkt den metallischen Teil des Kabels 8 Deutsch Computer SPDIF Video Audio L Audio R Pr Cr Pb Cb Y Audio L Audio R COMMON INTERFA...

Страница 76: ...n Sie auf folgendes Gehen Sie sicher dass die Batterien richtig eingesetzt wurden und die Pole und an den richtigen Stellen sind orientieren Sie sich an den Abbildungen im Batteriefach Verschiedene Ba...

Страница 77: ...e Taste um die Lautst rke zu erh hen oder verringern 3 7 5 12 2 10 Wechseln Sie Dr cken Sie diese Taste um den Ton zu ZIFFERNTASTEN W hlen Sie Kan le aus oder geben Sie ein Kennwort ein 4 6 AUDIO I II...

Страница 78: ...ammen zu wechseln wenn Radioprogramme verf gbar sind im DTV Modus Wechseln Sie zum Teletext dr cken Sie erneut f r den MIX Modus und ein weiteres Mal zum Beenden Wiedergabe Pause im Medien Modus Halte...

Страница 79: ...by Modus wenn es kein Signal gibt beispielsweise wenn das Programm durch den Fernsehsender gestoppt wurde Im PC Modus wird der Fernseher sich automatisch nach 90 Sekunden abschalten wenn kein Signal v...

Страница 80: ...sten um den derzeitigen Satelliten zu w hlen Suchmodus Dr cken Sie die Tasten um den Suchmodus zu w hlen Standard Service Typ Dr cken Sie die Taste um die Dienst Typ zu w hlen Alle DTV Radio Grundbedi...

Страница 81: ...en Sie CH um die Kanalnummer zu erh hen Dr cken Sie CH um die Kanalnummer zu verringern Mithilfe der 0 9 Zifferntasten Sie k nnen die Kanalnummer w hlen indem Sie 0 bis 9 dr cken Dar ber hinaus wenn d...

Страница 82: ...5 Dr cken Sie die Tasten um den gew nschten Wert zu w hlen Die Anpassung im OSD Men kann sich je nach gew hltem Men ndern 6 Dr cken Sie auf die MENU Taste um in das vorherige Men zur ckzukehren 7 Dr...

Страница 83: ...in Color System W hlen Sie das Farbsystem Feinabstimmung Stellen Sie die Frequenz des Kanals fein ein Suche Dr cken Sie die Taste um von der derzeitigen Frequenz abw rts zu suchen und dr cken Sie die...

Страница 84: ...n Sie die Taste um die Suchart zu w hlen Voll Auto oder digitale Nummern eingeben Frequenz Dr cken Sie die Taste um die Frequenz zu w hlen Auto Auto oder digitale Nummern eingeben Color System W hlen...

Страница 85: ...Satelliten ausw hlen Verwendet um das richtige Ger t auszuw hlen Motor Stellt die Positionierungsart zwischen DiSEqC1 2 und DiSEqC1 3 ein Wenn der Motor auf DiSEqC1 2 eingestellt ist Limit einstellen...

Страница 86: ...e Tasten um ihn auf die Position zu bewegen auf den Sie ihn setzen m chten Dr cken Sie die BLAUE Taste um den gew hlten Kanal zu berspringen Ihr Fernseher wird den Kanal automatisch berspringen wenn S...

Страница 87: ...n Sie die Farbintensit t des Bildes an Farbton Passen Sie den Farbton des Bildes an Nur im NTSC Modus Sch rfe Objektkanten werden f r Bilddetails verbessert Farbtemperatur W hlen Sie die Farbtemperatu...

Страница 88: ...el wenn Sie das Programm wechseln Da jede Rundfunkstation ihre eigenen Signalbedingungen hat kann die Lautst rkeanpassung jedes Mal erforderlich sein wenn der Kanal gewechselt wird Diese Funktion erm...

Страница 89: ...Zeit keine Bedienung gemacht wird wird er automatisch ausgeschaltet Wenn Sie eine Bedienung machen wird die Zeit zur ckgesetzt On Screen Men nach Ihrer letzten Bedienung angezeigt werden soll Sommerze...

Страница 90: ...4 stelliges Password ein wenn der Eingabebildschirm angezeigt wird Men Bedienung Jugendschutz Dr cken Sie die Tasten um Elternaufsicht zu w hlen Diese Funktion kann verhindern dass Kinder TV Programme...

Страница 91: ...ch Kanalnummer Kanalname Frequenz usw auf die USB Festplatte als Sicherung der Kanalinformationen f r dieses Ger t zu exportieren Sperren zur cksetzen Dr cken Sie die Tasten um Sperre aufheben zu w hl...

Страница 92: ...e Tasten um HDMI CEC zu w hlen dr cken Sie ENTER um das Untermen zu betreten CEC Control Dr cken Sie die Tasten um die CEC Control ein oder auszuschalten Audio Receiver Dr cken Sie die Tasten um den A...

Страница 93: ...hervorzuheben und die ENTER Taste um auf HINWEIS Besondere USB Ger te k nnten nicht oder nicht gut unterst tzt werden USB max Last DC 5 V 500 mA Die unterst tzten Formate Medium Datei Erw Codec Bemer...

Страница 94: ...24 32 BPP 9600 6400 png Non Interlaced Max Aufl sung 9600 6400 Interlaced Max Aufl sung 1280 800 Text txt ANSI UNICODE GB UTF8 Dateigr e Max 1MB HINWEIS Besondere Algorythmus Dokumente k nnten nicht o...

Страница 95: ...ielt nachdem Sie die Taste dr cken 4 Dr cken Sie die Taste um die Wiedergabe der Dateien anzuhalten 5 Dr cken Sie die EXIT Taste um in das vorherige Men zur ckzukehren und das Men zu verlassen Bei der...

Страница 96: ...edergabe von Film Dateien Dr cken Sie die INFO Taste auf der Fernbedienung um die Werkzeugleiste auf dem Bildschirm anzuzeigen zu verbergen Verwenden Sie die Tasten dann dr cken Sie ENTER um eine der...

Страница 97: ...ER um eine der Funktionen wie Wiedergabe Pause Vorige Datei N chste Datei aus der Werkzeugleiste auf dem Bildschirm zu w hlen Dr cken Sie die oder EXIT Tasten um die Wiedergabe zu verlassen zur ck zur...

Страница 98: ...G oder EXIT Taste zum Verlassen Senderliste Dr cken Sie auf die LIST Taste um die Senderliste anzuzeigen Verwenden Sie die Tasten um den Kanal zu w hlen und dr cken Sie ENTER um es anzusehen Dr cken S...

Страница 99: ...die untere H lfte der Seite zu vergr ern 3 Dr cken Sie noch einmal um zur normalen Anzeige zur ckzuwechseln Aufdeckungsmodus Sie k nnen verborgene Teletextinformation z B Antworten zue einem R tsel a...

Страница 100: ...Grie Signalquelle ist niedrig Stufe oder Signalkabel niedrigerer Qualit t Benutzen Sie das geeignete Signalkabel Kein Bild oder Ton und Kontrolleuchte gr n blau Volumen befindet sich im Minimalbereich...

Страница 101: ...mkabel zu ziehen um Sch den durch Blitzschlag oder berspannung zu vermeiden Entsorgung von Elektroger ten Gem der EG Richtlinie 2012 19 EU ber die Entsorgung von Elektro und Elektronik Altger ten WEEE...

Страница 102: ...ion du menu 15 21 Remplacer les piles Utilisation de la t l commande Connexion et configuration 7 Installation des piles dans la t l commande Navigation dans les menus 15 Menu des Cha nes 16 Menu Son...

Страница 103: ...r cepteur d Contacter le revendeur ou un technicien qualifi en radio t l vision pour toute assistance ATTENTION Ne pas essayer de modifier ce produit de quelque mani re que ce soit sans autorisation c...

Страница 104: ...ugies allum es des cigarettes ou des b tonnets d encens au dessus du t l viseur 4 Ventilation Lorsque vous installez votre t l viseur maintenez une distance d au moins 4 pouces entre le t l viseur et...

Страница 105: ...ces de rechange Dans le cas o le produit a besoin de pi ces de rechange assurez vous que la personne charg e de l entretien utilise les pi ces sp cifi es par le fabricant ou celles qui ont les m mes c...

Страница 106: ...registre de chaleur un po le ou tout autre appareil qui produit de la chaleur y compris les amplificateurs 6 Nettoyez uniquement avec un chiffon sec 9 N inhibez pas les dispositifs de s curit de la p...

Страница 107: ...le cordon d alimentation ou la prise sont ab m s si du liquide a t d vers sur l appareil ou qu un corps tranger a p n tr l int rieur si l appareil a t expos la pluie ou l humidit s il ne fonctionne p...

Страница 108: ...COMMON INTERFACE 6 PC AUDIO HDMI1 ARC OUT DIGITAL AUDIO AV YPbPr_R L 1 2 3 4 4 5 6 7 8 9 10 Capteur infrarouge Indicateur d alimentation Il met en marcheet teint le t l viseur Ouvreet fermelemenu Chan...

Страница 109: ...G Si la COMPOSANTE YPbPr et AV fonctionnent comme mini terminal et partagent le m me ensemble de donn es audio veuillez choisir d utiliser un trois c bles audio vid o carte CI USB Connectez le votre c...

Страница 110: ...d alimentation ne touchez pas directement la partie m tallique du c ble Fran ais SPDIF Video Audio L Audio R Pr Cr Pb Cb Y Audio L Audio R COMMON INTERFACE CI ecc esempio VCR couteur Lecteur USB L qui...

Страница 111: ...himiques et ou d explosion Veuillez noter les points suivants Assurez vous toujours que les piles soient ins r es avec les bornes et dans la bonne direction comme indiqu e dans le compartiment piles L...

Страница 112: ...x des Dual Dual Dual 6 AUDIO I II basculement entre 8 d ajuster le volume ordre ascendant ou descendant Pressez le nouveau pour la quitter Lorsque la dur e d termin e s est coul e le t l viseur passe...

Страница 113: ...DTV l image t l texte pressez nouveau pour d geler l affichage passer en mode t l texte pressez nouveau pour le mode MIX pressez encore une fois pour quitter M DIA PVR lecture pause en mode M DIA M D...

Страница 114: ...absence de tout signal tels que les programmes arr t s par la cha ne de t l vision En mode PC le t l viseur se met automatiquement hors tension dans 90 secondes s il n y a aucun signal Lorsque le c b...

Страница 115: ...ou saisir des chiffres num riques Satellite Appuyez sur les boutons pour s lectionner le satellite actuel Mode de balayage Appuyez sur les boutons pour s lectionner le mode de balayage Pr r gl e Bala...

Страница 116: ...a cha ne Appuyez sur CH pour diminuer le num ro de la cha ne En utilisant les touches num riques 0 9 Vous pouvez s lectionner le num ro de la cha ne en appuyant sur 0 9 De plus lorsque le t l viseur e...

Страница 117: ...r le sous menu d sir 4 Appuyez sur le bouton ENTRER pour acc der au sous menu 5 Appuyez sur les boutons pour s lectionner la valeur souhait e Le r glage de l OSD peut varier en fonction du menu s lect...

Страница 118: ...S lectionnez le num ro de cha ne Color System S lectionner le syst me de couleurs Sound System S lectionner le syst me audio R glage pr cis R gler la fr quence du canal Rechercher Appuyez sur la le bo...

Страница 119: ...riques D marrer Appuyez sur le bouton ENTRER pour lancer la recherche automatique R glage manuel ATV M morisation manuelle des cha nes ATV Canal actuel S lectionnez le num ro de cha ne Color System S...

Страница 120: ...e Scramble Free Type de service Appuyez sur les boutons pour s lectionner le Type de service Tout DTV Radio Type LNB S lectionner le type du LBN Puissance LNB S lectionner le type d alimentation pour...

Страница 121: ...r l emplacement Direction Latitude D finit la direction de Latitude pour l emplacement Angle Latitude D finit l angle de Latitude pour l emplacement Modification de programme Appuyez sur les boutons p...

Страница 122: ...Mode Image Vous pouvez s lectionner le type d image qui correspond le mieux vos crit res de visionnement La Contraste Luminosit Couleur Teinte et Nettet peuvent tre ajust es lorsque le mode d image es...

Страница 123: ...a ses propres conditions de signal le r glage du volume peut tre n cessaire chaque fois que la cha ne est chang e Cette fonctionnalit permet aux utilisateurs de profiter de niveaux de volume stables...

Страница 124: ...lways que vous voulez Fuseau horaire Appuyez sur les boutons pour s lectionner le fuseau horaire Menu de Verrouillage Verrouiller syst me La fonction peut emp cher les op rations non autoris es sur le...

Страница 125: ...olume par d faut pour chaque fois que vous allumez le t l viseur Mode d h tel Appuyez sur les boutons pour s lectionner le Mode H tel puis appuyez sur le bouton ENTRER pour passer en mode H tel Mode d...

Страница 126: ...ue des sous titres Sous titrage malentendants Appuyez sur les boutons pour s lectionner Malentendants appuyez sur les boutons pour s lectionner Marche Arr t Ratio d aspect Vous pouvez s lectionner la...

Страница 127: ...au t l viseur Device Menu Appuyez sur le bouton ENTRER pour ouvrir le menu principal de l appareil pour s lectionner le mode m moire ou le mode d accueil Appuyez sur les boutons Mode Setting Menu de...

Страница 128: ...edia Extension de fichier Codec Remarque Vid o Audio Vid o mpg MPEG 1 MPEG 2 MP3 AAC PCM R solution maximale 1920 1080 D bit de donn es max 40 Mbps avi MJPEG MPEG 4 SP ASP H 263 H 264 R solution maxim...

Страница 129: ...outon ENTRER pour acc der au sous menu 2 Utilisez les touches fl ch es et le bouton ENTRER pour entrer acc der au disque souhait Appuyez sur ENTRER pour ouvrir le dossier 3 Utilisez les touches fl ch...

Страница 130: ...la barre d outils l cran Appuyez sur ou SORTIE pour quitter la lecture et revenir la page des listes de fichiers Lors de la lecture des fichiers de Musique Utilisez les boutons puis appuyez sur ENTER...

Страница 131: ...la page des listes de fichiers Lors de la lecture des fichiers Texte Appuyez sur le bouton INFO de la t l commande pour masquer afficher la barre d outils l cran Utilisez les boutons puis appuyez sur...

Страница 132: ...puyez sur le bouton EPG ou SORTIE pour quitter Liste des cha nes Appuyez sur le bouton LISTE pour afficher la liste des cha nes Appuyez sur les boutons pour s lectionner la cha ne et appuyez sur ENTRE...

Страница 133: ...une nouvelle fois pour agrandir la partie inf rieure de la page 3 Appuyez sur la touche une fois suppl mentaire pour retourner l affichage normal Mode d affichage Vous pouvez afficher les informations...

Страница 134: ...rdon est d une qualit inf rieure Pas d image pas de son et le voyant lumineux est vert bleu Levolume est au minimum ou la TV est en mode muet Ajuster le volume Le cordon n est pas correctement connect...

Страница 135: ...r contre les d g ts dus la foudre ou aux ventuelles surtensions Enl vement des appareils m nagers lectriques Electriques et Electroniques DEEE exige que les appareils m nagers usag s ne soient pas jet...

Страница 136: ...lazione 12 Scegliere un canale 14 Cambio della sorgente d ingresso 14 Come navigare nei menu 15 Regolazione del volume 14 Funzionamento dei menu 15 Menu Canale 15 Menu Blocca 22 Menu Immagine 20 MODO...

Страница 137: ...circuito diverso da quello alla quale collegato il ricevitore d Consultare il commerciante o il tecnico radio TV per farvi aiutare ATTENZIONE Non tentare di modificare il prodotto in qualsiasi modo s...

Страница 138: ...ini d incenso sopra al tv 4 Ventilazione Quando installate la tv tenete una distanza di almeno 10 cm tra la tv e gli altri oggetti muri lati degli armadi ecc per assicurare una ventilazione appropriat...

Страница 139: ...aumentano il rischio di incendio 15 Sostituzione parti Nel caso ci sia il bisogno di sostituire delle parti del prodotto assicuratevi che l assistenza utilizzi ricambi specificati dal costruttore o co...

Страница 140: ...iasi fonte di calore come radiatori termosifoni stufe o altri apparati incluso amplificatori 6 Pulire solo con un panno asciutto Scollegare il prodotto dalla presa di corrente prima di pulirlo Non usa...

Страница 141: ...entazione non venga calpestato o schiacciato in particolare vicino alle spine prese multiple e in tutti I punti dove esce dall apparecchio 13 Per aumentare la protezione del vostro prodotto durante un...

Страница 142: ...ON INTERFACE PC AUDIO HDMI1 ARC AV YPbPr_R L Sensorea infrarossi Indicatore alimentazione Accende e spegne l apparecchio TV Apre e chiude il menu Cambia i canali Regola il livello del volume Il tasto...

Страница 143: ...ionano tramite mini terminale e condividono lo stesso audio utilizzare un cavo audio video one to three CI Permette di inserire il modulo CI per la visione dei canali criptati NOTA L alimentazione del...

Страница 144: ...dall alimentazione non toccare direttamente le parti metalliche Italiano 8 Computer SPDIF Video Audio L Audio R Pr Cr Pb Cb Y Audio L Audio R COMMON INTERFACE Cuffia Chiavetta USB Modulo CI Dispositi...

Страница 145: ...e una perdita di sostanze chimiche e o esplosione Prendete nota di quanto segue Assicuratevi sempre che le batterie siano inserite con I terminali e nella direzione esatta come mostrato nel compartime...

Страница 146: ...MENU premere per mostrare nascondere I menu sullo schermo o interrompere alcune operazioni 8 EXIT esce dall interfaccia corrente 9 per selezionare la direzione 10 ENTER selezionare o confermare una vo...

Страница 147: ...bloccarla entra nel Televideo premere ancora per la modalit MIX premere nuovamente per uscire Play Pausa in modalit Media programmi tv in modalit DTV e viceversa regola il formato dello schermo cambia...

Страница 148: ...i ad esempio quando ci sono problemi sull emittente televisiva In modalit PC il tv si spegner automaticamente dopo 90 secondi di mancanza del segnale Quando si collega il cavo VGA il tv si accende aut...

Страница 149: ...i per selezionare la Frequenza Auto o in automatico i numeri Velocit dei simboli Premere i pulsanti per selezionare Symbol Rate Auto o Avvio Premere il pulsante ENTER per avviare la ricerca automatica...

Страница 150: ...l tasto 5 Per selezionare il canale 20 premere I tasti 2 e 0 in breve tempo Scegliere un canale Premere I tasti VOL per regolare il volume Se volete eliminare l audio premere E possibile ripristinare...

Страница 151: ...lla sorgente utilizzata I tasti sul TV hanno la stessa funzione di quelli corrispondenti sul telecomando Se avete perso il telecomando o non funziona potrete utilizzare I tasti sul TV per selezionare...

Страница 152: ...izzazione automatica Premere il pulsante ENTER per accedere al sottomenu Paese Premere i pulsanti per selezionare il paese desiderato Tipo di sintonizzazione automatica Premere i pulsanti per selezion...

Страница 153: ...ere un nuovo satellite transponder Modalit di scansione premere I tasti per scegliere la modalit di scansione tra Prestabilito BlindScan Rete Tipo di canale premere I tasti per scegliere il tipo di ca...

Страница 154: ...antenna a che non viene fermata manualmente regolazione fine dell antenna Quando il motore impostato su DiSEqC1 3 Longitudine Direzione imposta la direzione longitudinale per la posizione Longitudine...

Страница 155: ...MCIA seguendo il senso della freccia NOTA Questa funzione disponibile solo se inserito un modulo CI E possibile cambiare la schermata del menu CI Common Interface consultando il vostro fornitore Si pr...

Страница 156: ...ensit delle sezioni nere nell immagine Colore regola l intensit del colore dell immagine Tono regola la tonalit dell immagine solo in modalit NTSC Nitidezza regola la nitidezza dell immagine aggrada R...

Страница 157: ...o visualizza l ora corrente del segnale DTV Fuso orario premere I tasti per selezionare il fuso orario Timer di spegnimento seleziona il tempo dopo il quale il TV va in standby automaticamente Spegn a...

Страница 158: ...Blocca programma In modalit ATV DTV Premere il tasto verde per bloccare i canali che volete Premere nuovamente il tasto verde per sbloccarli Per vedere un canale bloccato inserire I 4 numeri della pas...

Страница 159: ...a il volume predefinito che desiderate avere ad ogni accensione del TV Volume Max Imposta il volume massimo che si pu regolare Importa Database Se non possibile ripristinare le impostazioni dei canali...

Страница 160: ...ollegare l alimentazione o la memoria USB fino a che l aggiornamento non completato Modo Domestico premere I tasti per selezionare Modalita Casa o Modo Negozio HDMI CEC premere I tasti per selezionare...

Страница 161: ...la posizione verticale dell immagine Dimensioni regola le dimensioni dello schermo Fase regola la fase dell immagine Ripristino di posizione regola la Posizione Immagine se non si adatta al tv Per pr...

Страница 162: ...MPEG 2 H 264 HEVC Italiano 26 MUSICA mp3 MP3 Sample Rate 8K 48KHz Bit Rate 32K 320Kbps m4a aac AAC Sample Rate 16K 48KHz Channel Mono Stereo FOTO jpg jpeg Progressive JPEG Max Resolution 1024 768 Bas...

Страница 163: ...e I file selezionati Se non stato selezionato alcun file tutti I file all interno della cartella verranno riprodotti in sequenza dopo aver premuto il tasto 4 Premere per fermare la riproduzione 5 Prem...

Страница 164: ...e tornare alla lista dei file Quando si riproduce un Film Premere il tasto INFO sul telecomando per mostrare nascondere la barra degli strumenti Usare I tasti quindi premere ENTER per selezionare una...

Страница 165: ...tasti quindi premere ENTER per selezionare una funzione come Play Pausa File Precedente File Successivo sulla barra degli strumenti Premere I tasti o EXIT per uscire dalla riproduzione e tornare alla...

Страница 166: ...tasto LIST per mostrare la Lista Canali Premere I tasti per selezionare il canale e premere ENTER per guardarlo Premere I tasti CH CH per salire o scendere di pagina nella Lista Canali Premere il tast...

Страница 167: ...te una pagina possibile raddoppiare le dimensioni del testo per facilitarvi la lettura 1 Premere il tasto per ingrandire la met superiore della pagina 2 Premere il tasto nuovamente per ingrandire la m...

Страница 168: ...avo adatto No immagine no audio e indicatore led verde blu Il volume al minimo o il TV in muto Regolare il volume Il cavo d antenna non collegato correttamente Collegare il cavo correttamente Schermo...

Страница 169: ...i che l acqua in eccesso non vada sullo schermo quindi lasciatelo asciugare prima di riaccendere il tv Pulizia del cabinet Per rimuovere sporco o polvere pulire il cabinet con un panno privo di lanugg...

Страница 170: ...televisor 12 Men de imagen C mo cambiar la se al de entrada Funcionamiento de los men s Funcionamiento del men principal Men de sonido Men de hora Men de pantalla Funcionamiento de medios Men de bloqu...

Страница 171: ...est conectada la unidad receptora d Consultar con el distribuidor o con un t cnico especializado en radio TV PRECAUCI N NO intente modificar en modo alguno este producto sin la autorizaci n por escrit...

Страница 172: ...s de incienso sobre el televisor 4 Ventilaci n Al instalar el televisor mantenga una distancia de al menos 4 pulgadas entre el televisor y otros objetos paredes laterales de armarios etc para asegurar...

Страница 173: ...erivados 10 El enchufe de alimentaci n del aparato se usa como dispositivo de desconexi n y deber permanecer accesible 11 Montaje en pared Al montar el producto en la pared aseg rese de instalarlo sig...

Страница 174: ...res calefactores estufas u otros aparatos incluyendo amplificadores que produzcan calor 6 Limpie s lo con un pa o seco 9 No inutilice el dispositivo de seguridad del enchufe polarizado o con conexi n...

Страница 175: ...aci n de ser pisado o aplastado en especial en los enchufes tomacorrientes y el punto en que sale del aparato 13 Desenchufe este aparato durante las tormentas el ctricas o cuando no se utilice durante...

Страница 176: ...les COMMON INTERFACE PC AUDIO HDMI1 ARC AV YPbPr_R L 6 DIGITAL AUDIO OUT Sensor infrarrojos Indicador de encendido Enciende y apaga el televisor Abre y cierra el men Cambia canales Ajusta el volumen L...

Страница 177: ...YPbPr y el AV funcionan como miniterminal y comparten el mismo audio elija utilizar un cable audio y v deo de tres conectores Con ctelo a sus auriculares o equipo de audio NOTA dicho rango Conexi n y...

Страница 178: ...e directamente la parte met lica del cable SPDIF Video Audio L Audio R Yellow White Red Red Blue Green Pr Cr Pb Cb Y Audio L White Audio R Red COMMON INTERFACE CI Auriculares Unidad USB El equipo con...

Страница 179: ...minales y en la posici n correcta de acuerdo con lo mostrado en su compartimiento Diferentes tipos de bater as presentan diferentes caracter sticas No combine diferentes tipos No mezcle bater as vieja...

Страница 180: ...cionar direcci n bajar el volumen canales en modo ascendente o descendente 15 SLEEP Presione para ajustar el temporizador de descanso Cuando el tiempo predeterminado haya pasado el TV entrar en modo d...

Страница 181: ...salir Pulse de nuevo para salir media Cambia tama o de la pantalla de PAjustar la relaci n de aspecto de visualizaci n teletexto en modo de visualizaci n subt tulos DTV Volver al ltimo canal visto 0...

Страница 182: ...pausa 10 minutos despu s de quedase sin se al por ej programas interrumpidos por la cadena de TV En modo PC el televisor se apagar autom ticamente tras 90 segundos sin se al Cuando se conecta el cable...

Страница 183: ...d Autom tica o introducir d gitos Frecuencia Presione los botones para seleccionar la frecuencia Autom tica o introducir d gitos Velocidad de s mbolos Presione los botones para seleccionar la velocida...

Страница 184: ...el Puede desactivar el silencio presionando el o subir el volumen 14 El tipo de se al es sat lite Sat lite Pulse los botones para seleccionar el sat lite actual Modo de b squeda Pulse los botones para...

Страница 185: ...apartado deseado 4 Presione el bot n ENTER Entrar para acceder al submen 5 Presione los botones para seleccionar el valor deseado El ajuste en la OSD puede ser diferente seg n el men seleccionado 6 P...

Страница 186: ...es ATV Canal actual Establece el n mero del canal Color System Selecciona el sistema de color Sound System Selecciona el sistema de sonido Ajuste fino Ajuste preciso de la frecuencia del canal Buscar...

Страница 187: ...autom tica Pulse el bot n ENTRAR para entrar al submen Pa s Pulse el bot n para seleccionar pa s Sat lite Pulse el bot n para seleccionar sat lite actual Modo de b squeda Pulse el bot n para seleccio...

Страница 188: ...ajustes de l mite Permite a la antena girar el Cancela los l mites este y oeste Establecer posici n Pulse el bot n amarillo para establecer la posici n Mover autom ticamente Hace rotar la antena auto...

Страница 189: ...n que desee Presione el bot n AZUL para saltar el canal seleccionado Su aparato de TV se saltar autom ticamente el canal al usar CH para visualizar los canales Presione el bot n para establecer los c...

Страница 190: ...r Ajusta la intensidad de los colores de la imagen Matiz Ajusta las tonalidades de los colores de la imagen Solo en modo NTSC Nitidez Se realzan los bordes de los objetos para tener im genes m s detal...

Страница 191: ...Funci n ambliop a para los invidentes se mezclan las pistas de sonido para describir lo que hay en pantalla Necesita codestream para soportarla Men de hora Reloj Muestra el tiempo de conexi n de la s...

Страница 192: ...modo ATV DTV Presione el bot n verde para bloquear el canal disponible que desee Presione el bot n verde nuevamente para desbloquearlo Para ver un canal bloqueado introduzca su contrase a de 4 d gitos...

Страница 193: ...iende el televisor Volumen Max Establece el volumen m ximo que puede ajustar Importar Base de datos Si no puede restaurar la informaci n inicial de los canales despu s de clasificar mover saltar bloqu...

Страница 194: ...n puede ver informaci n importante del c digo de registro sobre el DivX Actualizar el software USB Actualiza el software usando el dispositivo de memoria USB Tenga cuidado de no desconectar la corrien...

Страница 195: ...e la imagen si no se ajusta al televisor Funcionamiento de medios Primero inserte el dispositivo de memoria USB en el puerto USB Presione el bot n SOURCE Fuente para llamar al men de selecci n de entr...

Страница 196: ...progresivo Resoluci n m x 1024 768 JPEG l nea de base Resoluci n m x 15360 8640 bmp BMP Resoluci n m x 9600 6400 Profundidad de p xeles 1 4 8 16 24 32 BPP 9600 6400 png no entrelazado Resoluci n m x 9...

Страница 197: ...o hay un archivo seleccionado se reproducir n todos los archivos de la carpeta en orden despu s de presionar el bot n 4 Presione el para detener la reproducci n de los archivos 5 Presione el bot n EXI...

Страница 198: ...reproducci n y volver a la p gina de lista de archivos Al reproducir archivos de pel culas Presione el bot n INFO del mando a distancia para esconder mostrar la barra de herramientas en pantalla Use l...

Страница 199: ...NTER Entrar para seleccionar una funci n como Previous Anterior Next Siguiente Rotate Girar Enlarge Agrandar en la barra de herramientas en pantalla Presione los botones o EXIT para salir de la reprod...

Страница 200: ...el bot n EPG o EXIT Salir para salir Lista de canales Presione el bot n LIST para mostrar la lista de canales Presione el bot n para seleccionar Todo TDT Registro de radios Fecha HD Free etc Use los...

Страница 201: ...la mitad inferior de la p gina 3 Pulse el bot n una tercera vez para volver a la visualizaci n normal Modo Reveal Puede mostrar informaci n oculta del teletexto por ejemplo respuesta a los rompecabez...

Страница 202: ...w grade or the signal cord is in a lower quality Use the qualified signal cord No picture no sound and indicator light is green blue Volume is in the minimum value or TV is in mute mode Adjust the val...

Страница 203: ...es da os por rayos o subidas de tensi n Eliminaci n de electrodom sticos viejos La directiva europea 2012 19 EU sobre residuos de aparatos el ctricos y electr nicos RAEE establece que los electrodom s...

Отзывы: