Champion Power Equipment 41311 Скачать руководство пользователя страница 20

Maintenance 

16 


Rev 41311-20100311 E


Spark Arrester 

1.


Allow the engine to cool completely 
before servicing the spark arrester. 

2.


Remove the two screws holding the 

cover plate which retains the end of the 
spark arrester to the muffler. 

3.


Remove the spark arrester screen. 

4.


Carefully remove the carbon deposits 
from the spark arrester screen with a 

wire brush. 

5.


Replace the spark arrester if it is 
damaged. 

6.


Position the spark arrester in the 
muffler and attach with the two screws. 


 CAUTION 

Failure to clean the spark arrester will result in 
degraded engine performance. 
 

Cleaning 

 CAUTION 

DO NOT spray engine with water. 

Water can contaminate the fuel system. 


Use a damp cloth to clean exterior surfaces 
of the engine. 

Use a soft bristle brush to remove dirt and 

oil. 
Use an air compressor (25 PSI) to clear dirt 

and debris from the engine. 

Adjustments 

The air-fuel mixture is not adjustable. 

Tampering with the governor can damage 

your generator and your electrical devices 
and will void your warranty. CPE 

recommends that you contact our service 

line at 1-877-338-0999 for all other service 
and/or adjustment needs. 

Maintenance Schedule 

Follow the service intervals indicated in the 
schedule below.  

Service your generator more frequently 

when operating in adverse conditions.  

Contact our help line at 1-877-338-0999 to 

locate the nearest Champion Power 
Equipment certified service dealer for your 

generator or engine maintenance needs. 


Every 8  hours or daily 


Check oil level 


Clean around air intake and muffler 

First 5 Hours 


Change oil 

Every 50 hours or every season 


Clean air filter 


Change oil if operating under heavy load 
or in hot environments 

Every 100 hours or every season 


Change oil 


Clean/Adjust spark plug 


Check/Adjust valve clearance * 


Clean spark arrester 


Clean fuel tank and filter * 

Every 3 years 


Replace fuel line 


*  To be performed by knowledgeable, 

experienced owners or Champion Power 
Equipment certified service dealers 


Generator Maintenance 

Make certain that the generator is kept clean 

and stored properly. Only operate the unit 

on a flat, level surface in a clean, dry 
operating environment. DO NOT expose the 

unit to extreme conditions, excessive dust, 
dirt, moisture or corrosive vapors.  

 CAUTION 

DO NOT use a garden hose to clean the 
generator. 

Water can enter the generator through the 
cooling slots and damage the generator 
windings. 

 
Use a damp cloth to clean exterior surfaces 

of the generator. 

Use a soft bristle brush to remove dirt and 
oil. 

Use an air compressor (25 PSI) to clear dirt 

and debris from the generator.  
Inspect all air vents and cooling slots to 

ensure that they are clean and unobstructed. 

Содержание 41311

Страница 1: ...Fe Springs Road Santa Fe Springs CA 90670 USA Made in China 7000 Peak Watts 6000 Running Watts PORTABLE GENERATOR SAVE THESE INSTRUCTIONS Important Safety Instructions are included in this manual Owne...

Страница 2: ......

Страница 3: ...3 Wattage Reference Chart 14 Maintenance 15 Engine Maintenance 15 Oil 15 Spark Plugs 15 Air Filter 15 Spark Arrester 16 Cleaning 16 Adjustments 16 Maintenance Schedule 16 Generator Maintenance 16 Stor...

Страница 4: ......

Страница 5: ...nt Accessories Champion Power Equipment manufactures and sells accessories designed to help you get the most from your purchase To find out more about our covers power cables and storm kits please vis...

Страница 6: ...mminently hazardous situation which if not avoided will result in death or serious injury WARNING WARNING indicates a potentially hazardous situation which if not avoided could result in death or seri...

Страница 7: ...KILL YOU IN MINUTES DANGER Rotating parts can entangle hands feet hair clothing and or accessories Traumatic amputation or severe laceration can result Keep hands and feet away from rotating parts Ti...

Страница 8: ...gas cap air filter spark plug fuel lines and exhaust system are properly in place Allow spilled fuel to evaporate fully before attempting to start the engine Make certain that the generator is resting...

Страница 9: ...r intended uses Operate only on level surfaces DO NOT expose generator to excessive moisture dust or dirt DO NOT allow any material to block the cooling slots If connected devices overheat turn them o...

Страница 10: ...city fuel tank 2 Fuel Valve Turn this valve to the On position to supply fuel to the engine 3 Choke Lever Used to start the engine 4 Air Cleaner Protects the engine by filtering dust and debris from t...

Страница 11: ...240 V 30 A Twist Lock protected by a 30 A push to reset circuit breaker on each 120 Volt leg of the receptacle This receptacle powers 240 Volt AC 60 Hz single phase loads requiring up to 25 A or 6000...

Страница 12: ...ece 10 Solid Wheel 2 pieces Support Leg 1 piece Vibration Mounts 2 pieces Bolt Kit Wheel Retaining Pins 2 pieces Flat Washers 2 pieces Cap Screws and Nuts 6 sets Oil Funnel 1 piece Spark Plug Socket 1...

Страница 13: ...to install the wheel kit Not Included 12 mm wrench Socket wrench with a 12 mm socket Pliers 1 Before adding oil to the engine tip the generator slowly so that the engine side is up 2 Slide the axle th...

Страница 14: ...ended type and amount of oil Damage to the generator as a result of failure to follow these instructions will void your warranty 1 Place the generator on a flat level surface 2 Remove oil fill cap dip...

Страница 15: ...g the fuel tank Grounding Your generator must be properly connected to an appropriate ground to help prevent electric shock WARNING Failure to properly ground the generator can result in electric shoc...

Страница 16: ...oltage fluctuations 2 Obtain an Uninterruptible Power Supply UPS device Most UPS devices come with a rechargeable battery between the electronic equipment and power supply source The device buffers th...

Страница 17: ...for several minutes to stabilize internal temperatures of the engine and generator 3 Turn the ignition switch to the Off position 4 Turn the fuel valve to the Off position Do Not Overload Generator Ca...

Страница 18: ...000 Water Heater 4000 Security System 180 AM FM Radio 300 Garage Door Opener 1 2 HP 500 600 Battery Charger 12V DC 110 Heating Cooling Air Conditioner 12000 BTU 1700 2500 Fan 300 600 Furnace Fan 1 3 H...

Страница 19: ...g with a 15 mm socket and extension 2 Allow the oil to drain completely 3 Replace the drain plug 4 Remove oil fill cap dipstick to add oil 5 Add 1 16 qt 1 1 L of oil and replace oil fill cap dipstick...

Страница 20: ...generator more frequently when operating in adverse conditions Contact our help line at 1 877 338 0999 to locate the nearest Champion Power Equipment certified service dealer for your generator or eng...

Страница 21: ...the fuel line and carburetor to prevent gum from forming 4 Add a fuel stabilizer into the fuel tank 5 Change the oil 6 Remove the spark plug and pour about ounce of oil into the cylinder Crank the en...

Страница 22: ...pacity is 6 5 gallons 25 L Use regular unleaded gasoline with a minimum octane rating of 85 Oil Oil capacity is 1 16 qt 1 1 L Spark Plugs Your generator comes equipped with a 3 4 long reach plug 19mm...

Страница 23: ...Specifications Rev 41311 20100311 E 19 Parts Diagram...

Страница 24: ...T02FD 05302001 L30 30 Amp Circuit Breaker 2 24 2910 Relay 1 25 GB1667 S5 12 Screw M5 12 1 26 ST188F 1020001 Grommet 1 27 ST05FD 05205002 Control Box 1 28 GB90 W 5 Washer 5 6 29 GB1667 S5 38 Screw M5 3...

Страница 25: ...Fuel Cock 1 75 ST188FD 1160002 Fuel Tube 1 76 ST188FD 1070006A Clip 2 77 ST182FD 1742001 CPE Fuel Tank Wing 2 78 ST05FD 03351000 5 Frame 1 79 ST182FD 1742202 UC Handle Underlay 2 80 GB896 86 UB6 Baffl...

Страница 26: ...20100311 E Item Part Number Description Qty 106 GB5789 FB8 25 Flange Bolt M8 25 2 107 ST188FD 1743002 C Vibration Mount 2 108 ST177FD 1743001 84 Support Leg 1 109 GB5789 FB8 16 Flange Bolt M8 16 2 11...

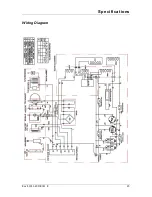
Страница 27: ...Specifications Rev 41311 20100311 E 23 Wiring Diagram...

Страница 28: ...erheating Generator is overloaded Review load and adjust See Power Management Insufficient ventilation Check for air restriction Move to a well ventilated area No AC output Cable not properly connecte...

Страница 29: ...hole Installation Use and Maintenance This warranty will not apply to parts and or labor if this generator is deemed to have been misused neglected involved in an accident abused loaded beyond the gen...

Страница 30: ...bject to provisions set forth below If during the warranty period emission related part on your engine is defective in materials or workmanship the part will be repaired or replaced by CPE OWNER WARRA...

Страница 31: ...od A statement in such written instructions to the effect of repair or replace as necessary shall not reduce the ECS Warranty Period Any such part repaired or replaced under the ECS Warranty shall be...

Страница 32: ...d with these listed systems TO OBTAIN WARRANTY SERVICE You must take your CPE engine or the product on which it is installed along with your warranty registration card or other proof of original purch...

Страница 33: ...Notes Rev 41311 20100311 E 29 Notes...

Отзывы: