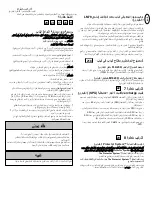
Chamberlain LM3800TXSA Скачать руководство пользователя страница 8

7-en

ADJUSTMENT STEP 2

Setting the Force

The force setting button is located on the front panel. The force
setting measures the amount of force required to open and close
the door.

3

0

1. Locate the orange button on the unit.

2. Push the orange button twice to enter unit into Force Adjustment

Mode. The LED (Indicator Light) will flash quickly.

3. Push the remote control or door control. The door will travel to the

DOWN (close) position. Push the remote control or door control again,
the door will travel to the UP (open) position. Push the remote control
or door control a third time to send the door to the DOWN (close)
position.

The LED (Indicator Light) will stop flashing when the force has been
learned.

The unit has learned the forces required to open and close your door.

The door must travel through a complete cycle, UP and DOWN, in order
for the force to be set properly. If the unit cannot open and close your
door fully, inspect your door to insure that it is balanced properly and is
not sticking or binding. 

See page 3, “Preparing your door.”

ADJUSTMENT STEP 3

Test Cable Tension Monitor

If your cable tension monitor has been activated the unit will click 9
times. See page 19.

ADJUSTMENT STEP 4

Test Power Door Lock

TEST

• With the door fully closed, the power door lock bolt should be

protruding through the track.

• Operate the door in the open direction. The power door lock should

retract before the door begins to move.

• Operate the door in the down direction. When the door reaches the

fully closed position, the power door lock should automatically activate
to secure the door.

NOTE:

If the power door lock does not function, the lock can be

manually released by sliding the manual release handle to the open
position.

3

1

ADJUSTMENT STEP 5

Test the Safety Reversal System

TEST

• With the door fully open, place a 50mm (1 1/2”) board (or a 4x2 laid

flat) on the floor, centered under the the door.

• Operate the door in the down direction. The door 

must

reverse on

striking the obstruction. Upon successful safety reversal test proceed
to 

Adjustment Step 4

.

ADJUST

• If the door stops on the obstruction, it is not traveling far enough in the

down direction. Complete Adjustment Steps 1 and 2 Programming the
Limits and Forces.

• Repeat the test.

• When the door reverses on the 50mm (1 1/2”) board (or 4x2 laid flat),

remove the obstruction and run the operator through 3 or 4 complete
travel cycles to test adjustment.

• If the unit continues to fail the Safety Reverse Test, call for a trained

door systems technician.

IMPORTANT SAFETY CHECK:

Test the Safety Reverse System after:

• Each adjustment of limits, or force controls.

• Any repair to or adjustment of the door (including springs and

hardware).

• Any repair to or buckling of the floor.

• Any repair to or adjustment of the operator.

3

2

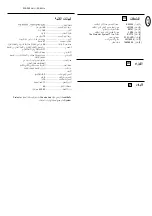
Содержание LM3800TXSA

Страница 1: ...Garage Door Operator Model LM3800TXSA Chamberlain GmbH Alfred Nobel Strasse 4 D66793 Saarwellingen www liftmaster eu info liftmaster eu Optional Accessory Available en ar LM3800TXSA...

Страница 2: ...oor balanced Do not let the garage door opener compensate for a binding or sticking garage door Sticking or binding doors must be repaired Garage doors door springs cables pulleys brackets and their h...

Страница 3: ...uded in the carton This operator is compatible with Doors that use a torsion bar springs and a door no more than 4 2m high 80mm 178mm drums NOT TO BE USED on tapered drums over 152mm High lift and sta...

Страница 4: ...w 8x1 2x Self Tapping Screw 10 32 4x Wall Anchor 6x Handle 1x Rope 1x Insulated Staples 20x Bracket 2x Bit 1x Bell Wire 093B0867 5 6 ASSEMBLY STEP 1 Attach the Collar to the Motor Unit To avoid instal...

Страница 5: ...erator by sliding the collar over the torsion bar until pilot holes align with bracket Securely tighten collar screws that attach to the torsion bar to 16Nm 19Nm of torque Securely tighten both set sc...

Страница 6: ...h conduit cut to proper length and strip insulation Attach with wire nuts not provided Properly secure wire under plastic ties so that wire does not come in contact with moving parts Reinstall the cov...

Страница 7: ...parate refer to FLA230 manual Connection of Door in Door Switch 16200LM optional accessory Prevents operator from starting if door in door is open See drawing for wiring Additional material is require...

Страница 8: ...ld be protruding through the track Operate the door in the open direction The power door lock should retract before the door begins to move Operate the door in the down direction When the door reaches...

Страница 9: ...d aligned 1 If open the door will close If closed it will open 2 If closing the door will stop 3 If opening the door will stop 4 If the door has been stopped in a partially open position it will close...

Страница 10: ...ensor Short travel 150 200mm Unplug unit to reset Try to operate motor unit check diagnostic code If it is still flashing 5 times and motor unit moves 150 200mm 6 8 The unit s APE Absolute Positioning...

Страница 11: ...f not move the position of the mounting bracket 15 Power lock makes noise when operating Call Chamberlain Liftmaster dealer for replacement power lock TROUBLESHOOTING 1 The operator doesn t operate fr...

Страница 12: ...oise level 57dB Travel Rate 24rpm down 36rpm up Safety Personal Push button and automatic stop in down direction Push button and automatic stop in up direction Electronic Automatic force adjustment El...

Страница 13: ...ar E1702 2 3 50 TheProtector System 40 400 1 5...

Страница 14: ...2 ar EverCharge Protector System Protector System 4 2 80 178 152 4 2 5 5 16 2 25 1 64 76 205 25 100 1 CM475 EverChargeTM SPU 5 2 2 1...

Страница 15: ...3 ar 1 2 3 2 1 1 16 19 8 1 480LM LM3800A 14 10 x1 7 8 6 x 1 2 8 x1 2 10 32 4 6 1 1 20 2 1 3 4 6 5 9 9a 6 093B0867...

Страница 16: ...4 ar 1 2 3 4 5 1 8 6 7 8 1 5 9 10 11 50 1 2 1 2 3 1 5 2 1 2 3 4 25 1 8 4 16 19 3 5 1 2 3 8 4 5 6 3 11 10 12 13 14 15...

Страница 17: ...5 ar 22 1 3 7 6 o 4 90 22 1 1 6 128 LM 1 5 3800 128 LM 128 LM 2 25 1 2 8 2 1 5 5 3 5 16 3 4 5 6 5 1 2 6 1 4 4 1 2 3 4 5 32 6 5 1 2 16 17 18 19 20 21...

Страница 18: ...LA230 16200 LM 7 Evercharge SPU CM475 1 SPU 80 2 SPU SPU SPU SPU 2 SPU SPU 3 CM475 SPU 4 5 6 16 1 7 1 7 2 50 8 Protector System 400 40 Protector System 400 The Protector System The Protector System ar...

Страница 19: ...7 ar 2 1 2 LED 3 LED 3 3 9 5 50 1 2 1 4 x 2 4 1 2 50 1 2 1 4 x 2 3 4 4 32 30 31...

Страница 20: ...6 100 64 128 LM 1 2 3 4 5 6 7 Chamberlain Protector System IR Chamberlain Protector System IR 5 78 LM LED 1 10 45 3 4 3 5 1 2 5 ar 8 33 34 35...

Страница 21: ...LED 3 4 LED 5 RPM 9 30 60 LED RPM 150 200 5 150 200 6 8 APE Chamberlain 1 LED 30 2 LED 30 3 30 LED 4 LED 5 LED ar 9 36 37 38...

Страница 22: ...LED 6 9 1 2 LED LED LED LED 3 4 5 6 7 4 9 2 8 LED 4 2 9 LED 5 10 11 12 EverCharge 20 13 1 2 1 14 15 Chamberlain Liftmaster www liftmaster eu ar 10...

Страница 23: ...9747 E 4 78 LM 5 770 EV The Protector System 6 FLA1 LED 7 16200 LM 230 240 50 40 145 5 10 57 24 36 4 2 14 5 5 16 11 64 433 92 Chamberlain Protector System ar 11 39 40 41 220 240 Volt 50 60Hz E53349 1...

Страница 24: ...114A4864B...

Отзывы: