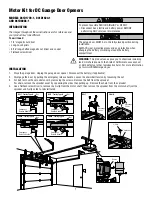
Chamberlain 041D1624-1 Скачать руководство пользователя страница 2

2

INSTALLATION

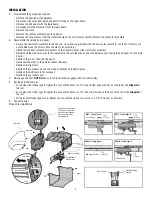
5.   Disassemble the garage door opener:
 

•  Remove the light lens (if applicable).


•   Disconnect the wires from quick-connect terminals on the logic board.


•   Remove the end panel with the logic board.


•   Disconnect all wire harnesses from the logic board.


•  Remove the cover.


•   Remove the motor assembly from the chassis.


•   Remove the wire harness from the travel module on the old motor assembly. Discard the old motor assembly.

6.   Reassemble the garage door opener:
 

 •   Secure the new motor assembly to the chassis. (If screws are provided with the new motor assembly, use them. If screws are 

not provided, use the screws from the old motor assembly.)


 •  Attach the old travel module wire harness to the travel module on the new motor assembly.


•   Reattach all the wire harnesses to the logic board (be sure the tabs on the wire harnesses are facing the end panel, not the logic 

board).


•   Reattach the cover, then the end panel.


•   Reconnect the wires to the quick-connect terminals.


•   Reattach the light lens.


•   Reattach the sprocket and use the C-clip to hold the sprocket in place.


•   Reattach the belt/chain to the sprocket.


•   Reattach the sprocket cover.

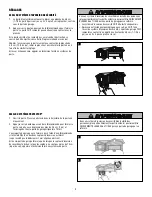
7.   Re-engage the door. 

NOTE: 

Make sure the inner trolley engages with the outer trolley.

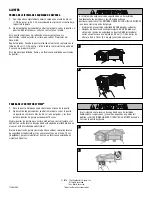
8.   Set the belt/chain tension:
 

•   For chains with trolley type A, tighten the nut until the chain is a 1/4 inch (6 mm) above the base of the rail at the 

midpoint

 of 

the rail.


•   For chains with trolley type B, tighten the nut until the chain is a 1/2 inch (13 mm) above the base of the rail at the 

midpoint

 of 

the rail.


•  For belts with trolley type A or B, tighten the nut until the spring is as close to 1-1/4" (3.18 cm) as possible.

9. Connect 

power.

Proceed to 

Adjustments

.

Tabs

Wire Harnesses

Logic Board

End Panel

Quick-Connect Terminals

To insert or remove the 
wires from the terminal, 
push in the tab with a 
screwdriver tip.

End Panel

Travel Module 
Wire Harness

Cover

Light Lens

Motor Assembly

1-1/4" 
(3.18 cm)

1/4" 
(6 mm)

1-1/4" 
(3.18 cm)

1/2" 
(13 mm)

Outer Trolley

Inner Trolley

Outer Trolley

Mid Length of Rail

Safety Reversing 
Sensors

Door Control

BELT - Trolley Type A

BELT - Trolley Type B

CHAIN - Trolley Type A

CHAIN - Trolley Type B

Содержание 041D1624-1

Страница 1: ...ease handle Loosen the chain belt tension by loosening the nut 3 For belt remove the sprocket cover by removing the screws Remove the belt from the sprocket For chain remove the sprocket cover by sque...

Страница 2: ...ch the light lens Reattach the sprocket and use the C clip to hold the sprocket in place Reattach the belt chain to the sprocket Reattach the sprocket cover 7 Re engage the door NOTE Make sure the inn...

Страница 3: ...ition press and release the Adjustment Button The garage door opener lights will flash twice and the UP Button will begin to flash 6 Press and release the UP Button When the door travels to the progra...

Страница 4: ...afety reversal system MUST be tested every month After ANY adjustments are made the safety reversal system MUST be tested Door MUST reverse on contact with 1 1 2 high 3 8 cm object or 2x4 laid at on t...

Страница 5: ...e de d verrouillage d urgence Rel cher la cha ne tendeur de cha ne en desserrant l crou 3 Pour la courroie retirer le couvercle du pignon en enlevant les vis Enlever la courroie du pignon Pour la cha...

Страница 6: ...r tenir le pignon en place Remettre la courroie cha ne sur le pignon Remettre en place le couvercle du logement des pignons 7 R engager la porte REMARQUE S assurer que le chariot int rieur s engage su...

Страница 7: ...ers le haut et le bas au besoin 3 Une fois que la porte est dans la position d ouverture d sir e appuyer sur le bouton de r glage et le rel cher L clairage de l ouvre porte de garage clignotera deux f...

Страница 8: ...r effectu quelque r glage que ce soit on DOIT faire l essai du syst me d inversion de s curit La porte de garage DOIT remonter au contact d un objet d une hauteur de 3 8 cm 1 1 2 de po ou un 2 x 4 pos...

Страница 9: ...he de emergencia Suelte la tensi n de la cadena o de la correa aflojando la tuerca 3 Para la correa retire la cubierta de la rueda dentada retirando los tornillos Retire la correa de la rueda dentada...

Страница 10: ...presilla en C para mantener la rueda dentada en el lugar Vuelva a fijar la correa o cadena de la rueda dentada Vuelva a fijar la cubierta de la rueda dentada 7 Reconecte la puerta NOTA Aseg rese de qu...

Страница 11: ...pueden utilizar para mover la puerta hacia arriba y hacia abajo seg n sea necesario 3 Una vez que la puerta est en la posici n deseada oprima y suelte el Bot n Ajuste Las luces del abre puertas de gar...

Страница 12: ...juste SE DEBE probar el sistema de reversa de seguridad La puerta DEBE retroceder al entrar en contacto con un objeto de 3 8 cm 1 1 2 de pulg de altura o de 5 x 10 cm 2 x 4 pulg acostado en el piso PR...

Отзывы: