background image

HELPLINE NO 08454 505299

13

ORIGINAL INSTRUCTIONS


5. Move the tool in long steady strokes 

    parallelto the grain using some lateral 

    motion to overlap the strokes by as much 

    as 75%. DO NOT apply excessive 

    pressure - let the tool do the work. 

    Excessive pressure will result in poor 

    handling, vibration, and unwanted 

    sanding marks

MAINTENANCE

          CAUTION!

1) Before any work on the machine itself, 

    pull the mains plug.

2) For safe and proper working, always 

    keep the machine and ventilation slots 

    clean.

3) Regularly check to see if any dust or 

    foreign matter has entered the grills near 

    the motor and  around the on/off switch. 

    Use a soft brush to remove any 

    accumulated dust. Wear safety glasses to 

    protect your eyes whilst cleaning.

4) If the body of the tool needs cleaning, wipe 

    it with a soft damp cloth. A mild detergent 

    can be used but nothing like alcohol, petrol 

    or other cleaning agent.

5) Never use caustic agents to clean plastic 

    part.

6) Lubricate all moving parts at regular 

    intervals.

   CAUTION Water must never come into 

   contact  with the tool.

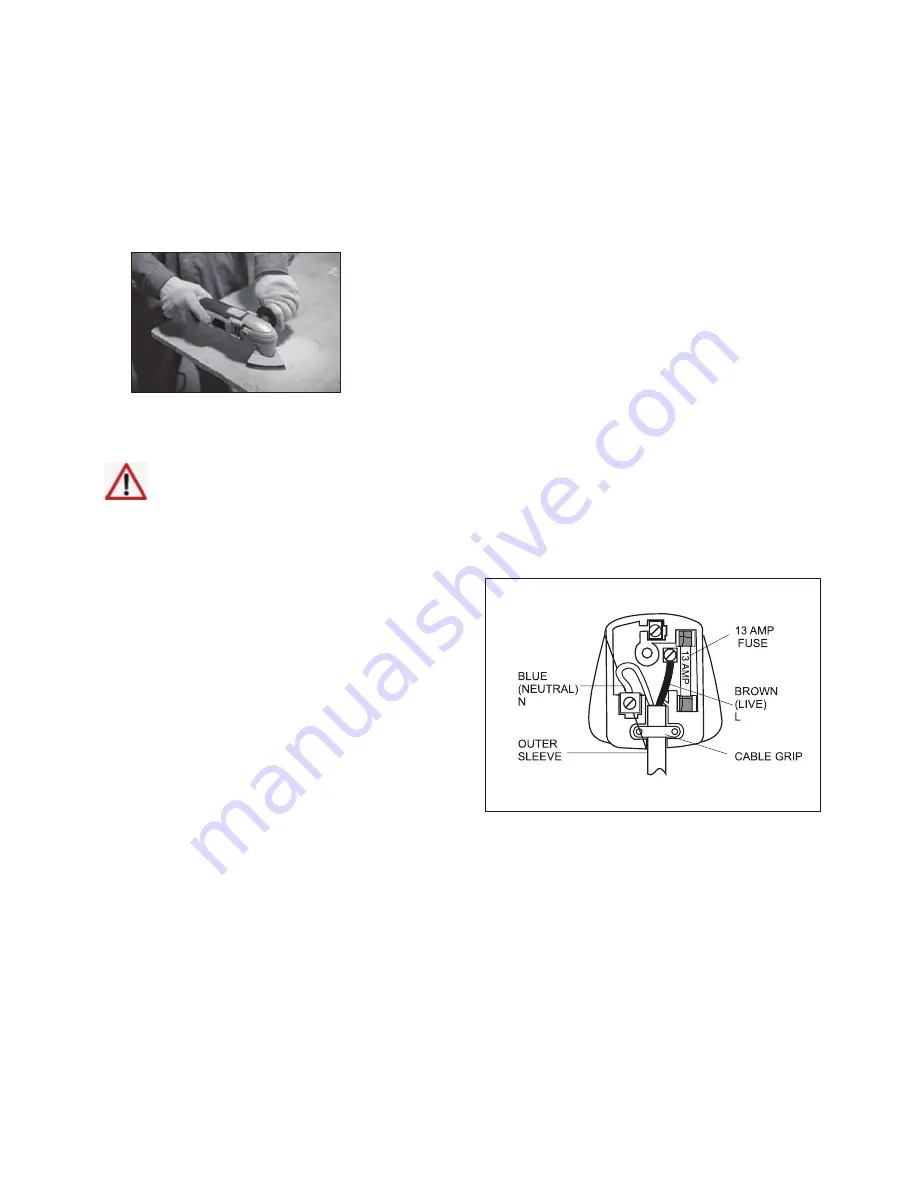
PLUG REPLACEMENT

Your Power Tool is supplied with a fitted

plug, however if you need to fit a new plug

follow the instruction below.

IMPORTANT

The wires in the mains lead are coloured in

accordance with the following code:

Blue = Neutral Brown = Live

As the colours of the wires in the mains

lead of this appliance may not correspond

with the coloured markings identifying the

terminals in your plug, proceed as follows:

The wire which is coloured blue must be

connected to the terminal which is marked

with 

N

.

The wire which is coloured brown must be

connected to the terminal which is marked

with the letter L.

If a 13 AMP (BS 1363/A) Plug is used, a

13 AMP Fuse must be fitted, or if any other

type of plug is used a 13 AMP Fuse must be

fitted, either in the Plug or Adaptor, or on the

Distribution Board.

Note: If a moulded plug is fitted and has to

be removed take great care in disposing

of the plug and severed cable, it must

be destroyed to prevent engaging into a

socket.

If the supply cord is damaged it must be

replaced by a service agent or a similarly

qualified person in order to avoid hazard.

Содержание PT100941

Страница 1: ...ORIGINAL INSTRUCTIONS 250W MULTI TOOL PT100941...

Страница 2: ...ite the dust or fumes Keep children and bystanders away while operating a power tool Distractions can cause you to lose control 2 Electrical safety Power tool plugs must match the outlet Never modify...

Страница 3: ...ication The correct power tool will do the job better and safer at the rate for which it was designed Do not use the power tool if the switch does not turn it on and off Any power tool that cannot be...

Страница 4: ...ion when working on plastic paint varnish etc Do not soak the materials or the surface you are about to work on with liquids containing solvents SAFETY WARNINGS FOR MULTI FUNCTION TOOLS Use the machin...

Страница 5: ...er must read instruction manual Warning Wear eye protection Wear ear protection Wear dust mask Double insulation Waste electrical products should not be disposed of with household waste Please recycle...

Страница 6: ...HELPLINE NO 08454 505299 6 ORIGINAL INSTRUCTIONS Pic A 8 9 10 11 1 2 3 4 5 6 7...

Страница 7: ...andle 8 Sanding sheet 9 Sanding pad 10 Segment cut blade 11 Hex key CHECK THE DELIVERY PARTS Carefully remove the machine from its packaging and check as the following parts are complete 250W multi to...

Страница 8: ...d pressure 82 4dB A A weighted sound power 93 4dB A KPA KWA 3 0dB A Wear ear protection when sound pressure is over 80dB A The declared vibration total value has been measured in accordance with a sta...

Страница 9: ...bration syndrome if its use is not adequately managed WARNING To be accurate an estimation of exposure level in the actual conditions of use should also take account of all parts of the operating cycl...

Страница 10: ...rovided Fig A Your accessories can be engaged into accessory holder 12 positions 30 degrees apart For intermediate position an adapter is provided that will allow you to attach the accessory in any po...

Страница 11: ...sawing close to edges in corners and hard to reach areas Example shortening already installed bottom rails or door hinges plunge cuts for adjusting floor panels Accessory Material Application HCS plu...

Страница 12: ...method This tool has two holes to change the auxiliary handle position SANDING 1 Sanding accessories are suitable for dry sanding of wood metal smaller surfaces corners and edges and hard to reach ar...

Страница 13: ...intervals CAUTION Water must never come into contact with the tool PLUG REPLACEMENT Your Power Tool is supplied with a fitted plug however if you need to fit a new plug follow the instruction below IM...

Страница 14: ...or alterations or has been the subject of commercial use In the event of a problem with the product within the guarantee period please contact the service centre for assistance on 08454 505299 If the...

Страница 15: ...min Oscillating angle 1 4o Protection class II Photograph Applicable EC Directives 2006 42 EC MD 2004 108 EC EMC 1999 5 EC R TTE 2006 95 EC LVD 2009 105 EC Pressure 2000 14 EC Annex 2005 88 EC 2009 12...

Отзывы: