background image


Audio/Video Ein-/Ausgang und HDMI-Anschluss 


1.


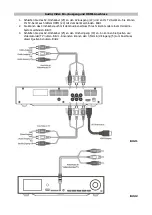
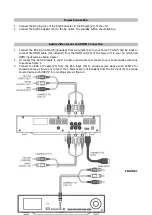
Schleißen Sie das AV-Cinchkabel (25) an den AV-Ausgang (22) und an Ihr TV-Gerät an. Sie können 

Ihr TV-Gerät auch mittels HDMI (20) mit dem Gerät verbinden. Bild 1 

2.


Sie können das Cinchkabel auch mit dem Audioanschluss Ihres Tv-Geräts oder einem Heimkino-

System verbinden. Bild 3 

3.


Schließen Sie das AV-Cinchkabel (25) an den Cincheingang (19) an. So können Sie Quellen wie 

Videorekorder/TV nutzen. Bild 1. Ansonsten können den 3,5mm-A/V-Eingang (5) zum Anschluss 
dieser Quellen benutzen. Bild 2 


Bild 1 


Bild 2 

Содержание electronic star 10005516

Страница 1: ...Video Aufnahmesystem mit USB SD Leser TFT Anzeige 10005516...

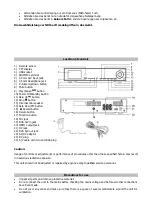
Страница 2: ...Mikrofonanschluss 19 Cinch AV Anschluss 20 HDMI Ausgang 21 DC Stromanschluss 22 Cinch AV Ausgang 23 Netzger t 24 DC Stecker 25 AV Kabel mit 2 Cinch Steckern Achtung Verwenden Sie das Ger t nur f r die...

Страница 3: ...mit dem Ger t verbinden Bild 1 2 Sie k nnen das Cinchkabel auch mit dem Audioanschluss Ihres Tv Ger ts oder einem Heimkino System verbinden Bild 3 3 Schlie en Sie das AV Cinchkabel 25 an den Cinchein...

Страница 4: ...Sie das Ger t in den Standby Modus Ein Aus Standby Taste 10 2 Schlie en Sie das USB Medium an oder legen Sie die Speicherkarte mit dem Pfeil nach oben ein Achten Sie hierbei das der USB Anschluss bzw...

Страница 5: ...unktionstaste 17 um zwischen CARD und USB Modus zu w hlen 3 Dr cken Sie die Aufnahmetaste 15 4 Dr cken vor und zur ck 11 14 um den Eingangskanal A V oder Cinch zu bestimmen 5 Dr cken Sie die Aufnhamet...

Страница 6: ...Betrieb k nnen Sie an Hand dieser Tabelle beheben Bei gr eren Fehlern wenden Sie sich bitte an das Servicecenter Problem M gliche Ursache L sung Kein Ton Bild auf dem TV w hrend der Wiedergabe A V HDM...

Страница 7: ...eh rt NICHT in den Hausm ll F r die fachgerechte Entsorgung wenden Sie sich bitte an die ffentlichen Sammelstellen in Ihrer Gemeinde Einzelheiten zum Standort einer solchen Sammelstelle und ber ggf vo...

Страница 8: ...Down button 15 Record button 16 Delete button 17 Function button 18 Mic jack 19 RCA A V in jack 20 HDMI output jack 21 DC jack 22 RCA A V out jack 23 AC DC adaptor 24 DC plug 25 A V cable with two end...

Страница 9: ...or connect the HDMI cable not included from the HDMI out 20 of the main unit to your TV which had HDMI input same as below figure 1 2 Or connect the RCA A V cable to your TV audio in and audio out con...

Страница 10: ...to decode and playback all MP3 MP4 which stored in the memory media with USB connecting port or SD MMC memory card 1 Set the system at standby mode first by Power On Standby 10 2 Plug in the USB pen d...

Страница 11: ...he RCA output as playing channel If HDMI output is selected there will be no audio through headphone jack 5 Encoding the Video into MP4 file to USB SD memory The system is able to encode your analogue...

Страница 12: ...adjust the volume level Function Press to select the functions Record Press to active record mode Play Pause Press once to start playback Press once again to stop playback temporarily Stop Press to s...

Страница 13: ...e the audio signal of another encode source device Can not recognize the folder name of USB SD media Maybe some folder create by the computer system not compatible by the unit Format the USB SD media...

Отзывы: