background image

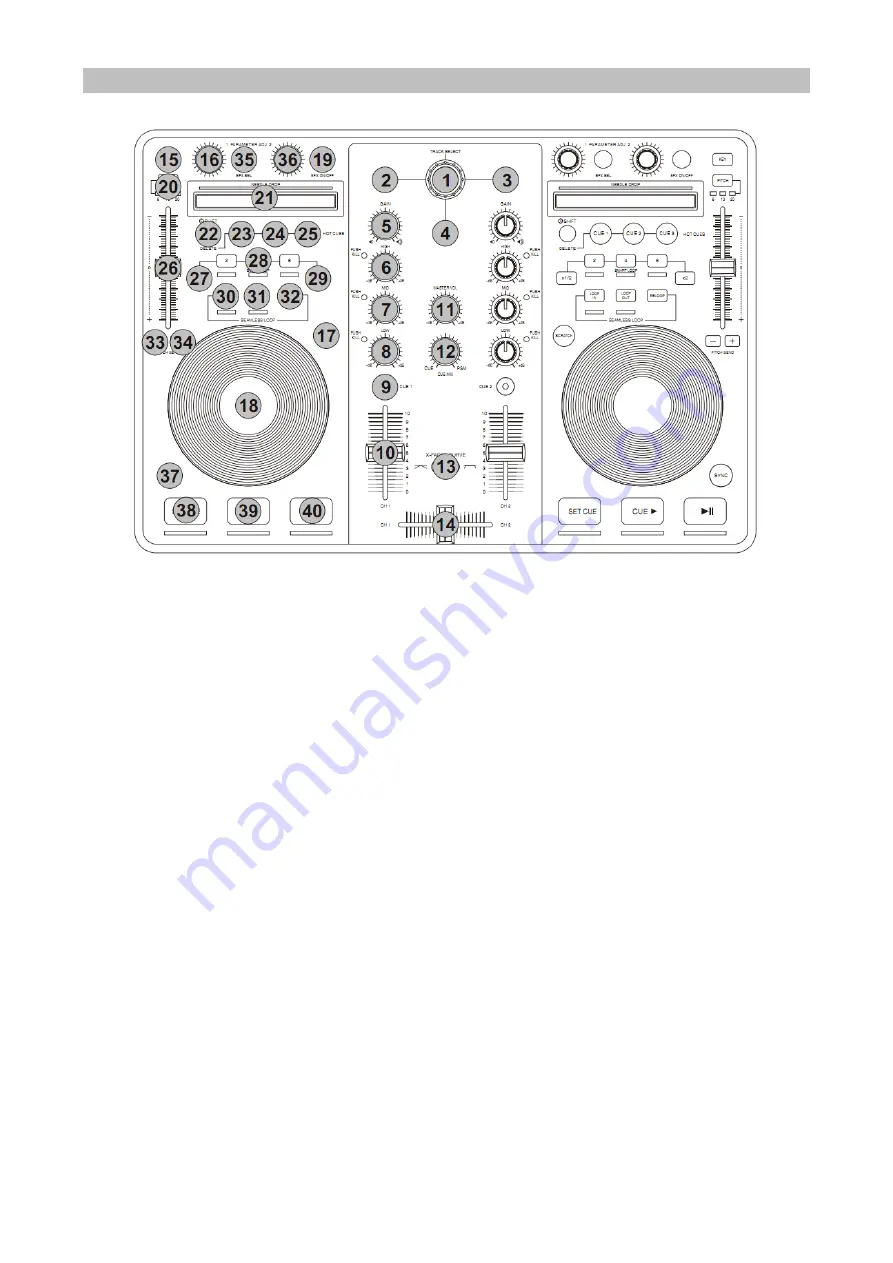
Control Panel 

Top Panel 


1.


TRACK SELECT 

Rotate this knob to the left or right to scroll up or down in the browser or music library.  Press  down  

on the knob to select the folder or file. 

2.


LOAD A 

Pressing the button will load the selected track to side A (left side) of the software. 

3.


LOAD B 

Pressing the button will load the selected track to side B (right side) of the software. 

4.


BACK 

This button allows you to return to the previous selection in the music library of the browser. 

Please note this will stop once you have reached the main root folder. 

5.


GAIN 

Rotate this knob to increase/decrease the volume of the corresponding channel. 

6.


HIGH 

Rotate this knob to increase/decrease the high band frequencies of the corresponding channel. 

7.


MID 

Rotate this knob to increase/decrease the middle band frequencies of the corresponding channel. 

8.


LOW 

Rotate this knob to increase/decrease the low (bass ) band frequencies of the corresponding channel. 

9.


CUE 

This button when pressed will allow the audio from that channel to be cued in the headphone. 
Please ensure that headphone volume is turned up. 

10.


CHANNEL FADER 

Adjusts the volume level of the corresponding audio channel. 

11.


MASTER VOL 

Allows adjustment of the main audio level. 

12.


CUE MIX 

Allows the user to hear mixed audio of the monitor (cue) audio and the program (master) audio in  
the headphones. When the knob is rotated to the left only the cue audio will be heard, when in the 

right position only the program audio will be heard. 

13.


CROSS FADER CURVE 

This switch allows the users to choose the type of cross fader curve they desire. Switching to the  
left side will have a "smooth" curve, while switching to the right will have a "sharp" curve. 

NOTE: A sharp curve is usually required when the user is performing scratch techniques. 

14.


CROSS FADER 

Allows you to fade the audio between decks A and B. When the fader is in the left position, only the  
audio from channel A will be heard. When the fader is in the right position, only the audio from  

channel B will be heard. Moving the fader to the middle position allows audio from both channels  
A & B to be heard. 

Содержание 10006302

Страница 1: ...USB MIDI Mischpult ABMA 1 10006302...

Страница 2: ...tulieren Bitte lesen Sie die folgenden Anschluss und Anwendungshinweise sorgf ltig durch und befolgen Sie diese um m glichen technischen Sch den vorzubeugen Lieferumfang 1 USB MIDI Mischpult 2 Virtual...

Страница 3: ...CD ein Das Setup startet automatisch 3 Befolgen Sie die nun angezeigten Anweisungen Geben Sie den Lizenzcode der sich auf der CD H lle befindet ein 4 Nach Eingabe des Lizenzcodes erscheint der Kontrol...

Страница 4: ...F r Mac Benutzer W hlen Sie die interne Soundcard Siehe unten F r PC Benutzer W hlen Sie das Mischpult als Soundcard Siehe unten...

Страница 5: ...Hintergrundbeleuchtung 17 Drehregler inkl 1x Titelwahl und 6x Abschalten 51 Druckkn pfe viele mit LED Hintergrundbeleuchtung 5 Schieberegler 1 Schalter 2 sehr ber hrungsempfindliche Felder zur schnell...

Страница 6: ...s gew hlten Kanals einstellen 6 H hen H hen des gew hlten Kanals einstellen 7 Mitten Mitten des gew hlten Kanals einstellen 8 Tiefen Tiefen des gew hlten Kanals einstellen 9 Cue Um w hrend des Abspiel...

Страница 7: ...ner beliebigen Stelle des Titels um diesen Punkt zu speichern Dr cken Sie die Taste erneut um diese Stelle erneut aufzurufen 26 Pitchfader Wiedergabegeschwindigkeit erh hen reduzieren 27 X1 2 Die L ng...

Страница 8: ...Eingaben f hren 5 Stromanschluss Anschluss f r ein optionales Netzger t DC 5V 500mA 1000mA Systemvoraussetzungen PC Minimum Voraussetzungen Intel Pentium 4 oder AMD Athlon XP 1024x768 Ausl sung Direc...

Страница 9: ...kungen pro Tag Monat Jahr sowie ber etwa anfallende Kosten bei Abholung entnehmen Sie bitte den Informationen der jeweiligen Gemeinde Hinweise zur Batterieentsorgung Batterien d rfen nicht in den Haus...

Страница 10: ...In the box 1 USB MIDI controller 2 Virtual DJ LE Software CD ROM License code 3 USB cable Wiring the system Please see the suggested connection diagram below...

Страница 11: ...utomatically 3 Follow the on screen instructions to install the virtual DJ Program Enter the System Serial Number which can be found on the CD cover to activate the program 4 After entering the Serial...

Страница 12: ...For Mac User Select Mac Built In Soundcard please refer to the setting below For PC User Select Controller Soundcard please refer to the setting below...

Страница 13: ...s 2 touch sensitive ultra precise jog wheels LED backlight 17 rotary knobs incl 1 track select push 6 kill push 51 push buttons many featuring LED back lighting 5 faders 1 switches 2 needle drop touch...

Страница 14: ...his button when pressed will allow the audio from that channel to be cued in the headphone Please ensure that headphone volume is turned up 10 CHANNEL FADER Adjusts the volume level of the correspondi...

Страница 15: ...to a set cue position and instantly play from that cue point Press the button once to set the cue and then repeat to play from that cue position 26 PITCH FADER Allows increase or decrease of the music...

Страница 16: ...as if not you may experience latency problems 5 POWER Input for optional power adaptor DC 5V 500mA 1000mA System Requirements PC Minimum system requirements Intel Pentium 4 or AMD Athlon XP 1024x768...

Отзывы: