CP30 User Manual
17
3.2 Power Connection
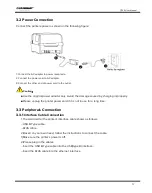
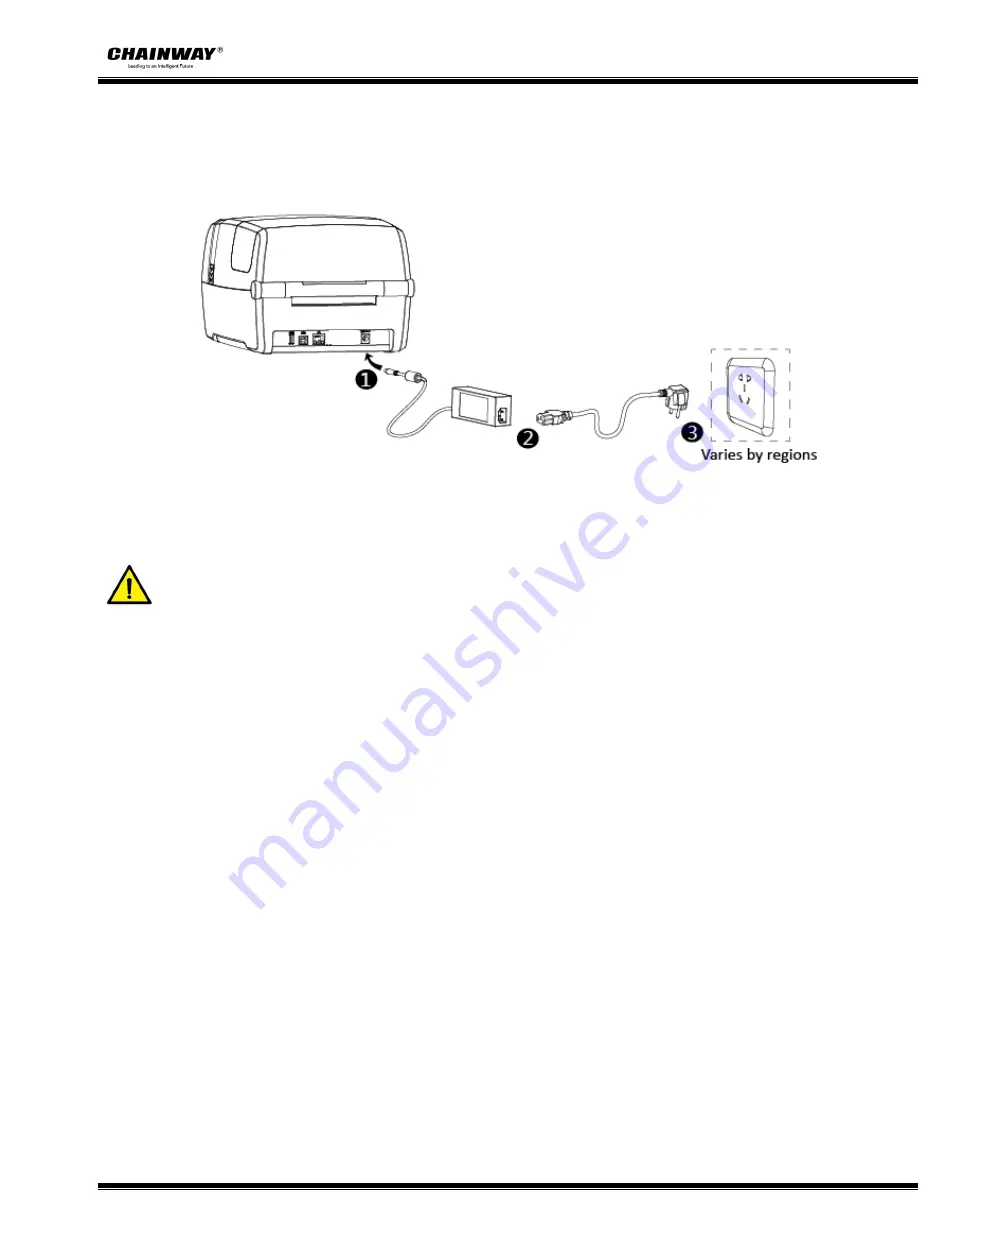
Connect the printere power as shown in the following figure
:
1.Connect the AC adapter to power receptacle.
2.Connect the power cord to AC adapter.
3.Connect the other end of power cord to the outlet.
Caution
:
●
Use the original power adapter only. Avoid the damage caused by charging improperly.
●
Please unplug the printer power cord if it is not in use for a long time.
3.3 Peripherals Connection
3.3.1
Interface Cable Connection
1.The standard for the printer’s interface cable shows as follows:
--USB B-Type cable
--RJ45 cable
2.Based on your own need, follow the instructions to connect the cable.
1)Make sure the printer’s power is off.
2)Please plug in the cables.
--Insert the USB B-Type cable into the USB(type B) interface.
--Insert the RJ45 cable into the ethernet interface.
Содержание CP30
Страница 2: ...CP30 User Manual C h a n g e s R e c o r d Rev Date Description 1 0...
Страница 12: ...CP30 User Manual 8 Inside View...
Страница 13: ...CP30 User Manual 9 1 3 Dimension Unit mm...
Страница 24: ...CP30 User Manual 20 Figure 2 Left...
Страница 26: ...CP30 User Manual 22 Figure 5 Left...
Страница 41: ...CP30 User Manual 37 4 2 Ethernet Port PIN SIGNAL NAME 1 TX 2 TX 3 RX 4 5 6 RX 7 8...
Страница 45: ...CP30 User Manual 41 2 Click Get Printer Information and printer information will show in the above...
Страница 46: ...CP30 User Manual 42 3 Click Get Status and printer status will show in the above...
Страница 49: ...CP30 User Manual 45 6 Click Ethernet then click Get to gain the relevant values...
Страница 50: ...CP30 User Manual 46 7 Click WIFI then set up the name password and so on...
Страница 56: ...CP30 User Manual 52 4 You can set a magnification of the graphic as needed...
Страница 58: ...CP30 User Manual 54 6 Click System Click language and choose the language of printer utility...
Страница 61: ...CP30 User Manual 57 5 Choose the installation directory then click Next 6 Click Finish...
Страница 63: ...CP30 User Manual 59 9 Specify Port then click Next 10 Enter a name for this printer then click Next...
Страница 64: ...CP30 User Manual 60 11 Click Finish...
Страница 67: ...CP30 User Manual 63 2 According to different needs set up the page...
Страница 68: ...CP30 User Manual 64 Click Stock Name and choose the paper type...
Страница 69: ...CP30 User Manual 65 Click New Stock and set up a new stock Click Edit Stock and edit the stock...
Страница 70: ...CP30 User Manual 66 Click Delete Stock and delete the stock Choose Orientation or Effects showed in the Preview...
Страница 71: ...CP30 User Manual 67...
Страница 72: ...CP30 User Manual 68 Click Preset Name and back to the default settings...
Страница 73: ...CP30 User Manual 69 Click Manage and change the settings...
Страница 74: ...CP30 User Manual 70 3 Click Graphics and edit the pictures...
Страница 75: ...CP30 User Manual 71 4 Click Stock...
Страница 76: ...CP30 User Manual 72 Set up the print method...
Страница 77: ...CP30 User Manual 73 Set up the media type...
Страница 78: ...CP30 User Manual 74 Click Feed Mode Mode and choose the method of media handing...
Страница 79: ...CP30 User Manual 75 5 Click Option...
Страница 81: ...CP30 User Manual 77 Click Speed Settings Set up the printing speed...
Страница 83: ...CP30 User Manual 79 2 Click General Print Test Page and printer will print labels with current settings...
Страница 84: ...CP30 User Manual 80 3 Click Ports and choose the port needed...


