P100
Po
P-SER
00X, P
owered
Instruc
RIES M
1500X
d Loud
ction Manual
ANUA
X & P18
dspeak
(English)
AL
800SX
kers
Страница 1: ...P100 Po P SER 00X P owered Instruc RIES M 1500X d Loud ction Manual ANUA X P18 dspeak English AL 800SX kers...
Страница 2: ...P1000X and P1500X as a floor stage monitor 14 Using the pole mount P1000X only 14 Using the pole mount P1500X only 15 Using the suspension points 16 Application 1 Single P1000X or P1500X 17 Applicatio...
Страница 3: ...u VEGA PROF 3 T SAFETY I ymbol within e unit s enclo eral triangle i the literature nded to alert hould be read do not remov ed service eng instructions be uld be read an do not expose es on apparat f...
Страница 4: ...mage se direct sunlig osure to inten nents Do not ts into speaker erating sound nce members e where the t y stop workin hin the speake with a potentia esulting in seri Potential area articles below ur...
Страница 5: ...ice must ac s to this unit n equipment ted and found able protection ency energy an ons However rmful interfer aged to try to ment and rece circuit differe TV technician Canadian ICES VEGA PROF 5 TORY...
Страница 6: ...erwin Vega speakers can generate considerable energy When placed on a slippery surface such as polished wood or linoleum the speaker may move due to its own mechanical vibration Precautions should be...
Страница 7: ...sing the loudspeaker set the master power switch to OFF before removing any cables and turning off the source audio equipment Do not switch the loudspeaker voltage selector or MIC LINE switch while th...
Страница 8: ...kwise MIN o the middle the system SWITCH pment conne MIC If a m WITCH POSIT MIC NE ch must be p ke may resul F VEGA PROF 8 nel an assortmen 1500X mixer BS ve input sign N position s e position an ecte...
Страница 9: ...on each channel level knob This connection is designed to provide an output which combines all three input channels together for connecting to another P1000X P1500X powered speaker or a recording dev...
Страница 10: ...se based on the speaker volume level Leaving the switch OFF and engaging the HIGH PASS FILTER is recommended when using the P1000X P1500X with a subwoofer When using the P1000X P1500X with the P1800X...
Страница 11: ...is illuminated when there is an audio signal present with a level greater than 30dB approximately the lowest level before a MUTE condition The CLIP indicator is illuminated when the audio signal is c...
Страница 12: ...und can be produced 3 The PROTECT indicator red will illuminate when the P1800SX automatically places itself into a condition where sound output is shutoff This condition may be the result of excessiv...
Страница 13: ...in CERWIN SX Power er connection ow to insure CTOR 120V AC or 2 necting the p n installed A pe and shou that can onl fication sect power to the r into an ON e loudspeake nsure proper VEGA PROF 13 r C...
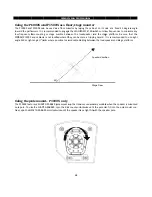
Страница 14: ...00X only pole mount c spin the disc kwise until th VEGA PROF 14 oor stage onitor by lay e the HIGH P ween the lo hey can beco void cable bin cup that redu c counter clo he speaker ha ESSIONAL St S e m...
Страница 15: ...ey will not p cables must hen moved o s on top of th nting be sure affect the str d for loudspe nd loudspeak re to use add attach banne al engineer re g the safet VEGA PROF 15 es level and at provides...
Страница 16: ...e rear s are locate and on the ull back poin on installation res qualified load can resu al engineer re g the safet e loudspeake n be sure to affect the str ble M10 load may deteriora oroughly by resp...
Страница 17: ...in he overall au tric Guitar Se Set switch to media player PUT 3 with the app CERWIN or P1500X eaker can be here a vocal dividual cha udience volu et switch to o MIC r propriate cable o VEGA PROF 17 X...
Страница 18: ...1000X r can easily b udience and X OUTPUT of ropriate sett the second VEGA PROF 18 X or P1500 be added usin situations w the first spe ing on the fi speaker so m ESSIONAL 0X ng a standard where more v...
Страница 19: ...urce is connected to INPUT 1 on each P1800SX subwoofer and then the signal is linked to the P1000X P1500X speakers by using the P1800SX THRU 1 outputs The P1000X P1500X and P1800SX also have CUSTOM FE...
Страница 20: ...Pas PF THRU L pole the P10 asy to setup a VEGA PROF 20 usting HP her it is impo B switch on t ser can rout ow have bee X to BO ss Filter is ON LPF SUB is ON 000X P1500X and transpor AUDIO SO ESSIONAL...
Страница 21: ...op out from the mix output should be used to daisy chain to the next P1000X P1500X and then use the thru out from the second speaker onward Equipment Cable Type Input 1 Microphone Set switch to MIC XL...
Страница 22: ...s specific req he monitor neral rule ne VEGA PROF 22 00X as a S have a stag tage monito may have a must be taken d to the pref uirements w loudspeaker ever point the ESSIONAL Stage Mon ge monitor t r...
Страница 23: ...venues the Front of House engineer has control of the entire sound reinforcement system using the console mixer The diagram below shows how a console mixer interfaces with the performers on stage aud...
Страница 24: ...ce can co nd specified t se the remot through the to the louds Second VEGA PROF 24 the grill atta t may result simply remov ket When re ring general 0X P1500X o al device no ontrol the m to support nu...
Страница 25: ...Sys Sys stem Bloc stem Bloc ck Diagra ck Diagra am P100 am P180 CERWIN 00X and 1 00SX subw VEGA PROF 25 1500X fu woofer ESSIONAL ll range l loudspea aker...
Страница 26: ...MUTE or LOOP switch that may need to be disengaged Microphones that require phantom power must be used with an external power source No Power Loudspeaker is not connected to active AC power Verify th...
Страница 27: ...e good Verify the connectors are clean and free of any residue build up Verify the insulation jacket on all cables has not been torn or crushed Rattling Sounds Be sure the rattling sounds do not come...
Страница 28: ...r A direct burst of air should be avoided and may harm the drivers as well as assisting debris into the enclosure When storing the loudspeaker be sure it is above ground to avoid accidental flooding a...
Страница 29: ...ld negative Shield GND Hot positive Shield GND T S 2 3 1 XLR C STANDARD PHONE Hot positive Cold negative Shield GND Floating or Balanced low impedance most professional equipment line in and line out...
Страница 30: ...n Pro Audio or one of Gibson Pro Audio s Authorized Service Centers in the US will repair the defect s or replace the merchandise as it deems appropriate at its sole discretion Warranty Period from da...
Страница 31: ...authorized dealer or upon which unauthorized repair or service has been performed GIBSON MAKES NO OTHER EXPRESS WARRANTY OF ANY KIND WHATSOEVER ALL IMPLIED WARRANTIES INCLUDING WARRANTIES OF MERCHANTA...
Страница 32: ...laims liability for defects or damage caused by services performed by unauthorized persons or non warranty service not performed by Gibson or an Authorized Gibson Pro Audio Service Center When contact...