Base Unit Manual
©
2020 Cervis, Inc.
15
C4: DIN-9H1R5/PG Remote Communication
CAUTION
To prevent inadvertent machine movement, be sure to
remove power from the Base Unit before attempting to
Associate or Dissociate.
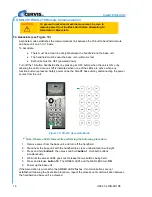
To Associate (See Figure 9).
The pistol grip (PG) remote must be OFF and the base unit must have power removed before the
Association process can be started.
✓
Note: The Machine Stop button must be in the UP position before activating and using the
console remote.
1. Stand near the base unit with the remote
OFF
and
power removed
from the
base unit (disconnect P1 and P2 or turn the source power OFF).
2. Release the
STOP
button on the PG remote by twisting and pulling up.
3. Push and hold switches
S1
and
S7 UP
. All four LEDs light solid.
4. Observe the LEDs. When the TX LED begins to blink, power up the base unit
while continuing to hold S1 and S7. When all four LEDs light solid, release S1
and S7.
Association is successful when LEDs TX and RX are rapidly blinking in unison.
Figure 9
.
PG Switch Actuation for Associate and Dissociate
To Dissociate (see Figure 9)
The PG remote must be OFF and the base unit must have power removed before the Dissociation
process can be started.
✓
Note: The Machine Stop button must be in the UP position prior to activating and using the
console remote.
1. Stand near the base unit with the remote
OFF
and
power removed
from the
base unit (disconnect P1 and P2 or turn the source power OFF).
2. Release the
STOP
button on the PG remote by twisting and pulling up.
3. Push and hold switch
S1 UP
and switch
S7 DOWN
. All four LEDs light solid.
4. Observe the LEDs. When the TX LED begins to blink, power up the base unit
while continuing to hold S1 and S7. When all four LEDs light solid, release S1
and S7.
Note: Be aware that all remote associations to the base unit are now broken.
Associate
Dissociate

