background image

6 • Owner’s manual - Model. CC6121.2 

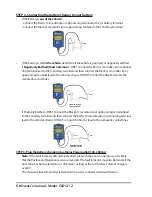
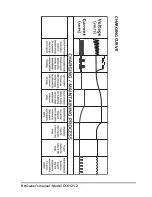
THE CHARGING PROCESS:

1)  Qualification - Battery Condition Check - Orange Charging LED Flashing Fast

When the charger is first switched on it checks the battery condition to determine whether the 
battery needs reconditioning. During this qualification process it checks the internal impedance 
and initial voltage of the battery and it will determine how much charge current, if any that the 
battery will accept. 

2)  Enhanced Battery Rejuvenation - Orange Charging LED Flashing Fast

If the initial qualification detected that the battery was in poor condition, the patented rejuve-
nation process will begin automatically. During the rejuvenation process a high voltage equal-
ising and peak pulse reconditioning charge is used to repair the sulphated battery. This unique 
patented feature will break down and dissolve the lead-sulphate crystal build up on the battery 
plates which will extend the life of your battery. It can also balance out high concentrations of 
acid. The equalisation voltage will be 8V maximum for 6V battery selection and 16V maximum 
for 12V battery selection.

3)  Soft Start Charging - Orange Charging LED Flashing Slow

Gently charges the battery using a reduced charge output until the battery voltages reaches 
5.5V for 6V battery selection or 11V for 12V battery selection. If the battery voltage doesn’t reach  
these levels within 6 hours, the safety timer protection will stop the unit from charging, the Red 
Fault LED will illuminate and the Orange Charging LED will start flashing.

4)  Bulk Charging - Orange Charging LED ON


Uses the maximum charge output until the battery voltage reaches 7.2V for 6V battery selection 
or 14.4V for 12V battery selection. If the battery voltage doesn’t reach these levels within 24 
hours, the safety timer protection will stop the unit from charging, the Red Fault LED will illumi-
nate and the Orange Charging LED will illuminate.

5)  Absorption Charging - Orange Charging LED ON

Uses a constant voltage while reducing the charging output current to ensure the battery 
receives a full charge without overcharging the battery. 

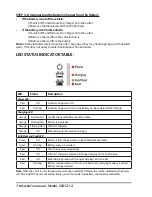
6)  Battery Analysis - Full/Float Green LED ON

The battery analysis stage checks the condition of the battery after the charge cycle is com-
pleted. If the battery voltage drops too quickly during the analysis mode, this means the battery 
is probably faulty.  If the battery analysis failed, this is indicated by the Green Full LED flashing.

7)   Float Mode - Full/Float Green LED ON

This stage allows you to keep the charger connected 24/7 to ensure your battery is well main-
tained and kept 100% fully charged. Float mode will maintain the battery at a constant 6.8V for 
6V battery selection or 13.6V for 12V battery selection. 

8)   Long Term Maintenance - Full/Float Green LED ON

During long term maintenance / float mode, the unit will apply a special pulse charge to ensure 
the battery is kept in optimal condition.

Содержание CC6121.2

Страница 1: ...OWNER S MANUAL Model CC6121 2 AUSTRALIAN NEW ZEALAND STANDARD AS NZS 60335 2 29 APPROVED ...

Страница 2: ... poisons centre or doctor If battery acid contacts your skin or clothing wash immediately with soap and water If hair con tact occurs remove contaminated clothing and flush hair with soap and running water Someone should always be within range of your voice If electrolyte is swallowed do NOT induce vomiting give a glass of water Seek immediate medical assistance Never attempt to charge a damaged b...

Страница 3: ...voltage equalising and peak pulse re conditioning to repair sulphated batteries This feature is fully automatic and depends on the internal impedance of the battery It also depends on whether the battery is still connected in the vehicle Ultra low power consumption ECO Mode Pulse charge for long term maintenance Can be left on 24 7 to ensure your battery is always maintained and fully charged The ...

Страница 4: ...nd the fault LED will come on Thispreventsthechargerfrombeingdamaged ifthepositiveandnegativecrocodileclipsortheoptionalringterminalsaccidentallytoucheach otherwhilethechargeristurnedon ECO MODE This Century battery charger has a built in ultra low power consumption circuit If AC power is connected and the battery is disconnected after 10 seconds the charger will automatically go into an ECO mode ...

Страница 5: ...harge check electrolyte level check Check the Battery Electrolyte levels On Sealed Maintenance Free batteries check the State of Charge indicator If necessary remove the vent caps and add distilled water so the levels are halfway between the upper and lower fill lines Check the battery voltage type and Ah capacity to ensure the charger is compatible Visit http www centurybatteries com au battery c...

Страница 6: ...al and then connect the Red Crocodile clip or optional ring terminal lead to the vehicle s chassis DO NOT connect the Red lead to the carburettor or fuel lines STEP 3 Plug the battery charger into a Mains Power outlet 100 240Vac Note If the Fault Indicator LED illuminates Red please check your connections as it is likely that the Positive and Negative Leads are reversed The Fault Indicator may als...

Страница 7: ...t reach these levels within 6 hours the safety timer protection will stop the unit from charging the Red Fault LED will illuminate and the Orange Charging LED will start flashing 4 Bulk Charging Orange Charging LED ON Uses the maximum charge output until the battery voltage reaches 7 2V for 6V battery selection or 14 4V for 12V battery selection If the battery voltage doesn t reach these levels wi...

Страница 8: ...and no Battery has been detected ECO Mode ChargingLED Orange Flashing Fast Qualification and battery condition check Orange Flashing Fast Battery rejuvenation Orange Flashing Slow Soft start charging Orange ON Bulk charging or absorption charging Full FloatandFaultLED Green ON Battery is fully charged and is in Float Maintenance mode Green Flashing Battery analysis has failed Red ON Short circuit ...

Страница 9: ...8 Owner s manual Model CC6121 2 CHARGING CURVE ...

Страница 10: ...oltage must be over 8V for the charger to start Check DC connection between charger and battery and make sure they are not short circuited Touching each other Check that the crocodile clips have not fallen off or come loose Check that the crocodile clips ring terminals are connected to the correct polarity Note The charger output is only present when connected to a battery No charging current Faul...

Страница 11: ...warranty the customer should enclose a copy of their receipt for proof of purchase It is recommended that returned products be sent by registered mail as Century Yuasa Batteries accepts no responsibility liability for goods lost or damaged in transit Exclusions If upon receiving a product for repair and if testing and examining the product has disclosed that the alleged defect or malfunction in th...

Страница 12: ...tice SAA Approval No GMA TBA Century Yuasa Batteries Pty Ltd 37 65 Cobalt Street Carole Park QLD 4300 T 1300 362 287 www centurybatteries com au Century Yuasa Batteries NZ Ltd 259 Church Street Onehunga Auckland 1643 New Zealand T 0800 93 93 93 www centurybatteries co nz CB113 2417 ...

Отзывы: