


PLAYING BACK A DISC
GENERAL FEATURES
REVERSE/
FORWARD
ENTER
PLAY
USB, DV, ZOOM, SOURCE FUNCTION
USB
ZOOM
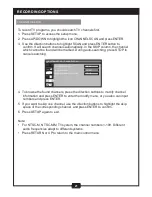
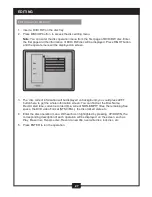
USB function
1. You must put the USB storage device into the USB port on the front of
the DVD recorder.
2. If the device is recognized by the system a USB symbol will appear on
the bottom corner of your screen.
3. Then press the USB button on your remote to see the contents of the
USB storage device.
Note: This system can only recognize certain file formats (for example:
*.JPG, *.MP3)
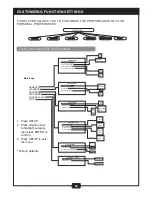
DV IN Function
See diagram on page 8. Enter the DV source by selecting source mode.
You can then play a camera through DV or record by inserting a
recordable disk.
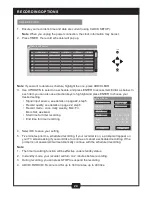
ZOOM function
When playing a disc, Press ZOOM button on the remote control:
the first time: the picture will be zoomed in 150%;
the second time: the picture zoomed in 200%;
the third time: the picture will display as normal;
SOURCE function
It's a switch button between sources of Audio &video, you can enjoy the
program from any source connected to this unit (set-top box, video
recorder or satellite receiver), and at the same time record from another
A/V source.
1. Fast forward playback
Press
I
during normal playback.The speed will cycle with
each press as: FF2, FF4, FF16, FF32 or play as normal
Press PLAYto resume normal playback.
2. Fast reverse playback
Press
@
during normal playback.The speed will cycle with
each press as: FR2, FR4, FR16, FR32 or play.
Press PLAY to resume normal playback.
3. Pause playback
Press PAUSE/STEPduring normal playback to pause
playback andpress PLAYto resume normal playback.
4. Frame advance
Press PAUSE/STEP during normal playback.One frame is
advanced each time you press PAUSE/STEP.
Press PLAYto resume normal playback.
5. Slow
Press the SLOW button during playbackThe playback speed
becomes 1/2, 1/4, 1/8 of the normal speed ornormal play
each time you press the SLOW button.
Note
:The above features vary depending on the disc type
such as MP3, Audio CD, etc.
12