background image

SKU 94481        For technical questions, please call 1-800-444-3353 

PAGE 10

1. 

Inspect the air supply Screen that is located in the End Cap (81) before each  


use, and clean or replace as necessary.  Dirt and water in the air supply Screen    

are major causes of pneumatic tool wear.  Use a filter in the compressed air  


system for better performance and longer tool life.  The filter must have adequate   

flow capacity for the specific application.

2. 

Clean the external parts of the Nailer with a clean cloth and mild detergent or  


non-flammable solvent.  Then, dry.

3. 

Store the tool in a clean, dry, safe location out of reach of children.

4. 

      CAUTION:  All maintenance, service, or repairs not listed in this manual   

are only to be attempted by a qualified service technician.

INSPECTION, MAINTENANCE, AND CLEANING

TROUBLESHOOTING

Problem

Possible Solutions

Air leak near top of tool.

1.  Tighten all screws on the cylinder cap.

2.  Have a qualified service technician install a head valve piston set.

Tool does not work.

1.  Make sure compressor is set between 70 to 120 PSI.

2.  Check all air connections for leaks.

3.  Make sure to fully depress the safety sleeve on the workpiece when attempting to fire 

a fastener.

4.  Check for fastener jams.  Clear the jam if necessary.

5.  Have a qualified service technician check out the tool.

Sluggish operation.

1.  Make sure the compressor is set between 70 to 120 PSI.

2.  Check all air connections for leaks.

3.  Have a qualified service technician install a head valve piston set.

Air leak near bottom of tool.

1.  Tighten all screws.

2.  Have a qualified service technician replace the bumper or head valve piston set.

Poor return after firing the tool.

Have a qualified service technician clean the interior of the tool and/or replace the bumper 

or head valve piston set.

Weak driving force.

1.  Make sure compressor is set between 70 to 120 PSI.

2.  Check all air connections for leaks.

3.  Have a qualified service technician clean the interior of the tool and/or replace the 

bumper or head valve piston set.

Poor feed.

Have a qualified service technician clean the interior of the tool and/or lubricate the 

magazine and install a new magazine spring.

Tool jamming too often.

Have a qualified service technician clean the interior of the tool and/or lubricate the 

magazine and install a new magazine spring.

Anytime any maintenance or repairs are done, FIRST:

1. 

Disconnect the Nailer from its air supply.

2. 

Empty the Magazine Assembly (70) completely.

3. 

Attempt to fire the Nailer into a piece of scrap wood to ensure that it is  


disconnected and is incapable of firing any Brads.

Содержание 94481

Страница 1: ...Mission Oaks Blvd Camarillo CA 93011 Visit our website at http www harborfreight com Read this material before using this product Failure to do so can result in serious injury SAVE THIS MANUAL Copyrig...

Страница 2: ...the presence of flammable gases or liquids 3 Keep children away Children must never be allowed in the work area Do not let them handle machines tools extension cords or air hoses 4 Store idle equipmen...

Страница 3: ...ortion of the tool s operating controls are inoperable disconnected altered or not working properly 10 Disconnect air hose and release any built up air pressure Never service the Nailer clear jams or...

Страница 4: ...an extension cord may cause your circuit breaker to trip or your panel fuse to break If this happens either use the compressor without an extension cord or find a larger amperage circuit to use 19 Ma...

Страница 5: ...peration the Nailer may kick back causing injury 28 Transport Nailer safely Always disconnect air supply when moving the tool in the workplace Carry the tool by the handle to avoid contact with the tr...

Страница 6: ...ty the Magazine Assembly 70 of Brads 3 The Nailer should not fire if the Safety 50A is not depressed against the workpiece 4 Make sure the Trigger 36 and Safety 50A move freely without sticking OPERAT...

Страница 7: ...y a qualified service technician 8 Depress the Safety 50A against the workpiece and squeeze the Trigger 36 The tool must cycle fire only once Release the Trigger and squeeze it again The tool must not...

Страница 8: ...on the workpiece The Nailer should not fire if the Safety is not depressed Once depressed gently and briefly squeeze the Trigger 36 once one Brad will be fired 4 Do not press the Safety 50A against th...

Страница 9: ...ne Assembly 70 5 While holding the Pusher 63 in place press the Release 74 and slide the Pusher forward all the way 6 Attempt to fire the Nailer into a piece of scrap wood to ensure it is disconnected...

Страница 10: ...Check for fastener jams Clear the jam if necessary 5 Have a qualified service technician check out the tool Sluggish operation 1 Make sure the compressor is set between 70 to 120 PSI 2 Check all air c...

Страница 11: ...OOL ONLY NEITHER THE MANUFACTURER OR DISTRIBUTOR MAKES ANY REPRESENTATION OR WARRANTY OF ANY KIND TO THE BUYER THAT HE OR SHE IS QUALIFIED TO REPLACE ANY PARTS OF THE PRODUCT IN FACT THE MANUFACTURER...

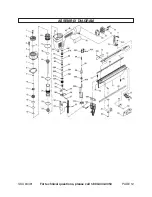
Страница 12: ...SKU 94481 For technical questions please call 1 800 444 3353 PAGE 12 ASSEMBLY DIAGRAM...

Страница 13: ...tal or consequential damages so the above limitation of exclusion may not apply to you THIS WARRANTY IS EXPRESSLY IN LIEU OF ALL OTHER WARRANTIES EXPRESS OR IMPLIED INCLUDING THE WARRANTIES OF MERCHAN...

Отзывы: