background image

SKU 93786  

    For technical questions please call 1-800-444-3353

        Page 7

Note:

 A qualified electrician must wire in a pressure switch control that turns off

the motor when the pump reaches the desired pressure (less than 145 PSI).

Note: 

Always install this Air Compressor Pump to an air tank that has a pressure

release valve set at less than 145 PSI.

Note:

 A high/low cut-in/cut-out switch (not included) can be incorporated to operate

a motor starter or motor contractor for semi-automatic control of air pressure
in the vessel.

Warning:

 Avoid serious injuries. Do not operate this Air Compressor Pump without

the Safety Guard in place.

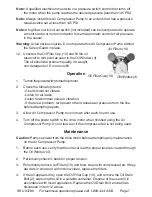
12. Unscrew the Oil Filler Cap (10) and fill the oil

reservoir to mid point as seen in the Oil Window (4).
The oil should be premium qualify, 30-weight,
non-detergent oil. Do not overfill.

Operation

1.

Turn on the power switch to the drive motor.

2.

Check the following items:

- V-belt should not vibrate.
- Listen for air leaks.
- Listen for abnormal noise or vibration.
- If there is a problem, turn power off and release air pressure from the line
before attempting repairs.

3.

Allow Air Compressor Pump to cool down after each hour of use.

4.

Turn off the power switch to the drive motor when finished using the Air

Compressor Pump. Do not leave on if the compressed air is not being used.

Maintenance

Caution:

 Remove power from the drive motor before attempting any maintenance

on the Air Compressor Pump.

1.

Before each use, verify that the oil level is at the proper level as viewed through

the Oil Window (4).

2.

Periodically check V-belts for proper tension.

3.

Periodically remove Air Filters (19) and blow clean with compressed air. If they

are dark in color and will not blow clean, replace the filters.

4.

If the oil appears dirty, open the Oil Filler Cap (10), and remove the Oil Drain

Bolt (2), capturing the oil in a suitable container. Dispose of the used oil in
accordance with local regulations. Replace the Oil Drain Bolt, and refill as
discussed in item 12 above.

Air Filters (19)

Oil Window (4)

Oil Filler Cap (10)

Содержание 93786

Страница 1: ...rbor Freight Tools All rights reserved No portion of this manual or any artwork contained herein may be reproduced in any shape or form without the express written consent of Harbor Freight Tools For technical questions and replacement parts please call 1 800 444 3353 93786 Due to continuing improvements actual product may differ slightly from the product described herein ...

Страница 2: ... allowed in the work area Do not let them handle machines tools or extension cords 4 Store idle equipment When not in use tools must be stored in a dry location to inhibit rust Always lock up tools and keep out of reach of children 5 Use the right tool for the job Do not attempt to force a small tool or attachment to do the work of a larger industrial tool There are certain applications for which ...

Страница 3: ...void unintentional starting Be sure the drive motor power switch is in the Off position when not in use and before plugging in 13 Stay alert Watch what you are doing use common sense Do not operate any tool when you are tired 14 Check for damaged parts Before using any tool any part that appears damaged should be carefully checked to determine that it will operate properly and perform its intended...

Страница 4: ...sult with their physician s before using this electric powered equipment operation of equipment in close proximity to a heart pacemaker could cause interference or failure of the pacemaker NOTE This item must be properly mounted on a strong level surface which is capable of holding the compressor weight and the forces put on it during operation A properly sized motor not included must also be moun...

Страница 5: ...owards the compressor 5 Avoid bodily injury Never direct the air outlet at any person or animal 6 Use Safety Guard for Pulleys The Air Compressor Belt Wheel 36 V belt not supplied and motor pulley not supplied must be covered by a safety guard not supplied covering all moving elements before operation 7 Avoid burns The Cylinder 15 Cylinder Head 26 Air Hose 24 and Air Outlet 25 become very hot duri...

Страница 6: ...belt is tight Recheck motor pulley V groove belt and Belt Wheel alignment 5 Use a pencil to mark through the Air Compressor Pump mounting holes onto the mounting surface 6 MovetheAirCompressorPumpanddrillfour7 16 inchholesinthemountingsurface 7 Move the Air Compressor Pump back to its mounting position 8 Secure each corner of the base with a 7 16 inch diameter bolt washer lock washer and nut all n...

Страница 7: ...ot vibrate Listen for air leaks Listen for abnormal noise or vibration If there is a problem turn power off and release air pressure from the line before attempting repairs 3 Allow Air Compressor Pump to cool down after each hour of use 4 Turn off the power switch to the drive motor when finished using the Air Compressor Pump Do not leave on if the compressed air is not being used Maintenance Caut...

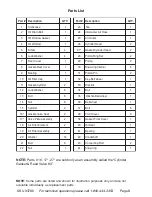
Страница 8: ...o L 4 8 2 t e S g n i R n o t s i P 2 7 r e v o C r a e R 1 9 2 n o t s i P 2 8 r e v o C r a e R t e k s a G 1 0 3 l a n r e t n I g n i r p a n S 4 9 g n i r a e B 1 1 3 n i P n o t s i P 2 0 1 p a C r e l l i F l i O 1 2 3 l e e h w t l e B y e K 1 1 1 r e d n i l y C t e k s a G 2 3 3 k c i t s p i D 1 2 1 r e h s a W k c o L 9 4 3 t l o B 1 3 1 t l o B 8 5 3 l e e h w t l e B r e h s a W 1 4 ...

Страница 9: ...IFIED TO MAKE ANY REPAIRS TO THE PRODUCT OR THAT HE OR SHE IS QUALIFIED TO REPLACE ANY PARTS OF THE PRODUCT IN FACT THE MANUFACTURER AND OR DISTRIBUTOR EXPRESSLY STATES THAT ALL REPAIRS AND PARTS REPLACEMENTS SHOULD BE UNDERTAKEN BY CERTIFIED AND LICENSED TECHNICIANS AND NOT BY THE BUYER THE BUYER ASSUMES ALL RISK AND LIABILITY ARISING OUT OF HIS OR HER REPAIRS TO THE ORIGINAL PRODUCT OR REPLACEME...

Отзывы: