background image

SKU 46309 

Page 9

For technical questions, please call 1-800-444-3353.

NOTE

: Some parts are listed and shown for illustration purposes only and are not available 

individually as replacement parts.

PLEASE READ THE FOLLOWING CAREFULLY


THE MANUFACTURER AND/OR DISTRIBUTOR HAS PROVIDED THE PARTS DIAGRAM AND 

TROUBLESHOOTING GUIDE IN THIS MANUAL AS A REFERENCE TOOL ONLY.  NEITHER THE 

MANUFACTURER NOR DISTRIBUTOR MAKES ANY REPRESENTATION OR WARRANTY OF ANY 

KIND TO THE BUYER THAT HE OR SHE IS QUALIFIED TO MAKE ANY REPAIRS TO THE PRODUCT 

OR THAT HE OR SHE IS QUALIFIED TO REPLACE ANY PARTS OF THE PRODUCT.  IN FACT, THE 

MANUFACTURER AND/OR DISTRIBUTOR EXPRESSLY STATES THAT ALL REPAIRS AND PARTS 

REPLACEMENTS SHOULD BE UNDERTAKEN BY CERTIFIED AND LICENSED TECHNICIANS AND 

NOT BY THE BUYER. THE BUYER ASSUMES ALL RISK AND LIABILITY ARISING OUT OF HIS OR HER 

REPAIRS TO THE ORIGINAL PRODUCT OR REPLACEMENT PARTS THERETO, OR ARISING OUT OF 

HIS OR HER INSTALLATION OF REPLACEMENT PARTS THERETO.

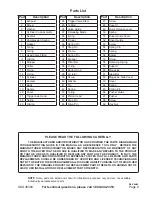
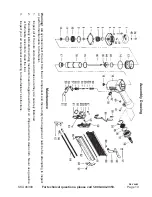
Parts List

Part

Description

1

Exhaust

2

Screw

3

Washer

4

Cylinder Cap Assembly

5

Seal Air

6

Compression Spring

7

Gasket

8

O-ring

9

O-ring

10

Head Valve Piston

11

O-Ring

12

Stopper

13

Collar

14

O-ring

15

O-ring

16

Cylinder

17

Bumper

18

Body

19

Nozzle

20

Cover

21

Trigger Axle Head

22

Spring

23

O-Ring

Part

Description

24

Trigger Valve Stem

25

O-Ring

26

Valve Guide

27

Releasing Blade

28

E-ring

29

Trigger

30

Spring Pin

31

Step Pin

32

Frame

33

Spring Pin

34

Stopper

35

Filter Net

36

O-ring

37

Bottom Cap

38

Air Inlet

39

Screw

40

Washer

41

Pin

42

Spring

43

O-ring

44

Piston Head

45

Step Pin

46

Drive Pin

Part

Description

47

Screw

48

Cover II

49

Quick Release Lever

50

Spring

51

Driver Guide Cover

52

Driver Guide

53

Screw

54

Spring Pin

55

Spring

56

Safety

57

Screw

58

Retaining Spring

59

Support

60

Magazine

61

Steel Bar

62

Magazine Side Cover

63

Cover

64

Spring

65

Spring Pin

66

Pusher Guide

67

Pusher

68

Screw

69

Hex Nut

REV 04/05

Содержание 46309

Страница 1: ... com Copyright 2001 by Harbor Freight Tools All rights reserved No portion of this manual or any artwork contained herein may be reproduced in any shape or form without the express written consent of Harbor Freight Tools For technical questions and replacement parts please call 1 800 444 3353 Manual Revised 11h TO PREVENT SERIOUS INJURY READ AND UNDERSTAND ALL WARNINGS AND INSTRUCTIONS BEFORE USE ...

Страница 2: ...2 Observe work area conditions Do not use machines or power tools in damp or wet locations Do not expose to rain Keep work area well lit Do not use electrically powered tools in the presence of flammable gases or liquids 3 Keep children away Children must never be allowed in the work area Do not let them handle machines tools extension cords or air hoses 4 Store idle equipment When not in use tool...

Страница 3: ...nt the tool towards yourself or anyone whether it contains fasteners or not 13 Stay alert Watch what you are doing use common sense Do not operate any tool when you are tired 14 Check for damaged parts Before using any tool any part that appears damaged should be carefully checked to determine that it will operate properly and perform its intended function Check for alignment and binding of moving...

Страница 4: ...o the edge of a workpiece They may split the workpiece and fly free causing personal injury 25 Take caution as some woods contain preservatives such as copper chromium arsenate CCA which can be toxic When stapling or nailing these materials extra care should be taken to avoid inhalation and minimize skin contact WARNING Some dust created by power sanding sawing grinding drilling and other construc...

Страница 5: ...he tool to an authorized service technician 8 Depress the Safety 56 against the workpiece and squeeze the Trigger 29 The tool must cycle fire once only Release the trigger and squeeze it again The tool must not cycle fire With the Trigger held carefully lift the nailer and press it against the workpiece again The tool must not cycle fire If it fails to act in the manner described in bold have it r...

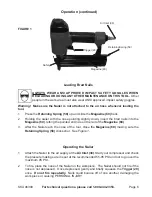
Страница 6: ...RSONAL INJURY Operation continued Loading Brad Nails ALWAYS WEAR ANSI APPROVED IMPACT SAFETY GOGGLES WHEN RELOADING OR DOING ANY OTHER MAINTENANCE ON THIS TOOL Other people in the work area must also wear ANSI approved impact safety goggles Warning Make sure the Nailer is not attached to the air hose whenever loading the tool 1 Press the Retaining Spring 58 up and slide the Magazine 60 back 2 Hold...

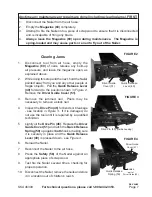
Страница 7: ...to the position shown in Figure 2 Remove the Driver Guide Cover 51 3 Remove the jammed nail Pliers may be necessary to remove a stuck nail 4 Inspect the Drive Pin 46 for bends or breakage see location in Figure 3 If it is damaged do not use the tool until it is repaired by a qualified technician 5 Lightly oil the Drive Pin 46 Replace the Driver Guide Cover 51 and latch the Quick Release Spring 50 ...

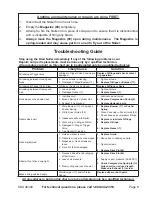
Страница 8: ...ap 1 Loose screws 2 Damaged Gasket 7 1 Tighten Screws 2 Replace Gasket 7 Runs slowly or has power loss 1 Insufficient oil 2 Broken Spring in Cylinder Cap 3 Exhaust 1 is blocked 1 Lubricate as instructed 2 Replace Compression Spring 6 3 Replace damaged parts Nailer skips a nail 1 Worn Bumper 17 or damaged Pusher Spring 2 Dirt in Driver Guide 52 3 Inadequate airflow to Nailer 4 Worn or dry O Ring on...

Страница 9: ...O THE ORIGINAL PRODUCT OR REPLACEMENT PARTS THERETO OR ARISING OUT OF HIS OR HER INSTALLATION OF REPLACEMENT PARTS THERETO Parts List Part Description 1 Exhaust 2 Screw 3 Washer 4 Cylinder Cap Assembly 5 Seal Air 6 Compression Spring 7 Gasket 8 O ring 9 O ring 10 Head Valve Piston 11 O Ring 12 Stopper 13 Collar 14 O ring 15 O ring 16 Cylinder 17 Bumper 18 Body 19 Nozzle 20 Cover 21 Trigger Axle He...

Страница 10: ...ls before attempting to inspect or perform maintenance to the Nailer 1 Inspect all of the nuts and screws and make sure they are securely fastened 2 Periodically lubricate the driving mechanism and magazine with a light oil Wipe down with a clean cloth Never use gasoline or flammable solvents to clean the tool 3 Inspect your air compressor according to manufacturer s instructions REV 04 05 ...

Страница 11: ...e exclusion or limitation of incidental or consequential damages so the above limitation of exclusion may not apply to you THIS WARRANTY IS EXPRESSLY IN LIEU OF ALL OTHER WARRANTIES EXPRESS OR IMPLIED INCLUDING THE WARRANTIES OF MERCHANTABILITY AND FITNESS To take advantage of this warranty the product or part must be returned to us with transportation charges prepaid Proof of purchase date and an...

Отзывы: