SKU 93245
For technical questions please call 1-800-444-3353. Page 3
9.
Do not operate product if under the influence of alcohol or drugs. Read warning labels on
prescriptions to determine if your judgment or reflexes are impaired while taking drugs. If there is
any doubt, do not operate the product.
10.
Use eye protection. Always wear ANSI approved impact safety goggles.
11.
Dress properly. Do not wear loose clothing or jewelry as they can be caught in moving parts.
Non-Skid footwear is recommended when assembling and when using the Sweeper.
12.
Do not force this product. Do not use inappropriate attachments in an attempt to exceed the
Sweeper’s capacity.
13.
Keep children away. Children must never be allowed in the work area. Do not allow children to
play with, or on the Sweeper.
14.
Keep the Sweeper clean. Prior to each use, clean nails, staples or any debris off the Sweeper.
Warning: The warnings, cautions, and instructions discussed in this instruction manual cannot cover
all possible conditions and situations that may occur. It must be understood by the operator that
common sense and caution are factors which cannot be built into this product, but must be supplied
by the operator.
Unpacking
When unpacking your Magnetic Sweeper, make certain that all parts on page 5 of this manual are
included. If any parts are missing or broken, please call
HARBOR FREIGHT TOOLS at
1-800-444-3353.
Assembly
Your 30” Magnetic Sweeper with Wheels will require simple assembly. It is important that you read
the entire manual to become familiar with the product BEFORE you assemble and use the Magnetic
Sweeper.
1.
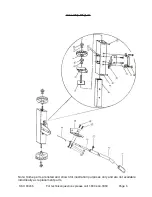
As necessary, attach the Connecting Plate (10) to the Aluminum Body (9) using two Bolts
(17).
2.
Slide the Thin Tube (3) down into the slot in the Connecting Plate (10). Secure the Thin Tube
(3) to the Connecting Plate with Pan Head Bolt (16) and Nut (23).
3.
Slide the Thin Tube (3) into the Thick Tube (2) and secure in place with Plastic Knob (12). If
not already attached, slide on Plastic Handle (1).
Operation
To release the material that has been picked up by the Magnetic Sweeper, place the Aluminum
Body (9) over a trash can or desired debris destination. Pull up on the Adjustable Handle (11)
as in Figure 1. Move the Sweeper away from the debris before releasing the Handle (11) or it
will pick up the debris again. Adjust the handle to the desired height, the handle telescopes from 30”
L to 44-1/2” L. The 1. handle can be adjusted by loosening the Plastic Knob (12) and pulling up on
the Plastic Handle This will extend the Thick Tube (2) from the Thin Tube (3). When the desired height
level is reached, tighten the Plastic Knob (12) into place.
REV 08e


