background image

7

7

SQUARE 150P  User Manual

Eng


y

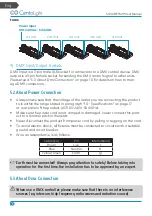
The unit can not be used near water; for example near a bathtub, a kitchen sink, 

a swimming pool, etc.

3.3. Heat


y

Do not use in a confined space. Always install the product in a location with 

adequate ventilation, at least 20in (50 cm) from adjacent surfaces. Be sure that 

no ventilation slots on the product’s housing are blocked.


y

The apparatus should be located away from heat sources such as radiators, 

stoves or other appliances that produce heat.

 Don not use it when maximum ambient temperature is higher than 50°C. Work 

temperature ranges from -20°C to 55°C (-4°F to 131°F).

3.4. Servicing


y

Do not implement any servicing other than those means described in the man-

ual. Refer all servicing to qualified service personnel only. The internal compo-

nents of the equipment must be purchased from the manufacturer. Only use 

accessories/attachments or parts recommended by the manufacturer.

4 -  i

nTroduCTion

Centolight SQUARE 150P is a professional LED Profile with 26° beam (also available 

optional 19° lens tube) designed for theaters and fixed installations where high LED 

chip reliability and warm white lighting (approx. 3.200K) are required. 

The light source is a 150W CITILED® LED with CRI ≥90 to allow excellent color 

rendering, especially in indoor venues like TV studios, theaters and museums. Great 

attention is paid to quality of dimmer control and chip temperature, to minimize the 

consequences of using LEDs instead of traditional lamps.

The cooling system uses high precision fans in order to keep noise within 25dB @ 

1m. The 4 beam-shaping shutter system allows both radial and angled adjustment 

of the beam. The fixture is equipped with a compartment for gobos and manual iris 

(both optional), as well as the front color-frame holder (included).

4.1. 

Features


y

LED Profile Spot with 26° Beam (19° optional)


y

Light Source: 150W Warm-White (3200K) CITILED® LED with over 50,000h 

lifetime


y

Radial/Angled Blade-Framing System

Содержание Square 150P

Страница 1: ...of it Leggete questo manuale e conservatelo per future consultazioni User Manual Manuale Utente 150W Led Profile Spot Light with Beam Shaping Shutters Gobo Slot Sagomatore a Led da 150W con ghigliotti...

Страница 2: ...ever closer to professional s real requirements The CENTOLIGHT Team Gentile Cliente Grazie per aver scelto un prodotto CENTOLIGHT La nostra missione quella di soddisfare ogni possibile richiesta da p...

Страница 3: ...atures 7 4 2 Product Dimensions and Overview 8 5 Product Setup 9 5 1 Rear Panel Description 9 5 2 About Power Connection 10 5 3 About Dmx Connection 10 5 4 DMX Terminator 11 5 5 3 Pin vs 5 Pin DMX cab...

Страница 4: ...show signs of mishandling notify the carrier or dealer seller immediately In addition keep the box and contents for inspection If the fixture must be returned to the manufacturer it is important that...

Страница 5: ...ed within this apparatus even under the normal operating conditions which may be sufficient to constitute the risk of electric shock or death The symbol is used to describe important installation or c...

Страница 6: ...before taking into operation for the first time and after changes before taking into operation another time He has also to make sure that an expert approves safety measure and the machine s technical...

Страница 7: ...nts or parts recommended by the manufacturer 4 Introduction Centolight SQUARE 150P is a professional LED Profile with 26 beam also available optional 19 lens tube designed for theaters and fixed insta...

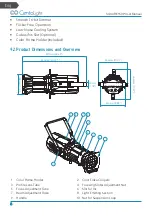
Страница 8: ...ded 4 2 Product Dimensions and Overview 590mm 23 29 30mm 1 18 520mm 20 47 182mm 7 16 266mm 10 47 266mm 10 47 224mm 8 89 1 2 3 4 5 6 7 8 9 10 1 Color Frame Holder 2 Color Flake Calipers 3 Profile Lens...

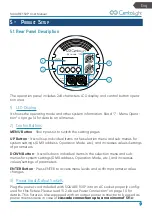
Страница 9: ...individual items in the selection menu and sub menus for system settings DMX address Operation Mode etc and increases values settings of parameters DOWN Button It scrolls down individual items in the...

Страница 10: ...r rear panel of the product AC110V 240V 50 60Hz y Make sure the power cord is not crimped or damaged Never connect this prod uct to a dimmer pack or rheostat y Never disconnect the product from power...

Страница 11: ...ve S and pin 3 is Data positive S CAUTION Wires must not come into contact with each other otherwise the fix tures will not work at all or will not work properly 5 4 DMX Terminator 120ohm 1 4W Resisto...

Страница 12: ...Pin and 5 Pin plug and socket standards 5 Pins XLR plug Pin 1 GND Screen Pin 2 Signal Pin 3 Signal Pin 4 N C Pin 5 N C 3 Pins XLR socket Pin 1 GND Screen Pin 2 Signal Pin 3 Signal 5 Pins XLR socket Pi...

Страница 13: ...the picture you want to show through the SQUARE 150P Refer to the drawing beside to for all details on mini mum maximum gobo size Both metal and glass can be used with SQUARE series LED Profiles 1 Lo...

Страница 14: ...Operation By pressing MENU button the display will cycle through 6 menus Press ENTER but ton to enter the corresponding menu press UP or DOWN to modify current parame ter value Then press ENTER butto...

Страница 15: ...dress When selecting a starting DMX address always consider the number of DMX chan nels If you choose a starting address that is too high you could restrict the access to some of the product s channel...

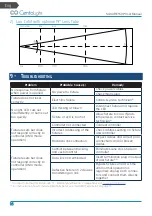
Страница 16: ...ode operation Controller not connected Connect controller Incorrect addressing of the fixtures Check address setting on fixture and controller Bad data link connection Inspect cables and correct poor...

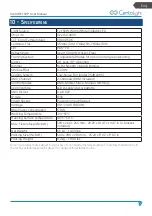
Страница 17: ...DM Included Control Modes DMX Master Slave Manual Dimming User Interface LCD Display and 4 buttons DMX In Out 3 pin XLR IP rate IP33 Power Socket Powercon Input Output Voltage 100 240V 50 60Hz Max Pow...

Страница 18: ...TER Via Enzo Ferrari 10 62017 Porto Recanati Italy In order to send a product to service center you need an RMA num ber Shipping charges have to be covered by the owner of the product For further info...

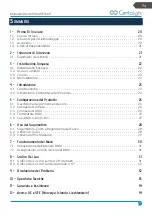
Страница 19: ...l Prodotto 25 5 1 Descrizione del pannello posteriore 25 5 2 Connessioni di Rete 26 5 3 Connessioni DMX 26 5 4 Terminatore DMX 27 5 5 Cavi DMX 3 Poli 5 Poli 27 6 Uso del Sagomatore 28 6 1 Sagomatore Z...

Страница 20: ...ano segni di maltrattamento avvisare immediatamente il vettore o il rivenditore Inoltre conservare la scatola e il contenuto per una eventua le ispezione Se il prodotto dovesse essere restituita al pr...

Страница 21: ...ne utilizzato per indicare che all interno di questo apparecchio sono presenti terminali sotto tensione anche in condizioni operative normali che possono essere sufficienti a costituire il rischio di...

Страница 22: ...ta il funzionamento dopo aver apportato qualsiasi modifica Deve inoltre assicurarsi che un esperto approvi l installazione e i dispositivi di sicurezza ogni anno IMPORTANTE il montaggio su strutture s...

Страница 23: ...con fascio luminoso a 26 disponibile anche tubo con lente a 19 opzionale progettato per teatri e instal lazioni fisse in cui richiesta un elevata affidabilit del chip LED e un illuminazione bianca ca...

Страница 24: ...incluso 4 2 Dimensioni e Panoramica del Prodotto 590mm 23 29 30mm 1 18 520mm 20 47 182mm 7 16 266mm 10 47 266mm 10 47 224mm 8 89 1 2 3 4 5 6 7 8 9 10 1 Porta Gelatina 2 Molla con Fermo del Porta Gela...

Страница 25: ...ostazione Tasto UP Premere per scorrere i vari menu e i parametri dei menu indirizzo DMX modalit operativa ecc e per aumentare i valori o le impostazioni dei parametri Tasto Gi Premere per scorrere i...

Страница 26: ...o o abbia fili scoperti Non collegare mai questo prodotto a un Dimmer Pack o un Variatore di Tensione y Non scollegare mai il prodotto tirandolo con forza il cavo di alimentazione y Per evitare scosse...

Страница 27: ...protocollo di comunicazione resiliente tuttavia si po trebbero verificare occasionalmente degli errori I terminatori ri ducono gli errori di segnale quindi consigliabile usarle quando si verificano pr...

Страница 28: ...Signal Pin 3 Signal 6 Uso del Sagomatore 6 1 Sagomatore Zoom e Regolazione del Fuoco 1 3 2 Dopo aver fissato o installato il faro e aver collegato i cavi Power In Out e DMX In Out 1 Estrarre le 4 lame...

Страница 29: ...o all interno 3 Accendere il faro e regolare le manopole dello Zoom e del Fuoco fino a che non si ottiene la di mensione desiderata e la proiezione del gobo non risulti pi chiara possibile 1 2 6 3 Uti...

Страница 30: ...corrente No Menu Function 1 001 x DMX Addr Selezione indirizzo DMX512 001 512 Quando non vi alcun segnale DMX in entrata il carattere in basso a destra una x quando un cavo DMX collegato a un control...

Страница 31: ...un indirizzo iniziale troppo alto possibile che si limiti l accesso ad alcuni parametri del prodotto SQUARE 150P utilizza 2 canali DMX i quali definiscono il pi alto indirizzo configurabile a 511 per...

Страница 32: ...ma non risponde correttamente alla centralina DMX Canali DMX errati Controllare i canali DMX sul faro e sulla centralina Errore di trasmissione dei dati Controllate che I cavi siano col legati corret...

Страница 33: ...MX 2 canali RDM incluso Modalit Operative DMX Dimmer Manuale Interfaccia Utente Display LCD e 4 pulsanti DMX In Out XLR a 3 poli Grado di Protezione IP IP33 Presa di Alimentazione Powercon Ingresso Us...

Страница 34: ...62017 Porto Recanati Italia Per inviare un prodotto al centro di assistenza necessario un numero di RMA Le spese di trasporto devono essere coperte dal proprietario del prodotto Per ulteriori informaz...

Страница 35: ...otto viene importato nella UE da FRENEXPORT SPA Via Enzo Ferrari 10 62017 Porto Recanati Italy www centolight com CentoLight is a registered trademark of FRENEXPORT SPA Italy CentoLight un marchio di...

Страница 36: ...Ver 1 2 May 2022 www centolight com...

Отзывы: