background image

33

SECTION 10

POTENTIAL HAZARDS


POTENTIAL 


WHAT CAN HAPPEN


   HOW TO AVOID THE HAZARD


HAZARD

Operating the Centaur 

with improper tires or 

with  improper  or  un-

even tire pressure.

Use of improper tires on the Centaur, or opera-

tion of the Centaur with improper or uneven tire 

pressure may cause loss of control increasing your 

risk of an accident. 

Always use the size and type tires specified in 

this Operator’s Manual for this Centaur. Always 

maintain proper tire pressure as described in this 

Operator’s Manual.

Operating the Centaur 

with improper modifi

-

cations.

Improper  installation  of  accessories  or  modi-

fication  of  the  Centaur  may  cause  changes  in 

handling which in some situations could lead to 

an accident.

Never  modify  the  Centaur  through  improper 

installation or improper use of accessories. All 

parts  and  accessories  added  to  this  Centaur 

should be genuine Centaur components designed 

for use on the Centaur and should be installed 

and used according to instructions. If you have 

questions, consult an authorized Centaur dealer 

or  contact  Ontario  Drive  &  Gear  Limited  at 

1-519-662-4000

Applying  brakes  sud-

denly  when  going 

downhill.

Sudden braking can cause the vehicle to roll 

over forward.

Gently apply the brakes to control downward 

vehicle speed. Do not jam on the brakes while 

travelling downhill.

Operating  Centaur  on 

public streets, roads or 

highways.

A collision can occur with another vehicle.

Never drive on public roads.

Never operate at exces

-

sive speeds.

Personal injury or vehicle damage may result.

Do  not  drive  the  vehicle  at  high  speeds  over 

unfamiliar or rough terrain.

Never operate at speeds too fast for your skills 

or the conditions.

Failure  to  use  extra 

care when operating the 

Centaur  on  unfamiliar 

terrain.

Personal injury or vehicle damage may result.

Do  not  drive  the  vehicle  at  high  speeds  over 

unfamiliar or rough terrain.

Failure  to  use  extra 

care when operating on 

rough, slippery or loose 

terrain.

Could cause loss of traction or vehicle control, 

which could result in an accident, including 

an overturn.

Do not operate on rough, slippery or loose ter-

rain  until  you  have  learned  and  practised  the 

skills necessary to control the Centaur on such 

terrain.

Turning improperly.

When turning, the back of the vehicle swings to 

the opposite direction of the turn, creating a risk 

of hitting persons or objects.

Sharp turns, especially at high speeds or when 

heavily  loaded,  may  cause  the  vehicle  to  roll 

over.

Always take precautions when making turns to 

avoid rolling the vehicle or hitting persons or 

objects.

Slow the vehicle down before making a turn.  Do 

not apply the brakes too suddenly.

Driving on inclines with 

a loaded vehicle.

Heavy loads and high loads decrease the stability 

of the vehicle and may cause it to roll.

Use  extreme  CAUTION  when  negotiating 

inclines with a loaded vehicle. Be prepared to 

shift occupant weight and load forward or have 

passengers get out of the vehicle to walk up an 

incline.

Going downhill improp-

erly.

Sudden braking can cause the vehicle to roll 

over forwards.

Avoid steep declines when possible. When a steep 

decline cannot be avoided, shift occupant weight 

to the rear of the vehicle to prevent the vehicle 

from rolling over.

Содержание 2008 Centaur

Страница 1: ...Ontario Drive Gear Limited 220 Bergey Court New Hamburg Ontario N3A 2J5 Telephone 519 662 2840 Fax 519 662 2421 www centaur8x8 ca Do not remove this manual from this vehicle MANUAL NO 671 102 Printed in Canada 2008 12 04 ...

Страница 2: ... manual Please read and follow them carefully Always be safety conscious when you operate your CENTAUR and remember it is a motorized vehicle The CENTAUR is easy to drive and you will soon be tempted to take on new challenges Please take the time to develop your driving skills before doing so Observe the recommendations outlined in this Opera tor s Manual and remember some things are just impossib...

Страница 3: ...at can result in personal injury or death Cautions are identified in the text by the following symbol Caution text contains cautions that can prevent damage to the vehicle This manual is based on the latest product information available at the time of printing Ontario Drive Gear Limited reserves the right to make changes at any time and without obligation Reproduction of any part of this publicati...

Страница 4: ...in the vehicle Special operating and safety procedures described in this manual must be observed before and during operation The use of approved hearing protection is recommended Equip your vehicle with a fire extinguisher and a first aid kit Equip your vehicle with basic tools for emergency repairs Before starting your engine check for spilled fuel and wipe any up immediately Any fuel is a potent...

Страница 5: ...G INSTRUCTIONS 3 1 STEERING 7 3 2 BRAKES 7 3 3 PARKING EMERGENCY BRAKE 7 3 4 THROTTLE CONTROL 7 3 5 STARTING PROCEDURE 7 3 5 1 Gasoline Powered 7 3 5 2 Diesel Powered 8 3 6 STOPPING THE ENGINE 8 3 7 SELECTING AND CHANGING TRANSMISSION GEARS 8 3 8 HEADLIGHTS 9 4 0 DRIVING PROCEDURES 4 1 DRIVING STRAIGHT AHEAD 10 4 2 STOPPING THE VEHICLE 10 4 3 TURNING THE VEHICLE 10 4 4 BACKING THE VEHICLE UP 10 4 ...

Страница 6: ... Oil Filter 17 6 4 LUBRICATION INFORMATION 17 6 4 1 General 17 6 4 2 Drive Chain Lubrication 17 6 4 3 Driven Clutch Maintenance 17 6 4 4 Axle Bearing Lubrication 17 7 0 MAINTENANCE INFORMATION 7 1 ELECTRICAL SYSTEM 18 7 1 1 General 18 7 1 2 Battery 18 Checking Fluid Level 18 Charging the Battery 18 Cleaning the Battery Terminals and Cable Connections 18 Cleaning the Battery 18 7 1 3 ELECTRICAL SYS...

Страница 7: ...TROUBLESHOOTING 28 9 0 CLEANING AND STORAGE 9 1 CLEANING THE VEHICLE 30 9 2 STORING THE VEHICLE 30 Clean the Vehicle 30 Drain the Fuel System 30 Prepare the Battery for Storage 30 Protect the Electrical System 30 Raise the Vehicle 30 Preparing the Engine for Storage 30 10 0 POTENTIAL HAZARDS 31 11 0 ACCESSORY INFORMATION 11 1 GENERAL 35 11 2 REAR CARGO TIE DOWN BARS Part No 849 116 35 11 3 ALL SEA...

Страница 8: ...48 110 42 11 12 DUMP BOX KIT Part No 835 100 42 11 13 CARGO LINER Part No 848 123 42 11 14 CENTAUR FOUR POINT LIFT KIT Part No 848 121 42 11 15 LIGHT GUARD KIT Part No 849 134 43 11 16 BRUSH GUARD KIT Part No 849 191 43 11 17 MUD FLAP EXTENDERS Part No 821 105 43 11 18 TRANSMISSION OIL HEATER Part No 613 103 43 11 19 SPEEDOMETER KIT Part No 849 165 43 APPENDIX 1 SPECIAL TOOLS 10R VICE GRIP MODIFIC...

Страница 9: ...Section 8 contains information for locating and correcting mechanical problems In many cases potential problems can be identified by unusual noises sluggishness or vibration before they result in a breakdown Refer to the chart to identify these symptoms Take immediate corrective action or take the vehicle to a CENTAUR dealer for service This manual does not provide detailed maintenance or servic i...

Страница 10: ...ains from transmission to eight 1 59 40mm diameter axles Automatically adjusted tensioner for each drive chain Tapered roller bearings in an oil bath support each axle Frame Powder coated 3 inch tubular steel lower body support pan welded construction FEA analyzed for strength and durability Body Vacuum formed lower hull and standard full skid plate formed from high density polyethylene HDPE Load ...

Страница 11: ...Heater 20 lbs 9 kg Winch Kit 45 21 Brush Guard 20 9 Cargo Liner 30 14 Dump Box 240 109 Snow Plow 150 68 Multi Purpose Tracks 310 141 Winter Tracks 515 234 3 1 6 CE MARKED CENTAURS CE marked Centaurs include CE marked serial number label horn activated from driver s compartment the weighted root mean square value for vibration of the vehicle does not exceed 2 5 m s 2 the weighted root mean square v...

Страница 12: ...e labels on all models which indicate operating hazards and provide special operating instructions Information about the operation of the vehicle correct fueling procedures and steering system use has been provided on distinctive yellow and black labels fastened to the various locations on the CENTAUR 4 ...

Страница 13: ...e intake and exhaust screen for obstruc SECTION 2 GENERAL OPERATING INFORMATION tions Clear any debris that has accumulated 2 3 CARRYING PASSENGERS AND CARGO 1 Keep cargo as low as possible and evenly distributed 2 Use extreme CAUTION when negotiating inclines with a loaded vehicle Heavy loads and high loads decrease the stability of the vehicle and may cause it to roll Be pre pared to shift occup...

Страница 14: ...cohols or ethers Excessive amounts of these blends can damage the fuel system or cause performance problems Do not use gasoline which contains Methanol If any undesirable operating symptoms occur use gasoline with a lower percentage of alcohol or ether Keep fuel tank full Do not over fill fuel tank Allow space for fuel expansion Check for fuel leaks at fuel filter carburetor fuel pump etc Centaur ...

Страница 15: ... The steering wheel is locked in the center position when the armrest is in the raised position When the armrest is in the lowered position the steering is unlocked and ready for use Ensure armrest is lowered and steering wheel moves freely before driving the Centaur If the steering lockout feature malfunctions steering will be impaired which could cause an accident resulting in serious injury or ...

Страница 16: ...tch to the OFF position Always remove key from ignition switch when leaving the vehicle unattended 3 7 SELECTING AND CHANGING TRANSMISSION GEARS The CENTAUR is equipped with a four position transmission The gearshift lever is located to the left of the dash R Reverse for backing up the vehicle Neutral for starting the engine or idling L Low for use when extra pulling power or very low speed is req...

Страница 17: ...e right and pull down firmly Less force is required to shift into reverse Reverse does not have a synchronizer so it is very important that the engine is idling If reverse gear does not engage the first time use the same technique as for shifting into high and low Do not attempt to move the gearshift from the neutral starting position until the engine idles down completely The Centaur is equipped ...

Страница 18: ...opping the vehicle 4 3 TURNING THE VEHICLE The Centaur is a skid steer vehicle The rear of the vehicle swings outward during a turn Always take precautions when making turns to avoid hitting persons or objects The steering system is powered by a hydrostatic transmission and works best when engine r p m is higher than at idle Avoid turning the steering wheel when engine is idling Do not use steerin...

Страница 19: ...rake suddenly while driving up or down a hill Sudden acceleration or braking can cause the vehicle to roll over causing serious personal injury or death Never attempt to turn the vehicle around on a steep hill or grade Turning the vehicle around on a hill can re sult in the vehicle rolling over and can result in serious injury or death Approach the hill head on to minimize the possibility of slidi...

Страница 20: ...on device PFD or life jacket while crossing water 2 Equip the vehicle with first aid kits and personal safety equipment Optional bilge pump kits Part No 849 146 are available from your Centaur dealer and are recom mended for vehicles that will be crossing shallow streams or rivers 3 Make sure both drain plugs in the rear of the lower body Figure 5 1 are in place and properly tightened To install l...

Страница 21: ...nd final drive components immobilizing the vehicle Store the vehicle indoors or under cover Equip your vehicle with snow tracks for travel over deep snow Steep snow covered or icy hills may be more difficult to ascend or descend Never travel alone into a remote area Leave your route and arrival plans with someone who can send help if you fail to arrive as planned 5 7 1 Use on Ice Covered Bodies of...

Страница 22: ...should be between the marks If the level has dropped add oil to bring the level up to the F mark DO NOT OVERFILL Figure 6 1 Oil fill and level location Briggs Stratton Daihatsu engine Do not run the engine if the oil level is above the F mark or below the L mark Premature engine damage or total engine failure can occur when the oil level is not properly maintained 6 1 2 Recommended Engine Oil Use ...

Страница 23: ...re removing Remove the dipstick by pulling up The transmission oil level should be even with the mark on the dipstick as shown in Figure 6 3 Add CitgoTransguardTractor Hydraulic Fluid or equivalent through the transmission oil fill dipstick hole until the transmission is filled to the correct level When the oil level is at the lower notch approximately one litre can be added DO NOT OVERFILL Replac...

Страница 24: ...er 1 Stop engine 2 Place a drain pan under fuel filter and loosen drain plug approximately 1 turn 3 Water should drain If necessary operate priming pump to drain water but only until fuel flows from filter Figure 6 4 Fuel Filter 4 Tighten drain plug Bleed air from fuel line 5 Start engine Make sure warning light goes out Check for leaks To replace fuel filter element 1 Disconnect sensor wire Remov...

Страница 25: ...arna VegOil A vegetable based chain oil that has been carefully developed by Husqvarna to produce a highly effective environmentally compatible lubricant Biodegradable and economical up to 40 less required than with conventional oils Low viscosity even in extreme cold and able to handle water contamination Can be cleaned with common detergents After every 100 hours of operation remove all the driv...

Страница 26: ...le servic ing the battery All models are equipped with a 12 volt wet cell type battery The battery is located in the engine compartment on the left side of the engine Checking Fluid Level Check the fluid level every 50 hours of operation Remove the vents and make sure each cell is filled to the fluid level as shown in Figure 7 1 If the fluid has dropped below the fill well add distilled water unti...

Страница 27: ...if the drive belt clutch components or other moving parts come loose If engine compartment inspection is necessary while the engine is running use EXTREME CAUTION Keep engine RPM low Avoid standing directly in line with moving components Use a mirror to view the components 7 2 1 DRIVE BELT The drive belt transmits power from the driver clutch on the engine to the driven clutch on the transmission ...

Страница 28: ...ace the nylon sliders properly Return the vehicle to a CENTAUR dealer for service 7 2 3 DRIVE CHAINS Roller chain stretch results from wear to the chain pins and bushings because of the loss of lubricant To prevent sprocket damage and unnecessary breakdowns replace the chains when the chain tensioner can no longer take up the chain slack the chain is seized due to rust and lack of lubrication the ...

Страница 29: ...NT Repair a flat tire by removing the tire completely from the rim Proper tire changing equipment is necessary to remove and remount the tire Apply a radial tire patch on the inside of the tire over the puncture or hole Remount the tire on the rim using ONLY WATER as a bead lubricant Spoon the tire onto the rim to prevent tire bead area damage THE TIRE MAYEXPLODE IF OVER INFLATED Place the tire an...

Страница 30: ...010 feeler gauge 010 is the correct clearance between the left brake pad and the brake disc when the right pad is pressed against the disc 2 Use another 1 2 open wrench to tighten the outer lock nut to the inner one 3 Tighten the adjustment lock nut with a 1 2 wrench so it is snug but the bolt can still be turned freely with fingers Figure 7 12 Tightening the lock nut Figure 7 13 Brake pad wear me...

Страница 31: ... ensure that the parking brake will bring the vehicle to a stop when coasting Repeat several times then check the gap be tween brake pad and the disk and readjust if necessary 8 Start up and drive the vehicle for 10 minutes Stop the engine and check that the parking brake caliper has not been dragging A strong brake material smell and a very hot brake disk would indicate that the parking brake cal...

Страница 32: ...ke performance is affected the pads are contaminated with lubricant and brake per formance is affected To replace the brake pads Remove both cotter pins from the brake caliper Remove the brake caliper from the transmission using a hex driver to remove the two SHCS mounting bolts accessible through the brake disc hole as shown in Figure 7 16 Without disturbing the connection of the brake line swing...

Страница 33: ...uld not rotate Figure 7 18 Position of steering spring plate 7 5 2 STEERING WHEEL LOCK ADJUSTMENT Adjust the steering cable so that the wheel will be centered when released Ensure that the steering wheel has unrestricted rotation to the stops located at the bottom of the steering wheel housing Adjust cable if necessary Tighten all nuts and bolts associated with the steering system Ensure that all ...

Страница 34: ... assembly when in the neutral position 5 To adjust the shift cables the shifting yokes threaded to the end of the push pull shift cables must be threaded further onto the cable or else threaded out further This is most easily done by loosening off the nuts from the outside of the shift box and adjusting as needed You may need to rotate the clutch to allow the shifting mechanism within the transmis...

Страница 35: ...ATTERY TERMINALS CONNEC CLEAN BATTERY CLEAN ADJUST REPLACE SPARK PLUGS CHECK THE DRIVE BELT CHECK PLASTIC SLIDERS DRIVEN CLUTCH CHECK SLIDERS CHAIN TAKE UP SYSTEM INSPECT MECH BRAKE PADS ADJUST PARKING BRAKE ADJUST PARKING BRAKE CABLE CHECK HYD BRAKE FLUID LEVEL COND INSPECT HYDRAULIC BRAKE PADS CHECK ADJUST STEERING CENTERING CHECK HYDROSTATIC TRANS DRIVE BELT TENSION CHECK FUEL TANK CONNECTIONS ...

Страница 36: ...on 6 Take the vehicle to a factory au thorized engine repair outlet 7 Gas engine fuel delivery system 7 Check that electric fuel pump is is faulty operating Make sure fuel shut off solenoid is activated to allow fuel into carburetor Engine will not run 1 Refer to engine manual Vehicle will not move and or turn 1 Transmission in neutral or not 1 Place gear shift properly in gear properly engaged in...

Страница 37: ... rim in a water tank Air may be escaping through the rim halves or the valve stem Repair as required 4 Defective valve 4 Replace defective valve Hydraulic brakes are spongy 1 Air in hydraulic system 1 Have a CENTAUR dealer bleed or there is excessive brake the brake system and add fluid pedal travel 2 Leak in system 2 Have a CENTAUR dealer check all fittings hoses calipers and seals for loose conn...

Страница 38: ... to the fuel tank and fill with fresh fuel Run the engine for a few minutes to allow the treated fuel to reach the engine Prepare the Battery for Storage Remove the battery from the vehicle Clean it and charge it with a battery charger Coat the battery terminals with a multi purpose grease to prevent corrosion Store the battery in a cool dry place Do not store the battery near flames sparks or any...

Страница 39: ...the vehicle Operating the Centaur after or while consum ing alcohol or drugs Could seriously affect your judgement cause you to react more slowly and affect your balance and perception This could result in an accident Never allow anyone under the influence of alco hol or any other intoxicating substance to drive or ride in the vehicle Never use with drugs or alcohol Carrying passengers in the dump...

Страница 40: ...e chains axles or bearings Never exceed the load capacity of the Centaur Follow the recommended load capacity for your vehicle listed in Section 1 Failure to fasten seat belts If the Centaur overturns the driver and passengers may be thrown from the vehicle and be seriously injured or killed Seat belts must be properly adjusted and worn by all occupants at all times EXCEPT when operating in water ...

Страница 41: ...hicle damage may result Do not drive the vehicle at high speeds over unfamiliar or rough terrain Never operate at speeds too fast for your skills or the conditions Failure to use extra care when operating the Centaur on unfamiliar terrain Personal injury or vehicle damage may result Do not drive the vehicle at high speeds over unfamiliar or rough terrain Failure to use extra care when operating on...

Страница 42: ...ontrol skidding or sliding by practising at slow speeds and on level smooth terrain On extremely slippery surfaces such as ice go slowly and be very cautious in order to reduce the chance of skidding or sliding out of control Improperly operating in reverse You could hit an obstacle or person behind you resulting in serious injury When turning in reverse steering operation is opposite to automobil...

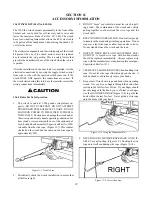
Страница 43: ...them all to 10 psi If the tires were just installed on rims or were left set under 5 psi it is very important that the tires have a chance to sit for at least 24 hours while pressurized Re check the tire pressure and re set to 10 psi if required b Measure the circumference of each tire using a suit able tape measure being sure to measure around the center line of the tire Figure 11 1 Write down th...

Страница 44: ...rmation on operating capacities CAUTION should be observed when operating in winter conditions and a drop in temperature occurs Snow and slush accumulation in the track could freeze resulting in damage to the track system Slush snow and ice ac cumulation should be cleared from the axles and track periodically to prevent build up CAUTION should be observed when using any track system on a Centaur M...

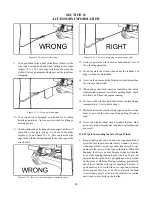
Страница 45: ...them all to 10 psi If the tires were just installed on rims or were left set under 5 psi it is very important that the tires have a chance to sit for at least 24 hours while pressurized Re check the tire pressure and re set to 10 psi if required b Measure the circumference of each tire using a suit able tape measure being sure to measure around the center line of the tire Figure 11 1 Write down th...

Страница 46: ... use on pavement gravel rocks or any other abrasive surface Abrasion will cause damage to the track assembly If a Centaur is taken outdoors into freezing temperatures after the track system has been installed indoors at normal room temperature the tires will lose air pressure After the tires have cooled down to the outdoor temperature where the vehicle is to be operated the tire pressure should be...

Страница 47: ...uperwinch Part No 1503 to double line the wire rope Figure 11 7 This reduces the load on the winch and the strain on the wire rope by approximately 50 Figure 11 7 Double Line 2 Periodically check the winch installation to assure that all bolts are tight 3 DO NOT move your vehicle to assist the winch in pull ing a load The combination of the winch and vehicle pulling together could overload the wir...

Страница 48: ...oad 15 When using your winch to move a load place the vehicle transmission in neutral set vehicle parking brake chock all wheels and keep the engine running 16 Do not use the winch to hold the Centaur in place during transportation Use tie down straps 17 Maintain at least five turns of wire rope around wire rope drum to prevent the wire rope from pulling off under load 18 Never run winch without c...

Страница 49: ...cludes a dash mounted switch and wire harness The pump is not designed to run dry Use only when water has collected in the vehicle 11 9 SNOW PLOW KIT Part No 657 106 The snow plow assembly attaches to the front mainframe as sembly of the Centaur The plow blade is an 81 2 m steel blade suitable for straight or angled use The power winch option is required to raise and lower the snow plow blade DO N...

Страница 50: ...frame and contamination of the bearings SECTION 11 ACCESSORY INFORMATION 11 11 CAB HEATER Part No 848 110 The Centaur can be fitted with a 17000 BTU cab heater It is equipped with a 3 speed dual fan motor This will provide operator comfort in the harshest winter conditions 11 12 DUMP BOX KIT Part No 835 100 The dump box is mounted to the mainframe It improves the load carrying versatility of the C...

Страница 51: ...mbs from damaging the lights and wind shield 11 17 MUD FLAP EXTENDERS Part No 821 105 For use with Snow or Multi Purpose Tracks Mud flap extend ers bolt onto the upper frame assembly and help to keep mud and snow out of the cargo compartment 11 18 TRANSMISSION OIL HEATER Part No 613 103 Recommended for use in cold temperatures This heater plugs into a 110V power supply and heats the transmission o...

Страница 52: ... be used to hold the ends of the idler chain together while inserting the connecting link Grind the undercut and sides of the vice grip jaw to fit over 2 chain rollers The undercut is approximately 5 16 radius as shown below DRIVER CLUTCH REMOVAL TOOL 658 17 Part No 658 17 Clutch Removal Tool can be used to assist in removal of the driver clutch from the engine Alternately a 6 length of 3 8 steel ...

Страница 53: ...45 NOTES ...

Страница 54: ...46 NOTES ...

Страница 55: ...r damaged during shipment 2 Normal maintenance or adjustments after initial pre servicing is completed 3 Normal replacement of service items 4 Accessory items not supplied by Ontario Drive Gear Limited 5 Damages resulting from misuse accident theft or fire use of improper or insufficient fuel fluids or lubricants use of parts other than genuine CENTAUR parts modifications alteration tampering or i...

Страница 56: ...________________________ CITY OR TOWN ____________________ PROV STATE _ ___________________ POSTAL ZIP ______________________________________________________ DATE OF SALE _ __________________________________________________ WARRANTY PERIOD EXPIRES ______________________________________ DEALER NAME ___________________________________________________ PHONE ___________________________________________...

Отзывы: