background image

28  

I


ESPAÑOL

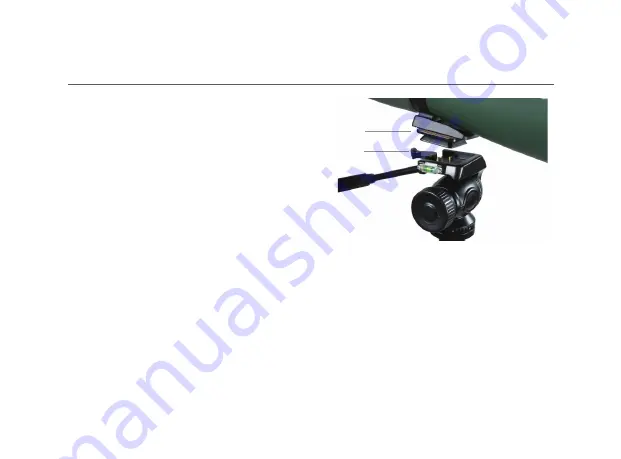
La placa de liberación rápida le permite fijar 
rápidamente la óptica al trípode.  Para soltar 
la placa de liberación rápida del cabezal de 
desplazamiento fluido, empuje la palanca de 
bloqueo hasta que encaje. Fije la placa de 
liberación rápida a cualquier dispositivo u óptica 
con soporte de montaje de ¼”-20 colocando la 
parte delantera de la placa de liberación rápida 
en el cabezal. A continuación, deslice la placa 
en posición.  Cuando la placa esté totalmente 
asentada, presiónela hacia abajo. La palanca de 
bloqueo encajará la placa automáticamente en 
posición.  

placa de liBeración rápida

Placa de liberación 
rápida (QR)

Palanca de 
bloqueo

Fig. 3

Содержание TRAILSEEKER CELE-82050

Страница 1: ...TRIPOD TR PIED TR PODE STATIV TREPPIEDE TRIPOD TR PIED TR PODE STATIV...

Страница 2: ......

Страница 3: ...ENGLISH 2 FRAN AIS 12 ESPA OL 22 DEUTSCH 32 ITALIANO 42...

Страница 4: ...time read these instructions carefully to ensure proper use and care celestron TrailSeeker Tripod Fluid Pan Head Bubble Level Quick Release Plate QR Plate Lock Lever Pan Tilt Handle Leg Angle Adjustm...

Страница 5: ...ilSeeker tripod will provide you with a stable platform for your spotting scope binocular or camera in the field With four leg sections three leg angles and an adjustable center column the tripod can...

Страница 6: ...lever to the left until it locks Attach the quick release plate to any device or optic with a 20 mount thread by placing the front of the quick release plate into the head Next slide the plate into pl...

Страница 7: ...knob to secure Adjusting the Center Column Center Column Lock Knob Center Column Adjusting the Leg Length The length of each leg section of the TrailSeeker tripod can be adjusted To adjust the length...

Страница 8: ...eg inward while pressing on the leg angle adjustment latch When the middle angle setting is reached the latch will depress and lock into place preventing it from pivoting outward To return to the stan...

Страница 9: ...retracted into the bottom of the center column with a spring mechanism that can easily be pulled out when needed To use the balance hook pull it down from the center column Hang a heavy object such as...

Страница 10: ...ipod legs and held in place with three set screws To remove the head loosen the set screws located under the center column with the included hex key With the pan tilt tension knob tightened turn the t...

Страница 11: ...ts like the inside of a car Do not place the tripod near anything that generates heat as this may cause damage 5 Clean your tripod with a mild detergent and a soft cloth Wipe away any dust dirt or wat...

Страница 12: ...ear and other conditions This warranty is valid to U S A and Canadian customers who have purchased their tripod from an authorized Celestron dealer in the U S A or Canada For products purchased outsid...

Страница 13: ......

Страница 14: ......

Страница 15: ...TR PIED FRAN AIS...

Страница 16: ...celestron TrailSeeker T te de mouvement panoramique fluide Niveau bulle Plateau retrait rapide RR Levier de verrouillage du plateau RR Poign e de mouvement vertical horizontal Loquet de r glage de l a...

Страница 17: ...tre lunette de recherche vos jumelles ou appareil photo sur le terrain quip de pieds quatre sections de trois angles pour les pieds et d une colonne centrale le tr pied peut tre install de multiples m...

Страница 18: ...qu son enclenchement Fixez le plateau de retrait rapide votre appareil ou optique l aide d une vis de montage de 20 en positionnant l avant du plateau de retrait rapide dans la t te Faites ensuite gli...

Страница 19: ...la colonne centrale Bouton de verrouillage de la colonne centrale Colonne centrale R glage de la hauteur des pieds La longueur de chaque section des pieds du TrailSeeker peut tre r gl e Pour r gler la...

Страница 20: ...ut en appuyant sur le loquet de r glage d angle Une fois le r glage du milieu atteint le loquet s enfoncera pour se verrouiller emp chant tout mouvement suppl mentaire Pour retourner au r glage standa...

Страница 21: ...t r tract pour viter de g ner dans la colonne centrale Ce dernier est attach l aide d un ressort et peut tre tir tout moment Pour utiliser le crochet d quilibre tirez le hors de la colonne centrale ac...

Страница 22: ...ue en place l aide de trois vis Pour retirer la t te d serrez les vis situ es sous la colonne centrale l aide de la clef hexagonale Serrez le bouton de r glage horizontal vertical puis faites tourner...

Страница 23: ...au soleil Ne pas entreposer le tr pied proximit d une source de chaleur susceptible de l endommager 5 Nettoyez le tr pied l aide d un d tergent doux et d un tissu doux Nettoyez toute poussi re salet o...

Страница 24: ...et d autres conditions Cette garantie est valable pour les clients r sidants aux tats Unis d Am rique et au Canada qui ont achet leur tr pied chez un revendeur Celestron agr aux tats Unis ou au Canad...

Страница 25: ......

Страница 26: ......

Страница 27: ...TR PODE ESPA OL...

Страница 28: ...Celestron Cabezal de desplazamiento fluido Nivel con burbuja Placa de liberaci n r pida QR Palanca de bloqueo de placa QR Mango de desplazamiento inclinaci n Pesta a de ajuste de ngulo de pata Fundas...

Страница 29: ...le ofrecer una plataforma estable para su catalejo binoculares o c mara en el exterior Con cuatro secciones de pata tres ngulos de pata y una columna central ajustable el tr pode puede colocarse en m...

Страница 30: ...la placa de liberaci n r pida a cualquier dispositivo u ptica con soporte de montaje de 20 colocando la parte delantera de la placa de liberaci n r pida en el cabezal A continuaci n deslice la placa e...

Страница 31: ...mna central Mando de bloqueo de la columna central Columna central Ajuste de la longitud de las patas La longitude de cada secci n de pata del tr pode TrailSeeker puede ajustarse Para ajustar la longi...

Страница 32: ...na la pesta a de ajuste de ngulo de pata Cuando se llegue a la posici n de ngulo media la pesta a se soltar y encajar en posici n evitando que siga rotando hacia fuera Para volver al ngulo de pata hab...

Страница 33: ...e inferior de la columna central con un mecanismo de muelle que puede sacarse f cilmente cuando sea necesario Para usar el gancho de equilibrado tire hacia abajo desde la columna central Cuelgue un ob...

Страница 34: ...ode y fijado con tres tornillos Para sacar el cabezal afloje los tornillos situados bajo la columna central con la llave hexagonal incluida Con el mando de tensi n de desplazamiento inclinaci n apreta...

Страница 35: ...ponga el tr pode cerca de ning n objeto que genere calor podr a da arlo 5 Limpie el tr pode con un detergente y una gamuza suaves Limpie el polvo la suciedad o el agua que pueda estar sobre el tr pode...

Страница 36: ...es Esta garant a tiene validez para clientes de EUA y Canad que hayan adquirido su tr pode en un vendedor autorizado de Celestron en EUA y Canad Para productos adquiridos fuera de EUA y Canad contacte...

Страница 37: ......

Страница 38: ......

Страница 39: ...STATIV DEUTSCH...

Страница 40: ...amit ordnungsgem er Gebrauch und Pflege gew hrleistet sind celestron TrailSeeker Stativ Fluid Schwenkkopf Wasserwaage Schnellwechselplatte Feststellhebel f r die Schnellwechselplatte Schwenk Neigegrif...

Страница 41: ...t Das TrailSeeker Stativ bietet Ihnen einen stabilen Unterbau f r Ihr Spektiv Fernglas oder Ihre Kamera Dank der vier Beinabschnitte der drei Beinwinkel und der einstellbaren Mittels ule kann das Stat...

Страница 42: ...lag nach links Die Schnellwechselplatte kann an jedes beliebige Instrument oder jede Optik mit einem 20 Gewinde angebracht werden indem die Vorderseite der Schnellwechselplatte auf den Kopf aufgesetzt...

Страница 43: ...ht Die Mittels ule einstellen Mittels ulen Feststellknopf Mittels ule Beinl ngen einstellen Die L nge jedes Beinabschnitts des TrailSeeker Stativs kann angepasst werden Um die L nge eines Beinabschnit...

Страница 44: ...egel des Beinwinkels gedr ckt halten Sobald die mittlere Winkeleinstellung erreicht ist rastet der Riegel ein damit das Bein nicht mehr nach au en gedreht werden kann Wenn Sie den Standard Beinwinkel...

Страница 45: ...ziehbaren Federmechanismus in die Unterseite der Mittels ule eingezogen werden Ben tigen Sie ihn wird er einfach aus der Mittels ule nach unten herausgezogen Nun k nnen sie einen schweren Gegenstand w...

Страница 46: ...tellschauben gesichert Zum Abnehmen des Kopfes werden die Feststellschrauben unter der Mittels ule mithilfe des enthaltenen Inbusschl ssels gel st Mit festgedrehtem Schwenk Neigespannknopf wird der St...

Страница 47: ...sie im Inneren eines Autos herrschen Legen Sie das Stativ nicht in die N he von W rme erzeugenden Quellen da dies zu Besch digen f hren k nnte 5 Reinigen Sie Ihr Stativ mit einem milden Reinigungsmitt...

Страница 48: ...und Verschlei bzw anderen Bedingungen ab Diese Gew hrleistung gilt f r Kunden in den USA und Kanada die ihre Stative bei autorisierten Celestron H ndlern in den USA oder Kanada erworben haben Wenden S...

Страница 49: ......

Страница 50: ......

Страница 51: ...TREPPIEDE ITALIANO...

Страница 52: ...celestron TrailSeeker Testa inclinabile Livella a bolla Piastra a sgancio rapido SR Leva di bloccaggio della piastra SR Leva di regolazione rotazione e inclinazione Fermo di regolazione dell angolazio...

Страница 53: ...e TrailSeeker fornisce una piattaforma stabile per l impiego di cannocchiali binocoli o fotocamere Grazie a quattro sezioni delle gambe tre angolazioni delle gambe e una colonna centrale regolabile il...

Страница 54: ...della stessa Fissare la piastra a sgancio rapido a qualsiasi dispositivo o strumento ottico con filettatura 20 posizionando la parte frontale della piastra a sgancio rapido sulla testa Quindi far scor...

Страница 55: ...centrale Manopola di bloccaggio della colonna centrale Colonna centrale Regolazione della lunghezza delle gambe possibile regolare la lunghezza di ciascuna sezione delle gambe del treppiede TrailSeek...

Страница 56: ...angolazione della gamba Quando viene raggiunta l angolazione intermedia il fermo si blocca in posizione impedendo la rotazione verso l esterno Per tornare all angolazione standard della gamba continu...

Страница 57: ...colonna centrale grazie a un meccanismo a molla che pu essere facilmente estratto quando necessario Per utilizzare il gancio per zavorra estrarlo dalla colonna centrale e tirarlo verso il basso Appen...

Страница 58: ...e da tre viti di fermo Per rimuovere la testa allentare le viti di fermo poste sotto la colonna centrale utilizzando la chiave a brugola in dotazione Con la manopola di tensionamento rotazione e incli...

Страница 59: ...on posizionare il treppiede in prossimit di fonti di calore poich potrebbe danneggiarsi 5 Pulire il treppiede con un detergente delicato e un panno morbido Rimuovere appena possibile eventuale polvere...

Страница 60: ...zia valida per clienti negli Stati Uniti e in Canada che abbiano acquistato il proprio treppiede da rivenditori Celestron autorizzati negli Stati Uniti e in Canada Per prodotti acquistati al di fuori...

Страница 61: ......

Страница 62: ...www celestron com 2013 Celestron All rights reserved Printed in China 0113 This product is designed and intended for use by those 14 years of age and older...

Отзывы: