background image

6


|


ENGLISH

You can take snapshots or a short video with your microscope 
using the built-in digital camera. With the SD card memory, you 
do not need to use a PC or any other devices to do imaging. 
Transferring images to your PC for saving or printing is easy and 
will be discussed later in this manual.

NOTE:  

If you are going to take images, do not connect the USB cable to your PC or 
damage could occur to the equipment. The USB cable is not used for taking 
images.

SETTINGS AND INFORMATION FOR THE  

DIGITAL CAMERA AND THE TOUCH SCREEN 

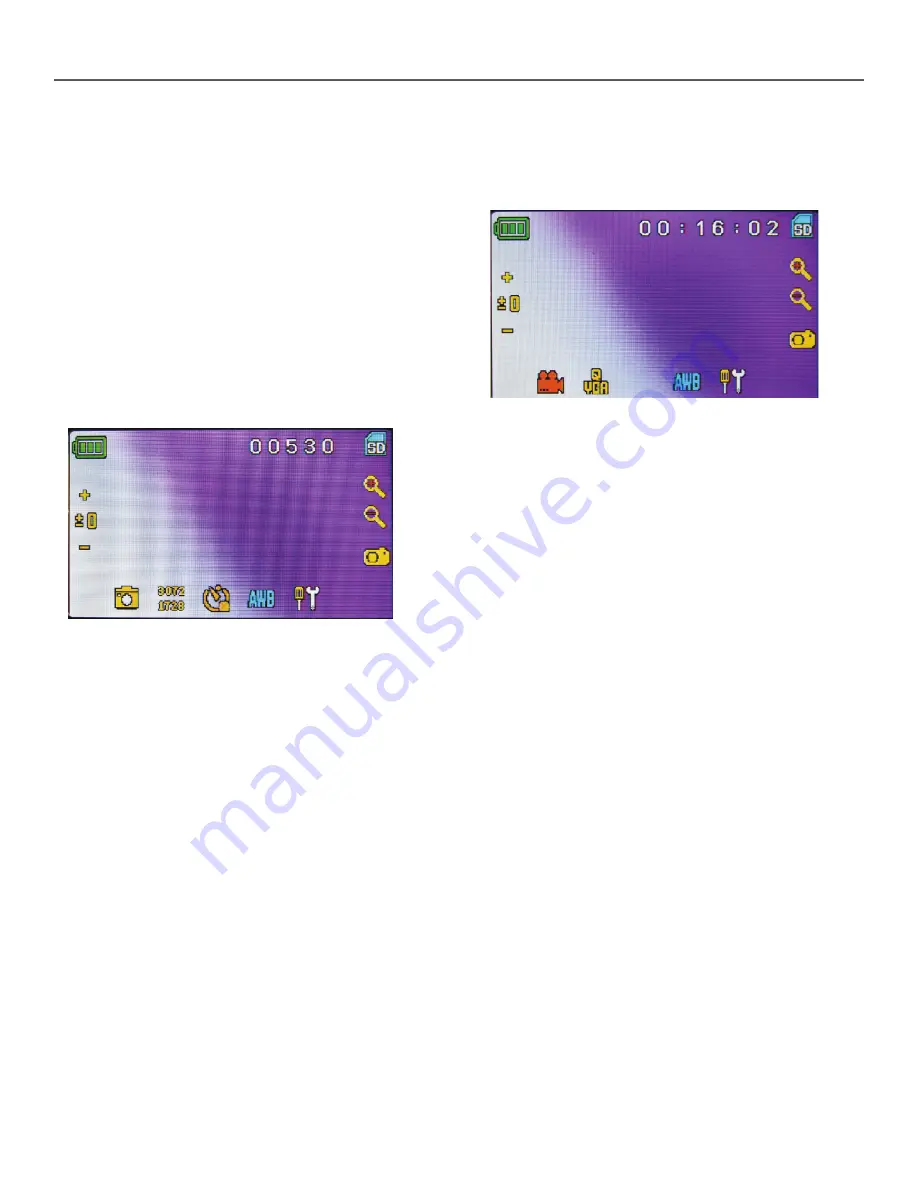
The touch screen icons and their functions are quite easy to use. 
Below we’ll discuss the general use of the icons. Typically, you use 
your fingers with the touch screen, but you can use the included 
touch pen as well. You will find the following twelve icons/ when in 
the viewing/ snapshot mode:

NOTE:


After turning the LCD Monitor off, most settings will revert to the default settings.

Settings Icon (7) 
Time & Date — Year, month, date, and time
Language —  Choose from Chinese (simple or traditional), English, 

French, German, Italian, Japanese, Korean, Portuguese, 
Russian, and Spanish

Beep —     Beeps with each touch of the screen (can be disabled)
Default Factory Settings — Revert to factory settings
Format- Format the SD card
TV OUT - Sends a signal to an external monitor

Pixel setting icon (4) 
Lightly tap the icon to change the pixel setting from 640x360, 
1920x1080, 2048x1152, 2560x1440, 3072x1728, and 
3648x2048. 3072x1728 is the sensor resolution and 3648x2048 
gives you higher resolution through interpolation. 

Snapshot selection (5)
The default setting is single shot, but you can set for timed shots.

VIDEO MODE

To take videos, change the “video” setting first. The icons on this 
image (Figure 11) work the same way as in the snapshot mode with 
the following exceptions:

3.  Touch to go to viewing mode.
4.  Set the pixel size to 640x360 (the highest resolution for videos) by 

touching the screen. In both resolutions (high 640x360 or low - QVGA), 
the frame specifications is 20fps.

8.  Record Video — Touch to begin video and touch again to stop  

the video.

12. Indicate recording time remaining

.

SNAPSHOT OR VIDEO REVIEW

From the video mode, touch the video icon in the lower left of the 
screen to go to the review mode. In this mode, you can review the 
snapshots and videos you have taken. Touch the arrows and touch/
scroll the screen to navigate and view your videos and snapshots. 
You can also delete them if you choose.

NOTE:


Inserting or removing an SD card while the LCD is on may cause the LCD to shut 
down and/or could damage the SD card. 

TRANSFERRING YOUR IMAGES 

To transfer images to a PC or Mac, you need to have a free USB 
port on your PC and have an imaging program for snapshots and/
or video. 

NOTE:

 Do not disconnect the USB cable while transferring images or damage may occur.

1.  You can transfer images from the SD card to your PC by using 

the supplied USB cable. The small plug end of the cable plugs 
into the LCD monitor (see Figure 1) and the large plug end of 
the cable plugs into your PC.When connected properly, you will 
see “MSDC” or similar on the screen. Your PC will automatically 
recognize the new hardware. Then you will choose a program 
on your PC to use for transferring images.

2.  You can take the SD card out and use the SD card slot on your 

PC (if available) to transfer the images as well. Either way, your 
PC will ask you to choose which program you want to transfer the 
images to.

Deleting all Snapshots/Video Images – To delete all images 
use the memory format function, select Settings / Memory / Format 
and choose SD card or Flash memory.

DIGITAL IMAGING

 1. 

Increase EV function

 2. 

Decrease EV function 

 3. 

Selection mode

 4. 

Pixel setting

 5. 

Snapshot selection

    6.  Color special effect

7.   Settings
8.   Shutter Trigger-take snapshot
9-10. Digital zoom indicator  —+  
11.   SD card storage 
12.  Snapshots remaining

3

4

12

8

VIDEO MODE

Fig 11

1

2

3

4

5

6

7

8

9

10

12

11

VIEWING/SNAPSHOT MODE

Fig 10

Содержание TetraView 44347

Страница 1: ...INSTRUCTION MANUAL ENGLISH MODEL 44347 ...

Страница 2: ...igital Microscope does not use eyepieces You will view specimens on the LCD screen In addition you can take snapshots or short videos with the built in digital camera Plus you can view on most TV screens with the AV TV cable The final sections of this manual provide simple care maintenance and troubleshooting tips to ensure that your microscope provides you with years of quality performance and en...

Страница 3: ...C power if you choose This gives you the freedom to operate the microscope outdoors or indoors anywhere you please You ll need 4 AA batteries user supplied Open the battery door on the bottom of the microscope and insert the batteries according to the battery polarity shown in the battery compartment Figure 4 After the batteries are installed close the battery door Battery life will typically be t...

Страница 4: ...ed to increase the amount of light to resolve certain features or details This is best done by increasing the brightness of the illuminator by rotating the brightness control dial to its highest setting Experiment with adjustments to find optimum lighting settings Each specimen and magnification may require slightly different illumination VIEWING A SPECIMEN Your instrument is provided with a mecha...

Страница 5: ... very bright transparent specimens To change the lighting color rotate the wheel Figure 8 to the desired color Red R Green G Blue B Each color is centered when you hear feel the faint click stop You may need to refocus by adjusting the focus knob Figure 1 slightly for best viewing You should experiment with each of the colors to see what works best Diaphragm Within the wheel are holes with three d...

Страница 6: ...ighest resolution for videos by touching the screen In both resolutions high 640x360 or low QVGA the frame specifications is 20fps 8 Record Video Touch to begin video and touch again to stop the video 12 Indicate recording time remaining SNAPSHOT OR VIDEO REVIEW From the video mode touch the video icon in the lower left of the screen to go to the review mode In this mode you can review the snapsho...

Страница 7: ...ur microscope remove any specimens left on the stage Turn off the illuminator switches Turn off the LCD monitor push the on off button until you see Shutting Power Off Unplug the power cord Always place the plastic bag or dust cover over the microscope when not in use to help keep it clean Store the microscope in a dry and clean place Be very careful if using your microscope in direct sunlight to ...

Страница 8: ... Telephone 800 421 9649 2014 Celestron All rights reserved Printed in China 04 13 Product design and specifications are subject to change without prior notification This product is designed and intended for use by those 14 years of age and older ...

Страница 9: ...MODE D EMPLOI FRANÇAIS MODÈLE 44347 MICROSCOPE NUMÉRIQUE LCD ...

Страница 10: ...s Vous verrez des spécimens ou des objets sur l écran LCD qui sont faciles à observer et vous pouvez aussi en profi ter avec les autres En outre vous pouvez prendre des photos ou des vidéos de courte durée avec l appareil photo numérique intégré De plus vous avez la possibilité de l affi cher sur la plupart des écrans TV avec le câble AV TV Les dernières sections de ce manuel vous offrent des cons...

Страница 11: ...ans alimentation CA si vous le désirez Cela vous donne la liberté d utiliser le microscope à l extérieur comme à l intérieur où que vous le désirez Le fonctionnement avec piles requiert 4 piles AA non inclus Ouvrir le compartiment de piles au bas du microscope et insérer les piles selon les polarités affi chées dans le compartiment de piles Figure 4 Après l installation des piles fermer la porte d...

Страница 12: ...er la fonction EV de l écran tactile La fonction EV valeur d exposition augmente ou diminue le niveau de luminosité en utilisant le ou sur l écran Lorsque vous observez un spécimen de couleurs foncées vous devrez peut être augmenter la quantité de lumière pour déterminer certaines caractéristiques ou certains détails La meilleure façon de le faire est d augmenter tout simplement la luminosité de l...

Страница 13: ...ans filtres colorés et avant d utiliser le microscope s assurer que les filtres ne sont pas dans le chemin optique Toutefois afin de faire ressortir différents niveaux de détail essayer de changer la couleur de l éclairage arrière du spécimen en particulier pour les très brillants spécimens transparents Pour modifier la couleur de l éclairage faire pivoter la molette Figure 8 à la couleur désirée ...

Страница 14: ...age normal est une simple photo mais vous pouvez le régler pour des photos chronométrées MODE VIDÉO Pour prendre des vidéos vous devez d abord changer le réglage à vidéo video Les icônes sur cette image Figure 11 fonctionnent de la même manière comme pour le mode de capture instantanée à l exception de ce qui suit 3 Toucher pour accéder au mode visualisation 4 Régler la taille de pixel à 640x360 l...

Страница 15: ...et sec Faire attention si vous utilisez votre microscope en plein soleil pour éviter d endommager le microscope ou vos yeux Lorsque vous déplacez le microscope le prendre par le bras avec une main et non pas par le bouton de mise au point le moniteur LCD etc Ensuite placer votre autre main sous la base de soutien Nettoyer les surfaces extérieures métal et plastiques avec un chiffon humide Toujours...

Страница 16: ...hone 800 421 9649 2014 Celestron Tous droits réservés Imprimé en Chine 04 13 La conception des produits et les spécifications sont sujettes à modification sans notification préalable Ce produit est conçu et destiné pour les personnes de 14 ans et plus ...

Страница 17: ...BEDIENUNGSANLEITUNG DEUTSCH MODELL 44347 DIGITALES LCD MIKROSKOP ...

Страница 18: ...cht über Okulare wie sie bei herkömmlichen Mikroskopen verwendet werden Proben oder Objekte werden Sie auf dem LCD Bildschirm angezeigt was die Betrachtung einfach macht und die Möglichkeit bietet sich gemeinsam mit anderen daran zu erfreuen Zusätzlich können Sie mit der integrierten Digitalkamera Schnappschüsse oder kurze Videos aufnehmen Außerdem ist mithilfe eines AV TV Kabels eine Ansicht auf ...

Страница 19: ... ist abgeschlossen Batteriebedienung Wenn gewünscht können Sie ihr Mikroskop ohne AC Strom verwenden Auf diese Weise haben Sie die Freiheit das Mikroskop beliebig im Freien oder in Innenbereichen einzusetzen Der Batteriebetrieb erfordert 4 AA Batterien nicht im Lieferumfang enthalten Öffnen Sie die Batterieklappe am Mikroskopfuß und legen Sie die Batterien entsprechend der im Batteriefach angezeig...

Страница 20: ...derung der EV Funktion auf dem Touchscreen Die EV Funktion Belichtungswert erhöht oder verringert die Helligkeitsstufe unter Verwendung der oder Tasten auf dem Bildschirm Beim Betrachten einer dunklen Probe müssen Sie möglicherweise die Lichtmenge erhöhen damit bestimmte Merkmale oder Details aufgelöst werden Am besten erreicht man dies durch erhöhte Helligkeit des Beleuchtungselements indem das H...

Страница 21: ...filter möglich bevor Sie das Mikroskop verwenden stellen Sie bitte sicher dass sich keine Filter im Strahlengang befinden Um jedoch verschiedene Details hervorzuheben können Sie mit unterschiedlicher Hintergrundbeleuchtung der Probe experimentieren vor allem im Falle sehr heller transparenter Proben Um die Belichtungsfarbe zu wählen drehen Sie das Rad Abbildung 8 zur gewünschten Farbe Rot R Grün G...

Страница 22: ...höhere Auflösung durch Interpolation Schnappschuss Auswahl 5 Üblich ist die Einzelbild Aufname aber Sie können zeitgesteuerte Aufnahmen einstellen VIDEO MODUS In diesem Modus können Sie Videos aufzeichnen Um Videos aufzuzeichnen müssen Sie zuerst die Einstellung Video vornehmen Die Symbole auf diesem Bild Abbildung 11 bewirken dasselbe wie im Schnappschuss Modus mit Ausnahme von 3 Berühren um in d...

Страница 23: ...erst vorsichtig wenn Sie Ihr Mikroskop im direkten Sonnenlicht verwenden um Schäden am Mikroskop und ihren Augen zu vermeiden Wenn Sie Ihr Mikroskop bewegen heben Sie es mit einer Hand am Arm und nicht am Fokussiererknopf LCD Monitor etc an Legen Sie anschließend die andere Hand zur Unterstützung unter den Fuß Reinigen Sie die äußeren Oberflächen Metall und Plastik mit einem feuchten Tuch Ziehen S...

Страница 24: ... Telefon 800 421 9649 2014 Celestron Alle Rechte vorbehalten Gedruckt in China 04 13 Das Produktdesign sowie Spezifikationen können ohne vorherige Ankündigung geändert werden Dieses Gerät wurde für den Gebrauch von 14 Jahren und länger konzipiert ...

Страница 25: ...MANUAL DE INSTRUCCIONES ESPAÑOL MODELO 44347 MANUAL DE INSTRUCCIONES ...

Страница 26: ...os especimenes u objetos en la pantalla LCD fácil de observar y podrá disfrutar con otras personas Además puede tomar capturas o breves videos con la cámara digital integrada También podrá observar en la mayoría de pantallas de TV con el cable AV TV Las últimas secciones de este manual ofrecen recomendaciones sencillas de cuidados mantenimiento y solución de problemas para usted para garantizar qu...

Страница 27: ...ión CA si lo desea Así dispondrá de la libertad de usar el microscopio en exterior o interior en cualquier lugar que desee El funcionamiento con baterías precisa de 4 baterías AA proporcionadas por el usuario Abra la tapa de baterías de la parte inferior del microscopio e introduzca las baterías de acuerdo con la polaridad mostrada en el compartimiento Figura 4 Cuando haya instalado las baterías c...

Страница 28: ...e exposición aumenta o reduce el nivel de brillo usando los botones o de la pantalla Cuando observe un espécimen de color oscuro deberá aumentar la cantidad de luz para poder ver ciertas características o detalles Es preferible hacerlo aumentando el brillo del iluminador girando el dial de control de brillo hasta la posición más alta Puede obtener una iluminación óptima experimentando con ajustes ...

Страница 29: ... el color de la iluminación del espécimen especialmente con especimenes transparentes y con mucho brillo Para cambiar el color de la iluminación gire la rueda Figura 8 al color deseado Rojo R Verde G Azul B Cada color está centrado cuando escuche note que encaja Puede tener que volver a enfocar ajustando el mando de ajuste Figura 1 ligeramente para mejorar la observación Debería experimentar con c...

Страница 30: ...imagen figura 11 funcionan igual que en el modo de fotografía con la excepción de los siguientes 3 Toque para ir al modo visionado 4 Establecer el tamaño de píxeles en 640x360 la mayor resolución paravideos tocando la pantalla En ambas resoluciones alta 640x360 o baja QVGA las especificaciones de fotogramas son de 20fps 8 Grabar video tocar para iniciar el video y tocar de nuevo para detenerlo 12 ...

Страница 31: ... que vea Apagando Desconecte el cable de alimentación Coloque siempre la bolsa de plástico o la cubierta para polvo sobre el microscopio cuando no lo use o cuando se guarde para mantenerlo limpio Guarde el microscopio en un lugar seco y limpio Tenga mucho cuidado si usa el microscopio a la luz del sol directa para evitar dañar el microscopio o sus ojos Cuando mueva el microscopio llévelo por el br...

Страница 32: ...hone 800 421 9649 2014 Celestron Todos los derechos reservados Impreso en China 04 13 El diseño y las especificaciones del producto están sujetos a cambios sin previo aviso Este producto está diseñado y pretendido para personas de 14 o más años de edad ...

Страница 33: ...MANUALE D ISTRUZIONI ITALIANO MODELLO 44347 MICROSCOPIO DIGITALE LCD ...

Страница 34: ...mpioni o oggetti sullo schermo LCD di facile visualizzazione e sarà inoltre possibile condividere le immagini con altri Inoltre è possibile scattare istantanee o brevi video con la fotocamera digitale integrata E ancora sarà possibile visualizzare tali file multimediali sulla maggior parte degli schermi TV con il cavo AV TV Le sezioni finali del presente manuale forniscono suggerimenti semplici di...

Страница 35: ...za l ausilio della corrente AC se lo si desidera Ciò dà all utente la libertà di utilizzare il microscopio all esterno o all interno nel posto che si desidera Il funzionamento della batteria richiedere 4 batterie di tipo AA non in dotazione Aprire il vano della batteria posto sulla parte inferiore del microscopio e inserire le batterie in base alla polarità indicata nel compartimento delle batteri...

Страница 36: ... modo per regolare la luminosità è quello di modificare la funzione EV sullo schermo touch La Funzione EV valore di esposizione aumenta o diminuisce il livello di luminosità utilizzando il tasto o sullo schermo Durante la visualizzazione di un campione di colore scuro potrebbe essere necessario incrementare la luce per rendere visibili certe caratteristiche o dettagli Ciò si ottiene semplicemente ...

Страница 37: ...ti e prima di utilizzare il microscopio assicurarsi che non vi sia filtri nel percorso ottico Tuttavia per mettere in evidenza diversi livelli di dettaglio sperimentare cambiando il colore della luce inferiore del campione specialmente per campioni molto trasparenti e luminosi Per cambiare il colore dell illuminazione ruotare la rotella Figura 8 fino al colore desiderato Rosso R Verde V Blu B Cias...

Страница 38: ...ossibile impostare scatti a tempo MODALITÀ VIDEO Per registrare video è necessario prima modificare l impostazione video Le icone su questa immagine Figura 11 funzionano allo stesso modo della modalità istantanee ad eccezione di quanto segue 3 Toccare per andare alla modalità visualizzazione 4 Impostare la dimensione dei pixel a 640x360 la risoluzione maggiore per i video toccando lo schermo In en...

Страница 39: ...mantenerlo pulito Conservare il microscopio in un luogo asciutto e pulito Prestare molta attenzione in caso di utilizzo del microscopio alla luce diretta del sole per evitare danni al microscopio o agli occhi Durante lo spostamento del microscopio trasportarlo per il braccio con una mano e non per la manopola del focheggiatore per il monitor LCD ecc Quindi mettere l altra mano sotto alla base per ...

Страница 40: ...421 9649 2014 Celestron Tutti i diritti riservati Stampato in Cina 04 13 Il design del prodotto e le specifiche sono soggette a modifiche senza previa notifica Il presente prodotto è progettato e destinato all uso di persone di età pari o superiore ai 14 anni ...

Отзывы: