INSTRUCTION MANUAL
TELESCOPE MaINTENaNCE
While your SkyProdigy telescope requires little maintenance,
there are a few things to remember that will ensure your telescope
performs at its best.
Care and Cleaning of the Optics
Occasionally, dust and/or moisture may build up on the lens of
your telescope. Special care should be taken when cleaning any
instrument so as not to damage the optics.
If dust has built up on the optics, remove it with a brush (made
of camel’s hair) or a can of pressurized air. Spray at an angle to
the lens for approximately two to four seconds. Then, use an
optical cleaning solution and white tissue paper to remove
any remaining debris. Apply the solution to the tissue and then
apply the tissue paper to the lens. Low pressure strokes should
go from the center of the corrector to the outer portion. Do NOT
rub in circles!
You can use a commercially made lens cleaner or mix your own.
A good cleaning solution is isopropyl alcohol mixed with distilled
water. The solution should be 60% isopropyl alcohol and 40%
distilled water. Or, liquid dish soap diluted with water (a couple
of drops per one quart of water) can be used.
To minimize the need to clean your telescope, replace all
lens covers once you have finished using it. This will prevent
contaminants from entering the optical tube.
Collimation (For SkyProdigy 130)
The optical performance of your SkyProdigy telescope is directly
related to its collimation, that is the alignment of its optical
system. Your SkyProdigy was collimated at the factory after it
was completely assembled. However, if the telescope is dropped
or jarred severely during transport, it may have to be collimated.
The SkyProdigy 70 and 90 have fixed optical systems that should
not come out of collimation. The SkyProdigy 130, however has
three collimation screws that can be used to adjust the alignment
of the primary mirror.
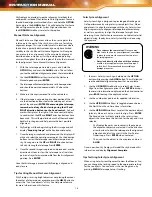
To check if your telescope is in collimation the following diagram
will help you. If you look into the eyepiece adapter (without an
eyepiece) at the top of the focuser, this is what you should see.
(See figure 6-1) If the reflection of your eye is off center, then
collimation is necessary.
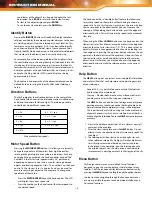
Adjustments to the collimation (See figure 6-2) of the telescope
can be made by turning the collimation adjustment knobs located
at the rear of the optical tube. First loosen the three Safety
screws on the rear cell of the tube. Turn each collimation knob,
one at a time, until the reflected image of your eye in the secondary
mirror is centered in the primary mirror. Once the telescope is
collimated, tighten the Safety screws until you feel a slight
resistance. Do not over tighten the screw.
If your telescope is out of collimation, the best way to re-collimate
it is with a good collimation tool. Celestron offers a Newtonian
Collimation Tool (#94182) with detailed instructions that makes
collimation an easy chore.
NOTE: Once your SkyProdigy 130 has been collimated, the
optics may no longer be aligned with the optical axis of the
camera resulting in unsuccessful alignments or poor pointing
accuracy. Therefore, it is recommended that you calibrate
the camera after collimation. For information on calibrating
the camera, see the Calibrate option under the StarSense
Camera section of the manual.
Figure 6-1
The view of a collimated telescope as seen
through the focuser of the SkyProdigy 130
reflector model.
24
Collimation
Knobs
Figure 6-2
Collimation Knobs
Safety
Screws
Содержание SKY PRODIGY 130
Страница 29: ...APPENDIX C TIME ZONE MAP 29...
Страница 30: ...30 INSTRUCTION MANUAL...
Страница 31: ...31...

